background image

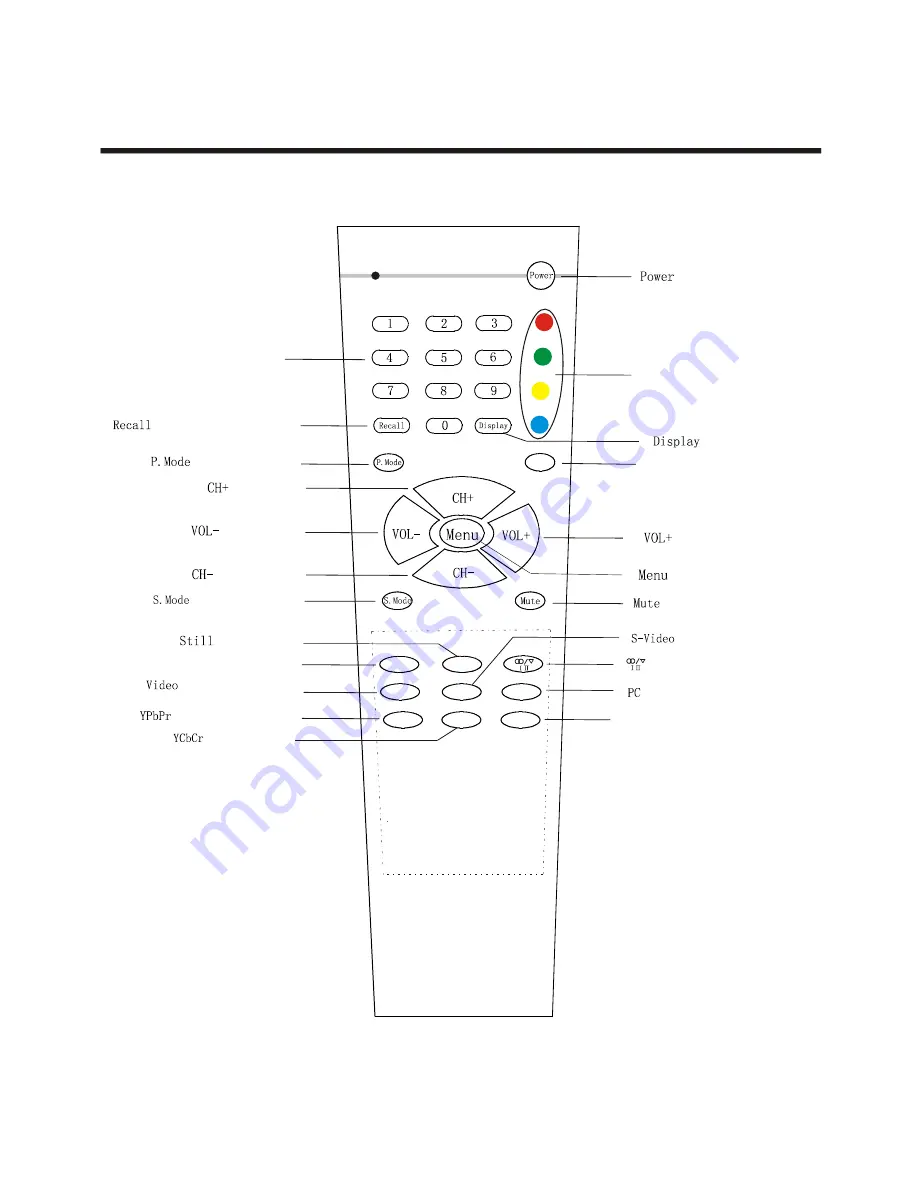
Learning about the remote control

Using the remote control 

- 8-

HYDFSR-EP209C1

Return to previous channel

:

selection

channel 

Direct 

Channel Number  

:

:

Select picture mode

Power on/off

:

Volume down

Make the volume to zero

:

Channel down

:

Freeze picture

:

Display current input

:

Not used

:

Component  mode

:

 S-VIDEO mode

:

:

 VGA/DVI mode

:

Volume up

:

:

Call up the main menu

Channel up

:

Select sound mode

:

Ajust zoom ration

Zoom

Zoom

:

Adjust the sleep time  

Time

:

Mono/Stereo 

:

PC

Time

S-Video

YCbCr

YPbPr

Video

Zoom

Zoom

Text

Still

FAST TEXT buttons

TEXT

TEXT

:

Teletext mode

Switch to TV,SCART1, 
AVand SCART2  mode

:

Содержание LCD3204

Страница 1: ...R Part No IES050409 81cm LCD COLOUR TV LCD3204EU USER SMANUAL...

Страница 2: ...rd 2 PreparationforyournewTV 3 SelectingalocationfortheTV 3 LearningaboutyourTV 3 ConnectingyourTV 5 ConnectingtoA Vequipments 5 Connectingtoacomputer 5 Connectingtoanantenna 6 Usingtheremotecontrol 7...

Страница 3: ...e power plug from the socket 2 This TV set shall be connected to a main socket outlet with a protective earthing contaction The main plug and main switch should be remain readily operable after instal...

Страница 4: ...Menu button to enter the main menu 2 Press the VOL or VOL button to slect the item General settings as shown on the right 3 Press the CH or CH button to select the Plug play and press the VOL button...

Страница 5: ...ll mounting Preparation for Using your new TV Learning about your TV You can operate yourTV by using the buttonson the front panel or theremote control Theterminals on the back panel provideall the co...

Страница 6: ...19 1 20 21 22 23 AC INPUT AV input AV output RS232C input AC Power Socket Antenna input VGA input Earphone output DVI input COMPONENT AUDIOinput COMPONENT VIDEO input S VIDEO input Scart2 connector Sc...

Страница 7: ...onnect the devices as shown below Connecting to A V equipments 5 1 1 B B B CR R R P P P P HDTV STB VCD DVD LANGUA Notes The input signalof 480P 60Hz 480I 60Hz 576P 50Hz 576I 50Hz 720P 60Hz 1080I 50Hz...

Страница 8: ...a subscriber of your local CATV net the outdoor or indoor antenna is not needed Connect the equipments as the following figure Connecting to an antenna 6 PC NB To VGA To speaker RGB line Audio line AN...

Страница 9: ...ry cover Note 1 Dispose of your batteries in a designated disposal area Do not throw batteries into fire 2 Do not mix battery types or combine used batteries with new ones 3 Remove dead batteries imme...

Страница 10: ...n Make the volumeto zero Channel down Freeze picture Display current input Not used Component mode S VIDEO mode VGA DVI mode Volume up Call up themain menu Channel up Select sound mode Ajust zoom rati...

Страница 11: ...a long time it is recommended that you unplug the power from the outlet and then turn blue Several seconds later TV picture will display on the screen remote control to make Power ON OFF 9 POWER BUTTO...

Страница 12: ...OSD is not on TV screen press to adjust the volume VOL or VOL To select a channel Press the channel numbers in series to select channel directly Press the button 1 and 1_ _ will display on the top ri...

Страница 13: ...enter main menu 2 Press button to select the item CHANNEL 3 Press button to select SKIP 4 Press button to skip or un skip the current channel VOL or VOL VOL CH or CH 1 Press MENU button to enter main...

Страница 14: ...audio settings 1 Press MENU button to enter main menu 2 Press button to select the item AUDIO SETTING 3 Press button to select the item you want to adjust 4 Press button to adjust the level 5 Adjuste...

Страница 15: ...RATTING CHANGE PASSWORD 1 Press button to select SET PASSWORD and press to enter SET PASSWORD 2 Input the new password The new password has now stored CH or CH VOL Enter the Menu Lock Password ______...

Страница 16: ...on to enter main menu 2 Press VOL or VOL button to select the item GENERAL SETTINGS 3 Press CH or CH button to select SLEEP TIMER 4 Press VOL button to adjust SLEEP TIMER SLEEP TIMER 1 Press MENU butt...

Страница 17: ...l Interpolation by selecting the function a smooth edge on moving objects with diagonal pattern will be obtained DEINTERLACER Using the PC menu 1 Press MENU button to enter main menu 2 Press VOL or VO...

Страница 18: ...e the answers Press button again to hide the answers REVEAL CANCEL When a page is selected in Teletext mode it may take some time before it becomes available Press YPbPr button to switch to the TV mod...

Страница 19: ...isplay the time FASTTEXT The RED GREEN YELLOW CYAN buttons are used for quick access to colour coded pages transmitted by FAST TEXT broadcast INDEX Teletext index page guides you quickly to your desir...

Страница 20: ...hannel The station may have broadcast difficulties Try another channel Check the antenna connections The station may have broadcast difficulties Try another channel Adjust the picture from the menu Th...

Страница 21: ...n of mild detergent and warm water to clean the TV screen and trim Do not use too much water as water spilled into the cabinet can cause damage to the TV 3 Wipe off any excess moisture with a clean dr...

Страница 22: ...40 ACCESSORIES Operating Instructions 1 Remote Control Unit 1 Power Lead 1 Dry Cell Battery 2 500 cd m2 Vp p 75 input Video 1 Vp p negativesync 75 input Y C separate videosignal Y 1Vp p negative sync...

Отзывы: