background image

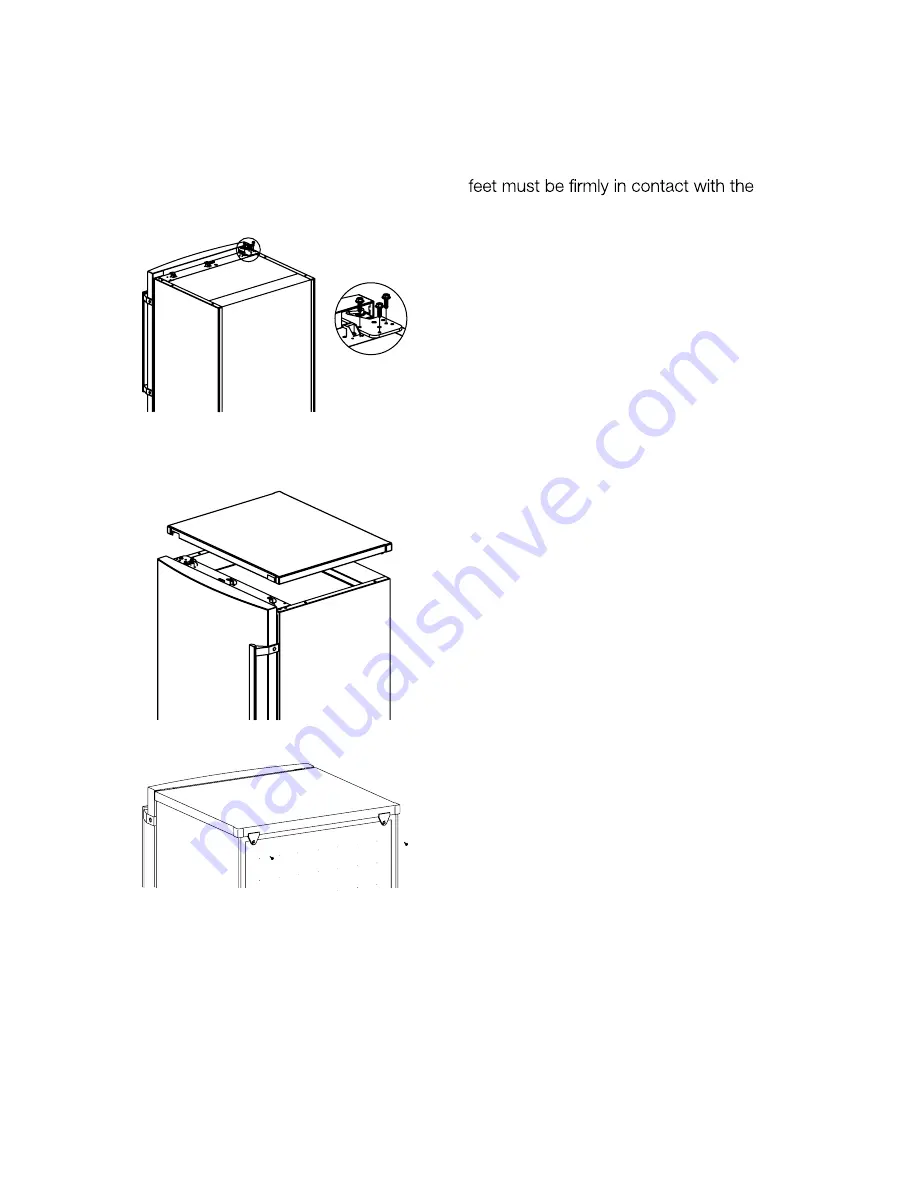
15.Put the door on the lower hinge.

Holding the door against the cabinet 
insert the pin of the hinge in the door.
The right and left sides of the door 
must align with the sides of the 
cabinet. And then securely fix the
upper hinge.

16.Place the top cover on the top of the 

refrigerator and push it to back side until
it is hooked by the fixed blocks.

17.Fix the top cover by the two screws.

Levelling

The appliance should be leveled with a 
small inclination backward to help  the 
closing of the door. Four adjustable feet 
are provided for that purpose. All four 

ground for stability and to reduce 
vibration.

Warning:

Reposition, level the appliance, 

wait for at least four hours and then 
connect it to the power socket. If you 
prefer, please contact Hisense Customer 
Care to have the door reversed by an 
authorized agent at for a small fee.

Warning:

After having reversed the 

opening direction of the door check that all 
the screws are properly tightened and that 
the magnetic seal adheres to the cabinet. 
If the ambient temperature is cold (i.e. in 
Winter), the gasket may not fit perfectly 
to the cabinet. In that case, wait for the 
natural fitting of the gasket. 

9

Содержание HR6WC36D

Страница 1: ......

Страница 2: ...erious injury Take appropriate protective action This appliance is not intended for use by persons including children with reduced physical sensory or mental capabilities or lack of experience and kno...

Страница 3: ...tions The inner lining of the appliance has channels through which the refrigerant passes Should the channels be punctured the unit would be damaged beyond repair DO NOT USE SHARP INSTRUMENTS to scrap...

Страница 4: ...of a brand new product and then dry naturally and thoroughly Do not use detergents or abrasive powders as these will damage the CONTROL PANEL A Temperature circle key of upper zone B Temperature circl...

Страница 5: ...aged or if it will improve over time Recommended storage temperature For champagne and sparkling wines For rose and light red wines between 12 When placing various bottles on top of each other make s...

Страница 6: ...5 Lamps must be replaced by authorized service agents only intended...

Страница 7: ...he guarantee or on the rating plate located inside the appliance on the bottom left hand side CUSTOMER SERVICE AND SPARE PARTS ELECTRICAL CONNECTION Before plugging in ensure that the voltage and freq...

Страница 8: ...all plate from left to right Then put the top cover on a safe place to avoid scratch 3 Remove the two screw covers 4 Remove the two screws and take the handle off Put the handle in a safe place 5 Move...

Страница 9: ...10 Lay the appliance on a soft rug or similar article to protect it Unscrew and remove the lower hinge pin and install it to other hole 11 Unscrew the screws that x the lower hinge and take the lower...

Страница 10: ...e closing of the door Four adjustable feet are provided for that purpose All four ground for stability and to reduce vibration Warning Reposition level the appliance wait for at least four hours and t...

Страница 11: ...iance is not level Readjust the feet The appliance is touching the wall or other objects Move the appliance slightly A component e g a pipe on rear of the appliance is touching another part of the app...

Страница 12: ...and...

Страница 13: ......

Страница 14: ...will be issued a JOB NUMBER along with the details of your nearest Hisense Authorised Service Centre to return your item for warranty repair Before making a claim please make sure that you understand...

Страница 15: ......

Страница 16: ......

Отзывы: