Hisense HLTE310E Скачать руководство пользователя страница 6

3

To go back to the Home screen, tap  .

 Recent key (virtual)

To open the list of recent apps, tap  . 

 Return key (virtual)

To go back to the previous screen, tap  .

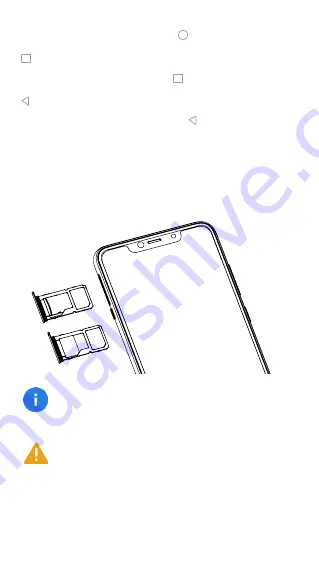
Inserting and removing cards

Follow the instructions in the following figure to set up your 

phone.


Ensure that the card is correctly aligned and that the 

card tray is level when you insert it into your device.

Be careful not to scratch your device or hurt yourself 

when using the SIM eject pin. Store the SIM eject pin 

out of the reach of children to prevent accidental swal-

lowing or injury.

or

SIM

M

icro

SD

SIM

SIM

Содержание HLTE310E

Страница 1: ...Hisense HLTE310E User Manual EN Before using the device read the User Manual thoroughly...

Страница 2: ...nlocking screen 10 Notification center 10 Screenshot 11 Calls Making calls 12 Receiving calls 12 Contacts Importing contacts 14 Creating a new contact 14 Searching for contacts 14 Messaging Sending me...

Страница 3: ...mer 20 Stopwatch 20 Calculator Making calculations 21 Recorder Recording sound 22 Playing a recording 22 Managing recordings 22 Security and Privacy Fingerprint 23 Appendix Important information 24 Di...

Страница 4: ...Device Device at a glance The device features may vary based on your location language carrier and model The device supports OTG functions please use a standard OTG data cable 1 2 3 4 6 13 12 11 10 9...

Страница 5: ...l the screen turns on To power off your phone press and hold the power button and then touch To force your device to restart press and hold the power button until your device vibrates Volume button To...

Страница 6: ...the instructions in the following figure to set up your phone Ensure that the card is correctly aligned and that the card tray is level when you insert it into your device Be careful not to scratch y...

Страница 7: ...your device Turning off the phone To power off your phone press and hold the power button and then touch Charging the battery Charge the battery before using it for the first time or when it has been...

Страница 8: ...arging Do not cover your device or the power adaptor Connecting the charger improperly may cause serious damage to the phone Any damage caused by misuse is not covered by the warranty If the AC power...

Страница 9: ...C will harm the battery perfor mance and shorten its life Long term charging in extreme temperatures will damage the battery While charging the device and the charger may heat up This is normal and sh...

Страница 10: ...evice and its apps Tapping To open an app to choose a menu item to press an on screen button or to enter a character using the keyboard on the screen tap it with your finger Tapping and holding Tap an...

Страница 11: ...t on the Home screen or the Applications screen to view other panels Swipe upwards or downwards to scroll through a webpage or a list of items Spreading and pinching Spread two fingers apart on a webp...

Страница 12: ...9 Pinch to zoom out Dragging To move an item tap and hold it and drag it to the target posi tion...

Страница 13: ...power con sumption and prevent unintended operations To change the screen sleep time go to Settings Display Advanced Sleep and select a time Unlocking the screen Press the Power button to wake the scr...

Страница 14: ...fications 2 Enable or disable notification settings as desired Close notification center Swipe up or press the Home button to close notification center Screenshot How to take a screenshot Press the po...

Страница 15: ...1 Tap 2 Tap to view all calls Tap the name or number of the person that you want to call Making international calls 1 Tap 2 On the dialer screen tap and hold 0 until the sign ap pears Then enter the c...

Страница 16: ...13 If the screen is unlocked Tap ANSWER to answer the call Tap DECLINE to reject the call...

Страница 17: ...act 1 Tap 2 Tap 3 Enter the contact s name phone number and other contact information and then touch SAVE Searching for contacts 1 Tap 2 Use one of the following search methods Scroll up or down the c...

Страница 18: ...p to create a message 3 Add recipients and enter a message 4 Tap to send the message Viewing messages 1 Tap 2 Select a contact on the message list 3 View your conversation Searching messages 1 Tap 2 T...

Страница 19: ...will be automatically saved to Recording videos 1 Tap 2 Swipe to Video on the screen Spread two fingers apart on the screen to zoom in and pinch to zoom out 3 Tap to start recording the video Tap to s...

Страница 20: ...1 Tap 2 Select a photo or a video Deleting photos or videos 1 Tap 2 Tap and hold the photo or video that you want to delete tap Sharing photos or videos Select the photo or video that you want to sha...

Страница 21: ...arch for information and bookmark your favorite web pages to access them conveniently 1 Tap 2 Enter the address field in the search bar You will have ac cess to web pages moreover bookmarks multiple w...

Страница 22: ...rn off the switch next to an alarm Configuring the alarm settings Tap Settings to configure the alarms Deleting an alarm Tap and hold the alarm that you want to delete Tap Clock Tap From the CLOCK tab...

Страница 23: ...and touch to start the timer Touch to pause the countdown 4 When the timer goes off tap STOP to dismiss the ringtone Stopwatch 1 Tap 2 Go to the STOPWATCH tab 3 Touch to start the stopwatch Touch LAP...

Страница 24: ...do simple or complicated calculations Making calculations Tap you can do the following calculations Tap the number and calculate sign to do simple calculations Go to advanced calculator tab by swipin...

Страница 25: ...ing sound 1 Tap 2 Tap to start recording 3 Tap or to pause or resume the recording 4 Tap to stop recording and enter the name Then touch SAVE Playing a recording 1 Tap 2 Tap 3 Select and touch a recor...

Страница 26: ...r Press down lightly on the sensor until your device vibrates Repeat this step using different parts of your fingertip until your device has successfully saved your fingerprint 4 Once you have added y...

Страница 27: ...eam lined experience It is particularly recommended to use Wi Fi for streaming or downloading games videos or bulky films Disclaimer The usage of non original accessories such as headsets chargers and...

Страница 28: ...e Before contacting Hisense service center please try the following solutions Some situations may not apply to your device Device does not turn on Ensure that you press and hold power key over 2 secon...

Страница 29: ...formance decreases Please contact service center for changing the battery If you play games or listen to music for a long period of time the standby time will be short Please shorten the time If the s...

Страница 30: ...charging equipment is incompatible with your device malfunctions will occur Please use charger supplied and stable charging equipment Touchscreen responds slowly or improperly Software or applications...

Страница 31: ...ight Check if cellular data setting has failure If so go to Set tings to set up cellular data Check if pre paid charge has reached its limit If so contact service provider Calls are not connected Chec...

Страница 32: ...anufacturers recommend that a minimum distance of 15 cm be maintained between a device and a pacemaker to prevent potential interference with the pace maker If using a pacemaker hold the device on the...

Страница 33: ...make sure the power adapter is plugged into a socket near the device and is easily accessi ble Unplug the charger from electrical outlets and the device when not in use Do not use store or transport t...

Страница 34: ...away from children to pre vent choking hazard Power off your device in any area with a potentially explo sive atmosphere Do not charge your device or use your device in areas where air contains chemic...

Страница 35: ...ing and maintenance Char ger should be unplugged from socket Device and charger should be disconnected to prevent any electric shock or short circuiting of battery or charger Do not wipe the device or...

Страница 36: ...93 W kg for the head 1 448 W kg for the body 3 936 W kg for the limb The actual SAR level will be much lower than above value since the device has been designed to use the minimum energy for necessary...

Страница 37: ...d on the market in Belgium BE Bulgar ia BG the Czech Republic CZ Denmark DK Germany DE Estonia EE Ireland IE Greece EL Spain ES France FR Croatia HR Italy IT Cyprus CY Latvia LV Lithuania LT Luxembour...

Страница 38: ...20 1980 MHz DL 2110 2170 MHz 23 50dBm 2 UL 1850 1910 MHz DL 1930 1990 MHz 24 00dBm 8 UL 880 915 MHz DL 925 960 MHz 24 00dBm LTE 1 UL 1920 1980 MHz DL 2110 2170 MHz 23 50dBm 2 UL 1850 1910 MHz DL 1930...

Страница 39: ...50MHz 5250MHz EIRP19 18dBm 5250MHz 5350MHz EIRP18 88dBm 5470MHz 5725MHz EIRP16 44dBm 5725MHz 5850MHz EIRP13 74dBm BT 2 4GHz 2402MHz 2480MHz EIRP8 05dBm GPS 1575 42MHz 1 023MHz GLONASS 1602 5625MHz 4MH...

Страница 40: ...y form or by any means electronic or mechan ical including photocopying recording or storing in any information storage and retrieval system without the prior written permission of Hisense Group Some...

Страница 41: ...SAS Address 9 Rue des 3 S urs 93420 Villepinte France Hisense Iberia S L U Address Ronda Auguste y Louis Lumiere 23 Nave 12 Edificio Lumiere Parque Tecnol gico 46980 Paterna Valencia Spain Hisense It...

Страница 42: ...300 328 V2 1 1 ETSI EN 301 893 V2 1 1 Draft ETSI EN 300 440 V2 2 0 ETSI EN 303 413 V1 1 1 EN 50360 2017 EN 50566 2017 EN 62209 1 2016 EN 62209 2 2010 EN 62479 2010 EN 60950 1 2006 A11 2009 A1 2010 A1...

Страница 43: ...Dongguan Aohai Power Technology Co Ltd USB Cable type C USB 1m Earphone NLD EM301k 05SH 1 2m Huizhou New Leader Industry Co Ltd 2018 08 07 Mark Zhang...

Отзывы: