


3
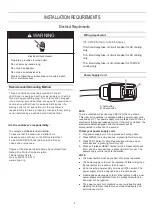
Wiring requirement
Electrical
Shock
Hazard
Plug
into
a
grounded
3
prong
outlet
.
Do
not
remove
ground
prong
.
Do
not
use
an
adapter
.
Do
not
use
an
extension
cord
.
Failure
to
follow
these
instructions
can
result
in
death
,
WARNING
fire, or electrical shock.
Recommended Grounding Method
To contact a qualified
.
electrical installer
It is the customer’s responsibility:
To assure that the electrical installation is
adequate and conforms to the Nation Electrical
Code,ANSI/NFPA 70-last edition,and all local
codes and ordinances.
Copies of the standards listed may be obtained from:
Nation Fire Protection Association
1 Batterymarch Park
Quincy,Ma 02169-7471
www.nfpa.org
This
conditioner is equipped with
a
power
supply
cord
with
a
three-prong
grounding plug.
The
cord
must
be
plugged
into
a
mating
,
grounded
three
-
prong
outlet
,
grounded
in
accordance
with
all
local
codes
and
ordinances
.
If
a
mating
outlet
is
not
available
,
it
is
the
customer
'
s
responsibility
to
have
a
properly
grounded
three
-
prong
outlet
installed by
a
qualified
electrical
installer
.
air conditioner must be grounded. This air
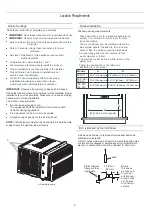
115 V (103.5 min. to 126.5 max.)
V
V
13 A time-delay fuse or circuit breaker for 8
K cooling
only
10 A time-delay fuse or circuit breaker for 6K cooling
only
15 A time-delay fuse or circuit breaker for 10K\12K
cooling only
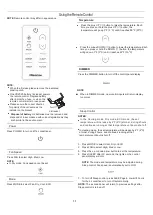
NOTE
:
Your
air
conditioner’s
device
may
differ
from
the
one shown.
To
test
your
power
supply
cord
:
1.
Plug
power
supply
cord
into
a
grounded
3
prong
outlet
.
2.
Press RESET
(
on
some
devices
,
a
green
light
will
turn
on
).
3.
Press
TEST
(
listen
for
click
;
Reset
button
will
trip
,
and
on
some
devices
,
a
green
light
will
turn
off
).
4.
Press and
release
RESET
(
listen
for
click
;
Reset
button
will
latch
,
and
on
some
devices
,
a
green
light
will
turn
on
).
The
power supply
cord
is
ready
for
operation
.
NOTE
:
■
The Reset button
must
be
pushed
in
for
proper
operation
.
■
The
power
supply
cord
must
be
replaced
if
it
fails
to
trip
when
the
test
button
is
pressed
or
fails
to
reset
.
■
Do
not
use
the
power
supply
cord
as
an
off
/
on
switch
.
The
power
supply
cord
is
designed
as
a
protective
device
.
■
A
damaged
power
supply
cord
must
be
replaced
with
a
new
power
supply
cord
obtained
from
the
product
manufacturer
and
must
not
be
repaired
.
■
The
power
supply
cord
contains
no
user
serviceable
parts
.
Opening
the
tamper
-
resistant
case
voids all
warranty
and
performance
claims
.
A
.
Test
button
B
.
Reset
button
TEST
RESET
A
B
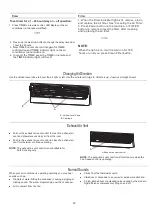
This
room
air
conditioner
is
equipped
with
a
power
supply
cord
required
by
UL
.
This
power
supply
cord
contains
state
-
of
-
the
-
art
electronics
that
sense
leakage
current
.
If
the
cord
is
crushed
,
the
electronics
detect
leakage
current
and
power
will
be
disconnected
in
a
fraction
of
a
second
.
Power
Supply
Cord
Electrical
Requirements
INSTALLATION
REQUIREMENTS
Содержание AW0621CR1W
Страница 1: ...Model AW0621CR1W AW1221CW1W AW1021CW1W AW0821CW1W ...
Страница 17: ......