background image

9

ENGLISH

FRANÇAIS

ESPAÑOL

Connecting Your TV to a Wireless or Wired Network 

You have the option to connect your TV to a wireless or wired network to access the Internet. For more information about 
the network settings on TV, see 

Network & Internet on page 24

.

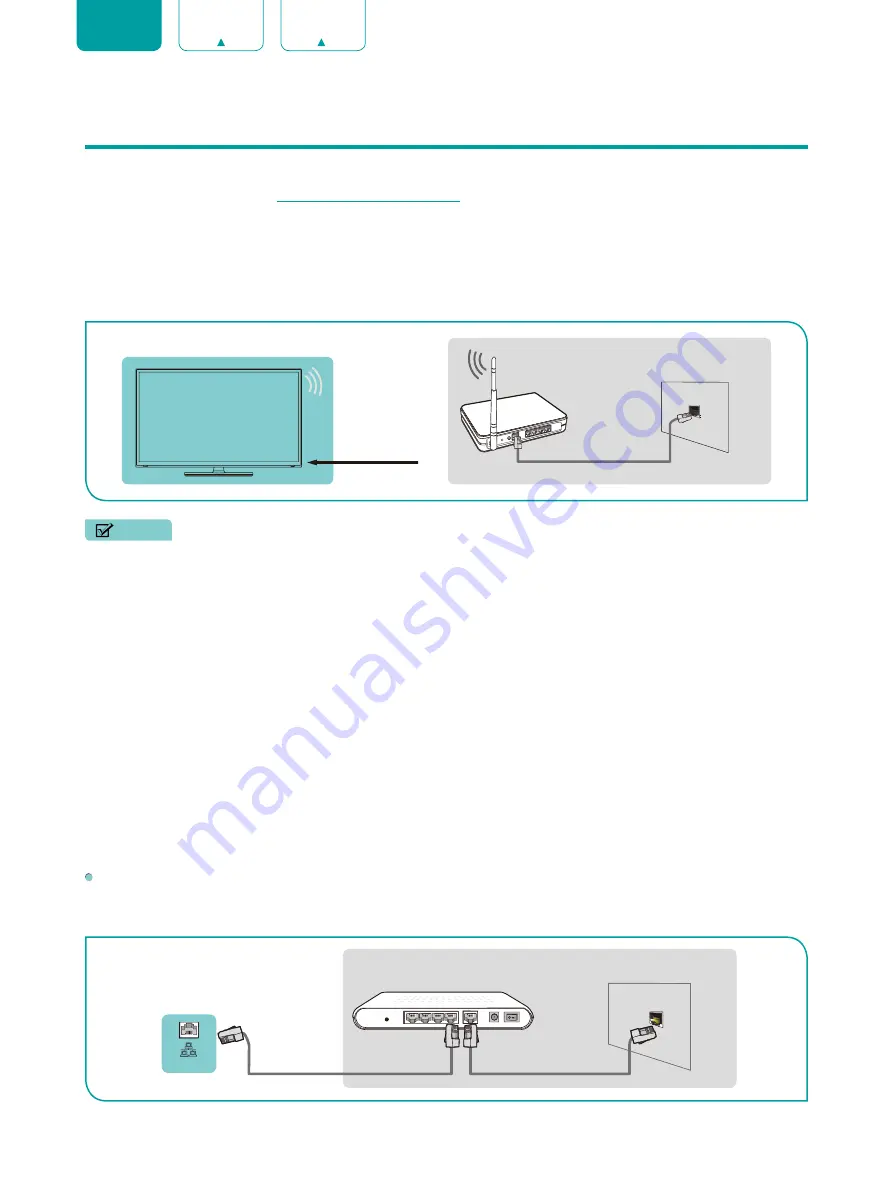
Connecting to a wireless network

Our built-in wireless LAN adapter supports the IEEE 802.11 ac/b/g/n communication protocols and we recommend that 
you use an IEEE 802.11n or IEEE 802.11ac router. When you play a video over an IEEE 802.11 b/g connection, the 
video may not play smoothly.

NOTES

•  You must use the built-in Wireless LAN Adapter to use a wireless network because the set does not support an 

external USB network adapter.

•  To use a wireless network, your TV must be connected to a wireless IP sharer. If the wireless IP sharer supports 

Dynamic Host Configuration Protocol (DHCP), your TV can use a DHCP or static IP address to connect to the 
wireless network.

•  Select a channel for the wireless IP sharer that is not currently being used. If the channel set for the wireless IP 

sharer is currently being used by another device nearby, this will result in interference and communication failure.

•  If you apply a security system other than the systems listed below, it will not work with the TV.
•  If Pure High-throughput (Greenfield) 802.11N mode is selected and the Encryption type is set to WEP, TKIP or 

TKIP-AES (WPS2 Mixed) for your Access Point (AP), then the TV will not support a connection in compliance with 
these Wi-Fi certification specifications.

•  If your access point (AP) supports Wi-Fi Protected Setup (WPS), you can connect to the network via Push Button 

Configuration (PBC) or PIN (Personal Identification Number). WPS will automatically configure the SSID and WPA 
key in either mode.

Connecting to a wired (Ethernet) network

You can attach your TV to your LAN in one of the three following ways:


Option 1

You can attach your TV to your LAN by connecting the 

LAN

 port on the back of your TV to an external modem using a 

Cat 5 LAN cable. See the illustration below. 

Wireless Adapter

built-in the TV set 

LAN Cable

Wireless Router

The LAN Port on the Wall

External Modem

(ADSL / VDSL / Cable TV) 

The Modem Port on the Wall

Ethernet Cable 

Modem Cable 

LAN

TV PORT

Содержание 43A68G

Страница 1: ...USER MANUAL Before using the TV please read this manual thoroughly and retain it for future reference ENGLISH ...

Страница 2: ...er or no consideration without the prior written permission of Hisense Company Ltd Requests for permission to store reproduce transmit or distribute materials may be made to one of the following addresses USA Hisense USA Corporation 7310 McGinnis Ferry Road Suwanee GA 30024 CANADA Hisense Canada Co Ltd 2283 Argentia Road Unit 16 Mississauga ON Canada L5N 5Z2 MEXICO Hisense Mexico S de R L de C V B...

Страница 3: ... of any kind either expressed or implied that the Application Service will be uninterrupted or error free including but not limited to vagaries of weather disruption of Service acts of God warranties of title local or regional limitations no infringement NOR IMPLIED WARRANTIES OF MERCHANTABILITY OR FITNESS FOR A PARTICULAR PURPOSE No advice or information given by Hisense providers affiliates or c...

Страница 4: ...io Return Channel ARC 8 Connecting Your TV to a Wireless or Wired Network 9 Connecting to a wireless network 9 Connecting to a wired Ethernet network 9 Using Your TV Remote Control 11 Buttons on your TV remote 11 Remote control range information 13 Begin using your remote 13 Pairing the Remote Control 13 Other 13 Completing the Setup Wizard Menu 15 Shortcuts Instructions 16 Turning your TV on or o...

Страница 5: ...imer 26 Language 26 Keyboard 26 Storage 26 Home screen 26 Usage Mode 27 Google Assistant 27 Chromecast Android Shell Chromecast built in 27 Screen saver 27 Location 27 Usage Diagnostics 27 Setup assistant 27 Send Diagnostics and Usage 27 Enhanced Viewing 27 IP Control Port 27 Power LED 27 FAV TV Button Customization 27 Security restrictions 28 Accessibility 28 Reset 28 Help 28 Product Registration...

Страница 6: ...5 ENGLISH FRANÇAIS ESPAÑOL Moving App Icons around 29 Media 30 File formats that may be supported 30 Browsing Content 30 Quick Problem Solving Tips 31 ...

Страница 7: ...3 Using your remote select the Inputs icon in Home screen and select Channels as the input source Connecting a satellite receiver DVD player or other audio visual AV devices with a composite video cable yellow white red To connect an AV device with a composite video cable not provided 1 Use the audio and video cables to connect the composite video audio ports of the external AV device to the AV IN...

Страница 8: ...headphone not provided to the HEADPHONE port on your TV While the headphone is connected the sound from the built in speakers will be disabled NOTES Headphones with microphones are not supported If Headphone with Speakers in the sound menu is selected manually the headset and the whole machine will have sound at the same time Connecting a USB device You can connect the USB devices such as hard dri...

Страница 9: ... cable to the HDMI ARC port By using this feature you will also be able to control the sound bar with your TV remote instead of using multiple remotes for each device To connect a digital sound bar with an HDMI cable not provided 1 Connect the cable that s attached to the sound bar to the HDMI ARC port on the TV 2 Turn on the sound bar by pressing the Power button 3 Press the button on your remote...

Страница 10: ...f the channel set for the wireless IP sharer is currently being used by another device nearby this will result in interference and communication failure If you apply a security system other than the systems listed below it will not work with the TV If Pure High throughput Greenfield 802 11N mode is selected and the Encryption type is set to WEP TKIP or TKIP AES WPS2 Mixed for your Access Point AP ...

Страница 11: ...automatically provide the IP address subnet mask gateway and DNS so you don t have to enter them manually Most home networks are Dynamic Networks Some networks require a Static IP address If your network requires a Static IP address you must enter the IP address subnet mask gateway and DNS values manually on your TV s Cable Setup Screen when you set up the network connection To get the IP address ...

Страница 12: ... input source Channel up down Quick access to all applications Special function buttons Display the Home screen Confirm button Quick access buttons to apps Press to enter your customized input source app Press and hold to enter customization settings Turn Closed Caption On Off and turn Closed Caption on when mute Choose the audio language in DTV mode and set MTS for Mono Stereo or SAP in ATV mode ...

Страница 13: ...f and turn Closed Caption on when mute Special function buttons Display the Home screen D pad up down left right navigation buttons Return to the previous place in the menu or app The button for the Menu Confirm button Volume up down Channel up down Google Assistant of TV Mute and restore sound Media content control function buttons Choose the audio language in DTV mode and set MTS for Mono Stereo...

Страница 14: ...3 seconds to start pairing 2 If the remote paired successfully then a confirmation will display on the screen If it did not pair successfully then an unsuccessful message will display Repeat step 1 NOTES If an unknown error occurred with the remote then it could have been caused by interference Try to remove what s causing the interference and pair it again If an unknown error occurred in the remo...

Страница 15: ...instructions to program your remote call your local Cable or Satellite provider s customer service center If your Cable or Satellite provider does not have a code available please contact us Using your cable set top box or satellite receiver remote as a universal remote If you prefer to use your Cable Set top Box or Satellite Receiver Remote as a universal remote visit the Support page to view a l...

Страница 16: ...he TV will turn on After the splash screen that displays the logo appears begin the Setup Wizard menu The guide setting is completed according to the boot navigation prompt The navigation information is specific to the actual condition The Home screen will be your starting point for navigating the TV ...

Страница 17: ...V channels were saved before you will be prompted to do a channel search You can also go to Menu Channels to change the channel settings Launch Live TV After channel scaning is done for the first time the screen will display LiveTV operating tutorial including how to Load info Bar how to load the channel list and so on Press the UP button to view channel and program information Press the OK button...

Страница 18: ...t in channel list 1 Press the OK button to call out the channel list in Channels source 2 Select a channel and add it by using the Special function buttons on your remote A heart shaped indicator will appear beside the channel as confirmation that it has been successfully added Viewing your Favorite list To view channels that you ve added to your Favorite List simply press OK on your remote to cal...

Страница 19: ...by speaking Google Search You can search movies TV and more by typing Notifications Notifications can come from the system an external device an application the media player etc Inputs Select the Input source depending on the device you have connected to your TV Network Internet You can set up the Network Internet Settings Settings lets you configure the TV set app options add accounts and change ...

Страница 20: ...ust how bright you want images to appear lower settings create darker images only when Dynamic Backlight Control is off Picture Mode If you d like to configure the settings for your picture then there are seven types of picture modes available Vivid Standard Energy Saving Game Sports Theater Day Theater Night and Auto Mode Picture mode options may vary depending on models Once you choose the mode ...

Страница 21: ...ust Current Source Reset Reset current picture settings to factory mode Sound System sounds Open the default system sound Sound Mode Select a preset sound mode to suit the type of content you are listening to Standard Theater Sports Music Speech Late Night and Auto Mode Sound mode options may vary depending on models Once you choose the mode you can adjust the audio based on the following settings...

Страница 22: ...is not appropriate for children to watch Turning Parental Control On 1 Press the OK button on your remote to turn Parental Control on 2 Create PIN window displays Using the number buttons on your remote create the password You will see the other Parental Control settings change from a greyed out state to highlighted When this occurs begin adding other settings to the Scheduled Blocking Channel Blo...

Страница 23: ... Adult Programming Canadian French Ratings Rating Defined as G General appropriate for all ages and must contain little to no violence or sexual content 8ans General but inadvisable for young children could contain scenes disturbing to children under eight Recommended for viewing with parent 13ans Programming is appropriate for children 13 and older and may contain moderate violence language and s...

Страница 24: ...ustom style where you can adjust the Font Size Font Style Font Color Font Opacity Background Color etc Audio Language MTS You can choose the audio language in DTV mode and you can set MTS for Mono Stereo or SAP in ATV mode Audio Only When you select this option the screen will not display the picture You can only listen the audio Press any button except the button VOL buttons and button to restore...

Страница 25: ... access the Internet via a wireless network connection Select an available network press OK to confirm A screen will appear prompting you to enter the password if necessary See all See fewer Press OK to view all available network or fewer Add new network You can add wireless network Scanning always available Check to scan for networks even when Wi Fi is turned off Wake on Wireless Network Wake on ...

Страница 26: ...use a Bluetooth device with your TV you must first pair it 1 Make the device you want to pair discoverable See the documentation that came with your device to learn how to make it discoverable 2 The TV displays the ID of all available devices in range 3 Click the ID of the Bluetooth device in the list on your TV to pair with it 4 Follow the prompts to complete the pairing Device List Show up avail...

Страница 27: ...er to automatically turn the TV off within a specified time off 10 Minutes 20 Minutes 30 Minutes 40 Minutes 50 Minutes 60 Minutes 90 Minutes and 120 Minutes Power On Timer Type Set the type Off Daily Once Power On Timer Set the clock for the time you want the TV to turn on automatically Power Off Timer Type Set the type Off Daily Once Power Off Timer Set the clock for the time you want the TV to t...

Страница 28: ...Setup assistant Use the Setup assistant for instructions to help you set up your TV Send Diagnostics and Usage Allow to send the diagnostics and usage of the report Enhanced Viewing You can set Automatic Content Recognition Picture Mode Auto Adaption Sound Mode Auto Adaption etc NOTE To use Enhanced Viewing connect your TV to network first This function is not available in some models countries re...

Страница 29: ... as credit card numbers NOTE This function is not available in some models countries regions Text to speech Let you specify text to speech engine details and speech rate Reset You can reset to the factory data Help See system message and signal information Product Registration Registering the TV with your contact information will keep you updated with related service information and marketing info...

Страница 30: ... From the Apps screen use the navigation buttons on your remote to select the app that you want to remove Long press the OK button on your remote 2 Click on Uninstall 3 A dialog message displays that asks do you want to uninstall this app Confirm and the icon is removed from the Apps screen NOTE If an app is deleted the information related to that app is also removed Moving App Icons around To mov...

Страница 31: ...ted may or may not be supported Medium File Format Video avi XviD Mpeg2 H 264 mkv H 264 H 265 mpg Mpeg2 ts H 264 H 265 Picture jpg Music mp3 Browsing Content You have two ways to enter Media Insert a USB devise and your TV automatically goes to the Media When your USB devise is connected to the TV that doesn t show Media page press the APPS button on your remote and browse down to open Media To br...

Отзывы: