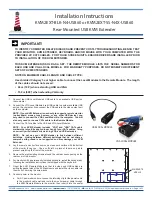
1. Connect the USB Local Module's USB cable to an available USB port on
the computer.
2. Connect the VGA Local Module's red USB cable to another available USB
port on the computer. Also connect the VGA cable to the video output port
on the computer.
NOTE: If your KVM Extender is used only to support a remote monitor
(no keyboard, mouse, touch screen, or any other USB device), you
only need to connect the VGA Local Module to the computer. You will
also only need to run one CATx cable to the Remote Module.
3. Connect the CATx cables to the USB and VGA Local Modules.
NOTE: Your KVM Extender includes "VGA" and "USB" CATx cable
markers that should be applied to each end of your CATx cables. Doing
so correctly will eliminate mismatching VGA and USB extenders.
NOTE: Do not use your KVM Extender to link between different
buildings. Linking between different buildings that do not share a
common earth ground is not supported and may damage your KVM
Extender.
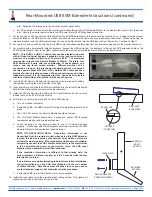
4. Lay the remote monitor face down on a clean work surface with the bottom
of the monitor facing you. Use a soft cloth or piece of foam as a pad to
prevent scratching the front of the monitor.
5. Remove the eight existing screws around the cable access opening on the
rear cover of the monitor.
6. For monitors with a permanently installed keyboard, install the keyboard by
following the installation instructions that shipped with the keyboard.
7. Orient the KVM Remote Module so that the video and USB cables are
exiting the gasket side of the KVM enclosure and install the video cable into
the monitor, securing the screw locks.
8. Connect power to the monitor.
a. For AC powered monitors: Loosen the retaining clip for the power cable
in the monitor's cable well and route the monitor power cable through
the KVM Remote Module to the monitor, then insert it into the power
99140B
•
January 6, 2015
•
www.HopeIndustrial.com
•
International:
+1 (678) 762-9790
• UK:
+44 (0) 20 7193 2618
•
© 2015 Hope Industrial Systems, Inc.
•
Page 1 of 2
IMPORTANT!
TO IDENTIFY COMPUTER RELATED ISSUES AND PREVENT COSTLY TROUBLESHOOTING, BENCH TEST
YOUR MONITOR, KVM EXTENDER, KEYBOARD, AND/OR MOUSE WITH YOUR COMPUTER WITH THE
PROVIDED 25' CAT5 CABLES. FOR TOUCH SCREEN UNITS, ENSURE DRIVERS ARE INSTALLED PRIOR
TO INSTALLATION OF THE KVM EXTENDER.
THIS KVM EXTENDER IS SOLD AS A SET. THE REMOTE MODULE LISTS THE SERIAL NUMBERS FOR
EACH USB AND VGA LOCAL MODULE. FOR WARRANTY PURPOSES, DO NOT MISMATCH DIFFERENT
SETS OF KVM EXTENDERS.
NOTE ON MAXIMUM CABLE LENGTH AND CABLE TYPE:
Use shielded Category 5e or higher cable to connect the Local Modules to the Remote Module. The length
of the cables should not exceed:
• 60 m (198') when extending USB and VGA
• 150 m (500') when extending VGA only
Installation Instructions
KVM2EXT-BLK-N4-USB60 or KVM2EXT-SS-N4X-USB60
Rear-Mounted USB KVM Extender
KVM REMOTE
MODULE
USB LOCAL MODULE
VGA LOCAL MODULE


