background image


14 

STARTING DEVICES 
 

Starting with electric starter 
 
Operate starter switch or starter button. Do not engage for more than 5 seconds. 

If it doesn’t 

start within that time, let it cool before another attempt is made. 
 
Starting with recoil Starter 
 
Hold the handle of the recoil starter with one hand. Brace the engine (or appropriate) with 
the other hand. Pull out the handle gently until resistance is felt. Now pull vigorously and 
swiftly about one arm length. Let the handle slowly back until all of the cable has reverted 
back into the starter housing. 
 
In order to avoid damage to the starter as well as several other possible problems, do not 
return handle abruptly or let go of the handle altogether until the cable has returned itself 
completely into the housing. Repeat if necessary. 


GROOVED BELT REDUCTION DRIVE 
 

ADJUSTING PROCEDURE 
 
Loosen locking bolt slightly. This is an M-10 bolt, which lies perpendicular to the line of the 
crankshaft.  
 
Turn the propeller shaft to remove tension from the belt. This should be in a clockwise 
direction as viewed toward the PTO. 
 
Take note of direction of belt, remove belt and inspect. 
 
Check bearings for unusual occurrences such as rough rotation. Rock the pulley back and 
forth checking for excessive movement in the bearings. 
 
Reinstall belt to turn the same direction as before. Ensure that it is on all the way and all 
grooves fit together properly. 
 
Tighten the belt counter-clockwise just to the point that the slack is taken up but yet the belt 
is not stretched. 
 
Measure the circumference of the belt. 
 
Adjust the locking bolt to the point where it has some tension, however, you are still able to 
turn the propeller shaft with only slight force. 
 
Put a straightedge to the pulleys and adjust the large pulley fore and aft until the grooves are 
paralleled and exactly match to the drive pulley. 
 
Rotate the propeller shaft counter-clockwise stretching the belt. 
 
Rotate the large pulley several revolutions. 

Содержание F-23

Страница 1: ...BE READ THROUGH IN ITS ENTIRETY AND COMPLIED WITH WHERE APPLICABLE IMMEDIATELY UPON RECEIPT OF ENGINE EVEN IF THE ENGINE WILL NOT BE USED IMMEDIATELY THIS MANUAL MUST STAY WITH THE ENGINE AT THE TIME OF RESALE Hirth Motoren and related agents reserve the right to make changes additions deletions and supercessions to this manual without notice ...

Страница 2: ...on drive Page 14 Gearbox Recoil Starter Page 15 Fuel System Page 17 18 Carburetor Info Page 19 Problem solving Page 19 21 Wiring diagram Page 22 PVL Ignition Page 23 Free Air Cooling Page 24 25 Exhaust System Page 26 Torque Values Page 27 Engine Setting Values Page 27 Maintenance Schedule Page 28 30 Troubleshooting Page 31 33 Engine maintenance repair log Page 34 ...

Страница 3: ...e with 4 threaded studs secured with hexagon head nuts The cylinder head consists of a special aluminium alloy that retains the same temper hardness in high temperatures It is attached to cylinder by cylinder screws and does not require a head gasket The piston consists of an aluminium alloy and is centered by two piston rings expanding against the cylinder wall The piston is attached to the conne...

Страница 4: ...ctional safe thorough maintenance is completed etc The user assumes all risk of use and acknowledges so by its use that he she knows this engine can experience mechanical failure Engine failure can result in crash landings that may lead to injury and or death Never operate the engine if there is any chance of causing damage to persons or properties Never operate the aircraft at locations airspeeds...

Страница 5: ...e nor tells every detail as it is impossible to list every piece of information and effect that each detail may or may not have in conjunction with all of the other related aspects As you can see the possibilities are endless For information regarding a specific topic that may or may not be covered in this manual consult with your local Hirth technical representative This manual has been compiled ...

Страница 6: ...ALLATION INSTRUCTIONS FURTHER THE PROPELLER MUST BE INSTALLED AND PITCHED TO MAKE NEAR MAXIMUM RATED RPM YET NOT ALLOW THE ENGINE TO OVERSPEED NOTE For free air cooled engines it is critical that proper steps be taken to ensure adequate cooling Refer to section in this manual regarding starting procedure Take care not to jerk the engine rpm up and down Increase and decrease rpm smoothly It will ev...

Страница 7: ...y If engine exceeds peak Hp Rpm 6150 Rpm stop break in and add pitch Restart warm up at idle and then go to full throttle again to check if your pitch adjustments now hold the engine to peak RPM If engine is more than 200 Rpm below peak Rpm prop pitch will have to be reduced to allow engine to come up to proper speed If engine is more than 100 Rpm above peak Rpm prop pitch will have to be increase...

Страница 8: ... 2 Clean engine thoroughly Always ensure all maintenance and inspections have been completed Always ensure all systems are in top condition and serviceable Never operate engine before reading this manual thoroughly and conforming to it where applicable Never operate engine without both ignition systems functioning Never engage starter mechanism without at least one spark plug for each ignition cir...

Страница 9: ... fuel injected mix Blue Max at 90 1 1 42oz of oil per gallon of gas FUEL MIXTURE In this manual gasoline and oil mixed together are referred to as fuel Gasoline oil mix ration of 2 50 1 Gasoline oil mix ration of 1 100 1 1 unit of oil to 50 units of gasoline 1 unit of oil to 100 units of gasoline 200 ml of oil to 10 liters of gasoline 100 ml of oil to 10 liters of gasoline 12 8 fl oz of oil to 5 g...

Страница 10: ... propeller Listen and feel for unusual occurrences It is wise to remove the spark plug caps or some other positive way to ensure that the engine will not fire Check propeller for secure attachment and condition nicks cracks crud etc Check spark plug caps for security condition Check exhaust system for security condition cracks wear broken springs etc Check gearbox for oil leaks if equipped Check b...

Страница 11: ...ted Ensure that the area is safe and aircraft secure Note any changes in temperature and barometric pressure since last operation Changes may indicate a need for re tuning of carburetors Keep these changes in mind while completing run up procedure and watching engine temperatures STARTING PROCEDURE STARTING A COLD ENGINE 1 Fuel on 2 Master switch on if installed 3 Set throttle to idle position 4 C...

Страница 12: ...er to a proper run up area and complete engine run up Refer to Run up Procedure Note If engine does not start after 3 4 attempts apply a little more throttle If engine still will not start check the spark plugs Refer to section dealing with Trouble Shooting RUN UP PROCEDURE PART 1 Never operate engine without propeller or other RPM restricting device After 2 or more minutes at 1800 2500 RPM open t...

Страница 13: ...tude set throttle back to cruise power This RPM is determined by the speed requirements of the aircraft and or pilot preference NOTES Ensure never to operate engine above maximum engine RPM Take care not to operate the engine at a lower throttle setting yet producing a higher RPM For example in a dive This can lean the fuel mixture and increase engine temperatures to a critical level that may caus...

Страница 14: ...s an M 10 bolt which lies perpendicular to the line of the crankshaft Turn the propeller shaft to remove tension from the belt This should be in a clockwise direction as viewed toward the PTO Take note of direction of belt remove belt and inspect Check bearings for unusual occurrences such as rough rotation Rock the pulley back and forth checking for excessive movement in the bearings Reinstall be...

Страница 15: ...eration or 1 year whichever comes first Remove gearbox and inspect elastomeric dampener or centrifugal clutch as equipped every 100 hours RECOIL STARTER When recoil starter is removed apply a small amount of grease to the annular spring which hold the clamp rollers in place When recoil starter is to be installed it is necessary to install it by the following procedure insert the three M6 Allen scr...

Страница 16: ...s Installation of EGT thermocouple to be mounted 75mm as measured through the center of the exhaust tube from the outer edge of the exhaust port If using EIS EGT probes with Westberg EGT gauge 4 feet of EGT extension wire must be spliced in to achieve proper readings CARBURETORS CARBURETOR ICE WARNING Carburetors can be susceptible to what is known as Carb Ice Carb ice can accumulate in the carbur...

Страница 17: ...17 Note 1 inch 25 4 millimeters ...

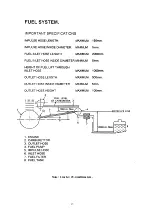
Страница 18: ...ved for the type of fuel which will be used Use fuel lines which have no chance of cracking or chafing Use hose clamps at hose connections Do not use soft hose for the pulse line It can lower the delivered pulse pressure vacuum to the fuel pump which can in turn lower the pumps capacity Use stiff 14 ID hose for the pulse line Ensure that the fuel tank as well as all other fuel system components ar...

Страница 19: ...the supplied jets should be sufficient to optimally tune the engine for summer and winter operation and sea level to several thousand feet field elevation Although jet changes may be required these changes should not be conducted unless proper Hirth tuning information is on hand and the changes are made by a qualified person Hirth uses different brands of carburetors throughout its engine line For...

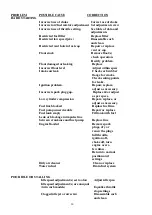
Страница 20: ...on problem Repair replace adjust as necessary Incorrect spark plug gap Replace or adjust as per specs Low cylinder compression Repair replace or adjust as necessary Fuel line blocked Replace fuel line Fuel pump unserviceable Repair or replace Fuel tank empty Fill tank with fuel Leak or blockage in impulse line between crankcase and fuel pump Replace line Engine flooded Remove spark plugs dry or re...

Страница 21: ...ustments are unequal twin carb models Equalize idle adjustments Slide sticking or binding Clean and inspect slide and return spring Replace if necessary Throttle cable binding Correct routing or replace cable as necessary ENGINE SURGES WHEN CRUISING AT A CONSTANT POWER SETTING Incorrect fuel air mixture Requires jet change and or needle position adjustment ENGINE DOES NOT DEVELOP FULL POWER OR MIS...

Страница 22: ...rom charging coil that is also attached to one of the yellow wires on rectifier The green with red stripe wire on rectifier is not used Set tach pulse set point for Grand Rapids Technologies EIS to 6 Ignition stop wires must be connected to separate switches or a left right both key switch Connecting both stop circuits to a single pole switch will damage the ignition system Hirth PVL ignition has ...

Страница 23: ...23 ...

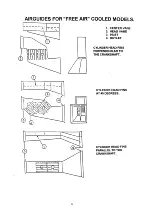
Страница 24: ...ngine would run hotter than with no shroud at all Further usually better results are obtained when a vane is installed which separates the air that is to pass over the cylinder from the air that is to pass over the cylinder head fins Some installations may not require cooling shrouds at all however each installation is different and therefore special care should be taken to find the cooling requir...

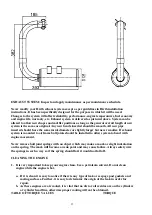
Страница 25: ...r If exhaust system is mounted to airframe ball joints should be installed to allow system to bend with engine movement Never remove ball joint springs with an object which may make a mark or slight indentation on the spring The mark will become a weak point and may cause failure Always safety wire the springs in such a way so if the spring should fail it would not fall off CLEANING THE ENGINE 1 I...

Страница 26: ...52 inch Lbs CRANKSHAFT NUT Magneto end 16mm 107Ft Lbs ENGINE MOUNTING BOLTS 10nn 37Ft Lbs 444 inch Lbs HIRTH ENGINE SETTING VALUES Engine F 23 VM slide carb F 23 BN carb F 23 E Fuel Inj Ign Timing 2000 carbureted 16 deg 16 deg Ign Timing 2000 Fuel injected 18 deg Spark Plug Heat Vl 280 280 280 Spark Plug Gap 030 030 030 No of Carburetors Injectors Two Two 2 injectors Carburetor ID Mikuni VM 34 389...

Страница 27: ...ce spark plugs x x x x x x x 10 check fit and serviceability of spark plug caps x x x x x x x x x x x x x x 11 check ignition timing x x x 12 grease cable of recoil starter x x x 13 check electrical connections for tight connection x x x x x x x x x x x x x x x x x 14 check wires for abraded spots and loose wires at connectors x x x x x x x 15 tension cooling fan belt x x x x x x x 16 check coolin...

Страница 28: ...eaks x x x x 33 check carb jet needle for wear replace if necessary x 34 replace needle jet and jet needle x x x 35 rebuild fuel pump x x x 36 replace fuel line x x x 37 lubricate control cables x x x x x x x x x x x x x x 38 check fuel hoses pulse line for leaks x x x x x x x x x x x x x x 39 check engine accessor y mounting supports x x x x x x x x x x x x x x 40 decarbonize cylinder head piston...

Страница 29: ... x 55 replace 5 v belts on re drive x x x x x x x x x x x x x 56 disassemble inspect lubricate recoil starter x 57 check re torque prop bolts as per manufactur er s instruction 58 59 60 61 62 63 Items 58 63 are for you to add additional points to check such as accessories At 500 hours total time the engine is to be disassembled and all points checked service as required replace rings and start the...

Страница 30: ...re The majority of problems are usually lack of spark or lack or abundance of fuel and or air Spark or lack of is usually quite simple to determine The fuel air mixture is a little more complicated It must be determined whether it is a lack or abundance of fuel in relation to the amount of air and at which point to make an adjustment The way to determine most problems is thorough a process of elim...

Страница 31: ...s Example 1 Let s say that the EGT is normal but the CHT reads hot By this we know that the combustion temperature is correct however for some reason the engine is not receiving proper cooling Check for cooling problems restrictions of the cooling system etc Note Improper lubrication and stuck piston rings can also cause CHT to be high with little effect on EGT Example 2 Let s say CHT EGT are hot ...

Страница 32: ...utside air temperature has gotten cooler whereby the engine will now require more fuel to properly run If this is the case it may be noted that the engine makes slightly more power than before Carbs must be re jetted An engine that is slightly lean will make more power than normal However with the extra power will come extra heat An engine running in this lean condition may be on the verge of burn...

Страница 33: ...33 ENGINE MAINTENANCE AND REPAIR LOG DATE EXPLANATION OF WORK COMPLETED Record the specifics of your engine here This information may be needed when calling for tech support and parts ...

Страница 34: ..._____________ Date of purchase ____________________ Place of purchase ____________________ PSRU Type Ratio ____________________ PRSU Propeller speed reduction unit Number of carburetors _____ Type of carburetor _________________ Application Type of vehicle ______________ Tractor or pusher prop_____________ ...

Отзывы: