3
SAFTEY FIRST
Requirements to be met by the user
The tool is intended for professional use. The tool may be operated, serviced and maintained only by trained, authorized personnel
who have received special instruction regarding the hazards that may be encountered.
Use the tool for the first time only after you have been trained by a Hilti specialist on how to use it safely.
Personal safety
̵ Never tamper with or modify the tool in any way.
̵ Do not use the tool for purposes for which it was not intended.
̵ Stay alert, watch what you are doing and use common sense when operating the tool.
Do not use the tool if you are not concentrating.
̵ To reduce the risk of injury use only genuine Hilti accessories and spare parts or those of equivalent quality.
̵ Use only fasteners of a type approved for use with the tool.
̵ Observe the information printed in the operating instructions concerning operation, care and maintenance.
̵ Never point the tool toward yourself or other persons.
̵ Never press the nosepiece of the tool against your hand or against any other part of your body (or other persons hand or part of
their body).
̵ Drive the fasteners only into structural steel members. Do not attempt to drive fasteners into other materials or into hardened or
brittle steel, cast iron or spring steel.
̵ Pull the trigger only when the nosepiece of the tool is in contact with the working surface and the tool is fully compressed.
̵ When driving fasteners, always hold the fastening tool at right angles to the working surface in order to help prevent the fastener
being deflected by the surface.
̵ Never redrive a fastener, as this may cause the fastener to brake.
̵ Keep the grips dry, clean and free from oil and grease.
̵ Never leave a loaded tool unattended.
̵ Always remove the cartridges before cleaning, servicing or carrying out maintenance work on the tool.
̵ Never leave the tool unattended.
̵ When not in use, the tool should be unloaded (cartridge strips removed) and stored in a locked, dry place where it is inaccessible
to children.
̵ Never compress the tool while operating the Pawl, as this presents a risk of injury to the operators hand.
̵ Remove the cartridge strip from the tool carefully. Never attempt to pry a cartridge from the magazine strip or tool.
̵ Do not disassemble the tool while it is hot. If this is unavoidable, wear protective gloves.
̵ Store unused cartridges in a dry place, where they are locked away or high up and out of reach of children.
̵ Do not operate the tool when parts are damaged or when the controls do not function correctly,
have the tool repaired by Hilti Tool Service.
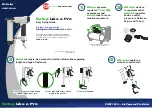
Personal Protective Equipment (PPE)
Operator and bystanders must wear helmet, eye and ear protection. Hilti recommends the operator wear hand gloves. In addition, all
the jobsite safety requirements (steel toe safety shoes, safety harness, high visibility vest, etc.), deemed necessary by the local regula-
tions and jobsite requirements must be adhered to.
Information here is general: read the operating instructions for complete details