HiLook THC-B120-MPIRL Скачать руководство пользователя страница 6


2


Menu Description


Purpose: 

Call the menu by clicking button      on the PTZ Control 

interface, or call the preset No.95.   
Steps: 
1.


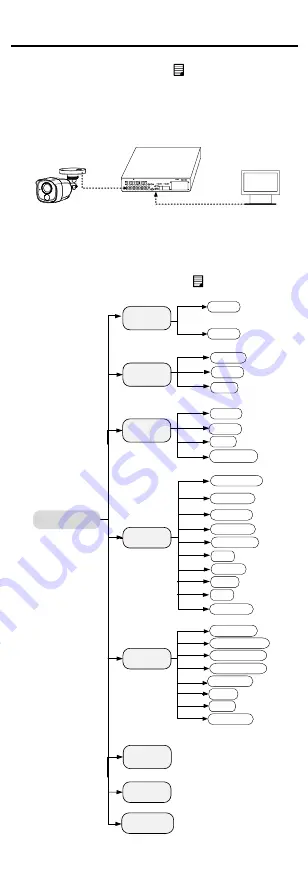
Connect the camera with the TVI DVR, and the 

monitor, shown as the figure 3-1. 

Camera

TVI DVR

Monitor


Figure 2-1


Connection 

2.


Power on the analog camera, TVI DVR, and the 

monitor to view the image on the monitor. 

3.


Click PTZ Control to enter the PTZ Control interface. 

4.


Call the camera menu by clicking      button, or call 

the preset No. 95. 

EXPOSURE

GLOBAL

MAIN MENU

VIDEO 

SETTINGS

FUNCTIONS

EXIT 

SAVE & EXIT


DWDR

BLC

CONTRAST

SHARPNESS

SATURATION

AGC

MIRROR

BACK

TRIGGER MODE 

ALARM MODE

TIME SETTINGS

VIDEO 

FORMAT

FACTORY 

DEFAULT

BRIGHTNESS

EXIT

SAVE & EXIT 

WHITE LIGHT

PIR LEVEL

DAY/NIGHT

BACK

EXIT

SAVE & EXIT

 MODE

IMAGE MODE

2M25

2M30

BACK 

SAVE & EXIT

EXIT


Figure 2-2


Main Menu Overview 

5.


Click the direction arrow to control the camera. 

Содержание THC-B120-MPIRL

Страница 1: ...ealer This manual applies to the models below Model THC B120 MPIRL This manual may contain several technical incorrect places or printing errors and the content is subject to change without notice The...

Страница 2: ...eration EU Conformity Statement This product and if applicable the supplied accessories too are marked with CE and comply therefore with the applicable harmonized European standards listed under the L...

Страница 3: ...mounting is adopted If smoke odor or noise rise from the device turn off the power at once and unplug the power cord and then contact the service center Never attempt to disassemble the camera by unpr...

Страница 4: ...rom liquid while in use for non water proof device While in delivery the camera shall be packed in its original packing or packing of the same texture Mark Description Table 0 1 Mark Description Mark...

Страница 5: ...or IR cut filter with auto switch OSD menu with configurable parameters Auto white balance Internal synchronization SMART IR mode Visible alarm PIR detection 3 axis adjustment 1 2 Overview Video Cable...

Страница 6: ...monitor 3 Click PTZ Control to enter the PTZ Control interface 4 Call the camera menu by clicking button or call the preset No 95 EXPOSURE GLOBAL MAIN MENU VIDEO SETTINGS FUNCTIONS EXIT SAVE EXIT DWDR...

Страница 7: ...balances the brightness level of the whole image and provides clear images with details 2 3 DAY NIGHT COLOR B W Black White and AUTO are selectable for DAY and NIGHT switches COLOR The image is color...

Страница 8: ...GS IMAGE MODE IMAGE MODE is used to adjust the image saturation and you can set it as STD Standard or HIGH SAT High Saturation BRIGHTNESS Brightness refers to the brightness of the image You can set t...

Страница 9: ...e TRIGGER MODE as CAMERA the embedded PIR module sends the alarm signal to the visible alarm in the camera when PIR module detected the alarm source ALARM MODE In the ALARM mode you can select the ALA...

Страница 10: ...he value is the more sensitive the PIR module is 2 6 FACTORY DEFAULT Reset all the settings to the factory default 2 7 EXIT Move the cursor to EXIT and click Iris to exit the menu 2 8 SAVE EXIT Move t...

Отзывы: