CAUTION
: park the machine in an enclosed place, on a flat and level surface; near the machine there must be no objects that could either damage it, or be damaged through contact with it.
DANGER
: the room used to recharge the batteries must be adequately ventilated to prevent the accumulation of gases that leak from batteries.
2. Perform the procedure for securing the machine ( see the section titled “
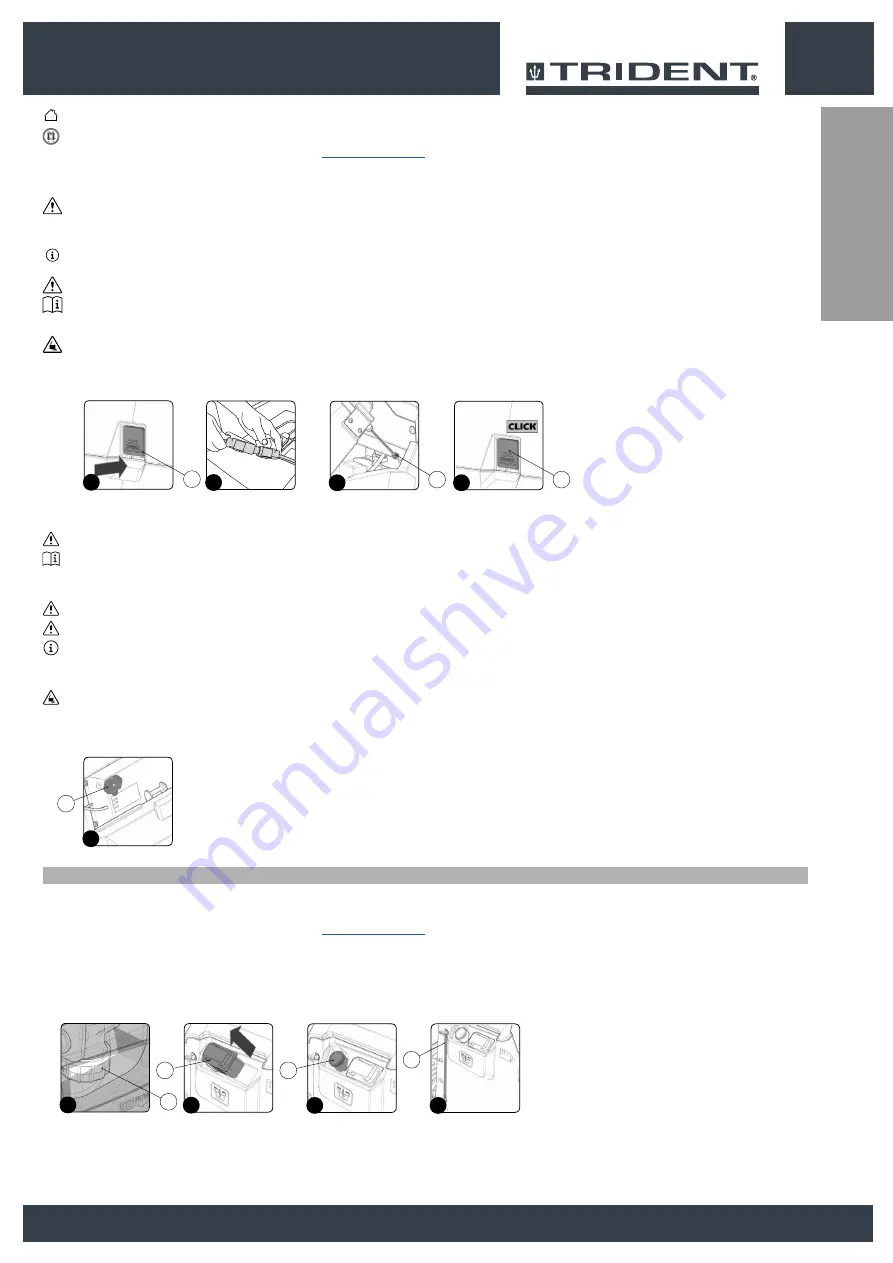
3. Press the recovery tank release lever (1) and turn the recovery tank into the maintenance position (
Fig. 1
).
To recharge the batteries without the built-in battery charger, proceed as follows:
CAUTION
: the following operations must be carried out by qualified personnel. An incorrect connection of the connector may cause problems with machine functioning.
A. Disconnect the electrical connector from the battery connector (
Fig.2
).
B. Connect the external battery charger cable to the battery connector.
N.B.
: the coupling connector of the battery charger is consigned inside the bag containing this instruction booklet, and must be assembled on the cables of the battery charger as indicated in the
instructions.
DANGER
: before connecting the batteries to the battery charger, make sure it is suitable for the batteries used.
N.B.
: carefully read the use and maintenance instructions of the battery charger that is used for charging.
C. Rotate the recovery tank until the pin in the gas spring (2) is resting on the solution tank (
Fig.3
).
CAUTION
: keep the recovery tank open for the duration of the battery recharging cycle to allow gas fumes to escape.
D. Once the recharge cycle has been completed, rotate the recovery tank to the maintenance position and disconnect the battery charger's cable from the battery connector.
E. Connect the electrical system connector to the battery connector (
Fig. 2
).
F. Rotate the recovery tank into the working position (
Fig.4
). Make sure that the recovery tank retainer system is correctly engaged.
To recharge the batteries with the on-board battery charger proceed as follows:
CAUTION
: the following operations must be carried out by qualified personnel. An incorrect connection of the connector may cause problems with machine functioning.
NB
: Carefully read the use and maintenance instructions of the battery charger that is used for charging, this document is delivered along with the machine.
I. Rotate the recovery tank until the pin in the gas spring (2) is resting on the solution tank (
Fig.3
).
II. Remove the cap (3) from the battery charger socket (
Fig.5
).
CAUTION
: before connecting the batteries to the battery charger, make sure it is suitable for the batteries used.
WARNING
: Before inserting the battery charger power cable into the socket, verify that there is no condensate or other forms of liquids.
N.B.
:
the battery charger power cable is delivered inside the bag containing this instruction booklet.
III. Plug the battery charger cable into the mains socket.
IV. Connect the battery charger's power cable to the socket on the battery charger itself.
CAUTION
: keep the recovery tank open for the duration of the battery recharging cycle to allow gas fumes to escape.
V. When the recharge cycle is complete, disconnect the battery charger cable from the mains.
VI. Disconnect the battery charger's power cable from the socket on the battery charger itself.
VII. Reposition the cap (3) into the socket of the battery charger (
Fig.5
).
VIII. Rotate the recovery tank into the working position (
Fig.4
). Make sure that the recovery tank retainer system is correctly engaged.
2
4
3
1
1
1
2
5
3
FILLING THE SOLUTION TANK
Before filling the solution tank, carry out the following steps:
1.
Take the machine to the usual place for filling the solution tank.
2. Perform the procedure for securing the machine ( see the section titled “
3.
Move to the front of the machine and check that the water system filter cap (1) is tightened otherwise tighten it (
Fig.1
).
The solution tank can be filled with water in two different ways:
A.
Removing the cap/measuring device (2) and filling the solution tank by means of a rubber hose or a bucket (
Fig.2
).
B.
Using the filler hose (3) (
Fig.3
), which supports the water hose on its own. In this case, be sure to remove the cap/measuring device (2) in order to allow the air to vent properly.
3. Fill with clean water, at a temperature not higher than 122°F and not lower than 50°F. The amount inside the tank can be seen by means of the level tube (4) (
Fig.4
) on the left-hand side of the machine.
2
4
3
1
1
4
3
2
13
Содержание TRIDENT R26SC PRO
Страница 2: ......
Страница 3: ...ENGLISH 4 ESPA OLA 30 FRAN AIS 56 3 ESPA OLA FRAN AIS ENGLISH...
Страница 82: ...ESPA OLA FRAN AIS ENGLISH 82...
Страница 83: ......
Страница 84: ...HILLYARD INDUSTRIES PO Box 909 St Joseph Missouri 64502 0909 U S A Telephone 816 233 1321 www hillyard com...


