HIKVISION iVMS-2000 Скачать руководство пользователя страница 18


iVMS-2000 Installation Guide 


© 2006-2010 by HIKVISION. All rights reserved.


16 


2


IP Camera Installation


2.1

 IP Camera Connection Mode 

2.1.1

  Wireless-Connection 

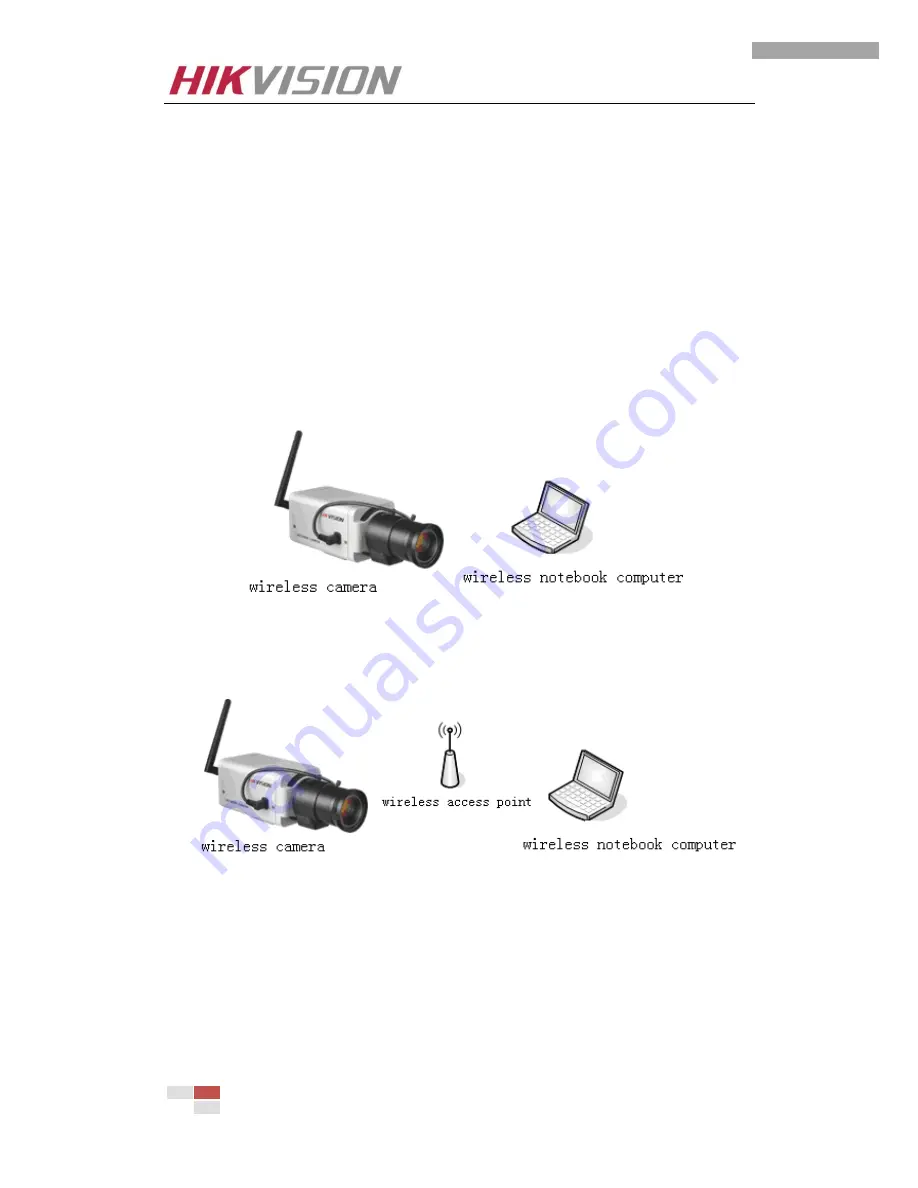
  Wireless  connection  can  be  divided  into  Ad-hoc  mode  and  Infrastructure  mode.  Ad-hoc  mode  is  to 

connect IP camera directly to a PC with wireless support (Figure 2-1), while Infrastructure mode is to 

connect IP camera to a wireless access point (Figure 2-2).   


Figure 2-1 Connect IP Camera Directly to a PC 


Figure 2-2 Connect IP Camera to a Wireless Access Point 


2.1.2

  Network Connection via Cables 


Connect IPC to the LAN via Ethernet Interface 

IP camera can be connected to the LAN via a network switch or Hub (Figure 2-3).   

Содержание iVMS-2000

Страница 1: ...iVMS 2000 Hybrid PC DVR Software Installation Guide V2 0 1 Hangzhou Hikvision Digital Technology Co Ltd...

Страница 2: ...for iVMS 2000 Hybrid PC DVR Software This manual may contain several technically incorrect places or printing errors and the content is subject to change without notice The updates will be added into...

Страница 3: ...2 Driver Installation 14 2 IP Camera Installation 16 2 1 IP Camera Connection Mode 16 2 1 1 Wireless Connection 16 2 1 2 Network Connection via Cables 16 2 2 Modify IP Camera Configuration 17 3 GSM Mo...

Страница 4: ...HCI HFVI series 1 1 1 Product Description DS 4216HFVI Figure 1 1 Support 16ch 4CIF 2CIF CIF QCIF real time encoding Support up to 16ch 4CIF main stream 16ch CIF sub stream encoding on dual stream mode...

Страница 5: ...10 by HIKVISION All rights reserved 3 Figure 1 2 DS 4208HFVI DS 4216HCI Figure 1 3 Support 16 channel CIF QCIF real time encoding Support up to 16ch CIF main stream 16ch CIF sub stream encoding on dua...

Страница 6: ...ce may be slightly different according to the card number and hard disk read write efficiency of the system Technical Specification Model DS 4216HCI DS 4208HFVI DS 4216HFVI Dimensions mm 162 101 162 1...

Страница 7: ...g cable for DS 40xxHCI HSI card The audio cascading cable connects between multiple DS 40xxHCI HSI cards and feeds live audio data to each of them Figure 1 4 Figure 1 5 Audio cable for DS 40xxHCI HSI...

Страница 8: ...iVMS 2000 Installation Guide 2006 2010 by HIKVISION All rights reserved 6 Figure 1 7 Loosen the screws 3 Open the PC chassis Figure 1 8 Figure 1 8 Open PC Chassis 4 Put Down the PC chassis Figure 1 9...

Страница 9: ...n card into an empty PCI slot You may need to take off the covering pieces on the PC back panel first Figure 1 10 Figure 1 11 and Figure 1 12 Figure 1 10 PCI slots on the PC motherboard Figure 1 11 Co...

Страница 10: ...HCI HSI card with the audio input of the second HCI HSI card connect the audio output of the second HCI HSI card with the audio input of the third HCI HSI card the rest may be deduced by analogy Conne...

Страница 11: ...nd Connection 8ch video 2ch audio connection cable 2 units for each card Figure 1 15 8ch video 2ch audio connection cable Description VID1 VID8 stand for video 1 video 8 when connected to DB1 or video...

Страница 12: ...dapter Description AID5 AID16 stand for audio 5 audio 16 DS 4216HFVI Connection Figure 1 17 DS 4216HFVI Connection DB1 video 1 video 8 audio 1 audio 2 DB2 video 9 video 16 audio 3 audio 4 JP2 audio 5...

Страница 13: ...VID4 stand for video 1 video 4 when connected to DB1 and video 5 video 8 when connected to DB2 AID1 AID4 stand for audio 1 audio 4 when connected to DB1 and audio 5 audio 8 when connected to DB2 DS 42...

Страница 14: ...e 1 20 8ch video 2ch audio connection cable Description VID1 VID8 stand for video 1 video 8 or video 9 video 16 AID1 AID2 stand for audio 1 audio 2 or audio 3 audio 4 12ch audio connection cable and i...

Страница 15: ...llation Guide 2006 2010 by HIKVISION All rights reserved 13 Figure 1 22 DS 4216HCI Connection DB1 video 1 video 8 audio 1 audio 2 DB2 video 9 video 16 audio 3 audio 4 JP2 audio 5 audio 16 DB1 DB2 JP2...

Страница 16: ...Figure 1 23 Driver Installation Interface 2 Click Continue Anyway to continue hardware installation If there is more than one card inserted in the PC or more than one DSP in one card the operation sy...

Страница 17: ...l success message popup during driver installation there will be Hikvision DS42xx Series displayed in the list Sound Video and Game Controller of Windows Device Manager as below The total number of th...

Страница 18: ...d hoc mode is to connect IP camera directly to a PC with wireless support Figure 2 1 while Infrastructure mode is to connect IP camera to a wireless access point Figure 2 2 Figure 2 1 Connect IP Camer...

Страница 19: ...Connection 2 2 Modify IP Camera Configuration The default IP for HIKVISION IP camera is 192 0 0 64 with 8000 as port number and admin 12345 as default user name password The administrator can create u...

Страница 20: ...ights reserved 18 Figure 2 5 Search IP Cameras If the IP address is not in the required IP section users can modify the network parameters in the SADP software Click the device on the list and input a...

Страница 21: ...ace the GSM Module works with high stability and meets various commercial or industrial application requirements This Document gives example of a certain kind of GSM modem and for the other GSM modems...

Страница 22: ...ide 2006 2010 by HIKVISION All rights reserved 20 Figure 3 2 Power Cable Serial cable for PC connection some GSM modems support USB connection Figure 3 3 Figure 3 3 Serial Cable External antenna for s...

Страница 23: ...e 2006 2010 by HIKVISION All rights reserved 21 Figure 3 4 External Antenna 3 1 2 GSM Modem Connection Guide 1 Insert SIM card into the GSM modem Figure 3 5 Figure 3 6 Figure 3 7 Figure 3 5 Press the...

Страница 24: ...6 2010 by HIKVISION All rights reserved 22 Figure 3 6 Insert the SIM card Figure 3 7 Push the SIM card platfrom back to the device 2 Install the antenna Figure 3 8 Notes it is suggested to keep the an...

Страница 25: ...Antenna 3 Connect Serial Cable Connect the round plug in pin with GSM modem and the DB9 connector to the PC Figure 3 9 Figure 3 10 Note Please make sure the connectors are fixed to the devices Figure...

Страница 26: ...dialog box will popup for Windows driver installation Figure 3 11 Figure 3 11 Windows Driver Installation Inset the CD attached with GSM Modem into the PC and click Automatic in Figure 3 11 and the sy...

Страница 27: ...by HIKVISION All rights reserved 25 Figure 3 13 GSM Modem Installation Click Finish after driver installation finished Figure 3 13 Figure 3 14 Driver Install Complete After driver installation we can...

Страница 28: ...15 Note The GSM modem s port number in iVMS 2000 should be set as same as the GSM Modem Figure 3 15 GSM Modem port number displayed in Windows Device Manager Note Right click My Computer and select Pr...

Страница 29: ...with iVMS 2000 software Figure 4 1 Alarm Box Components Function Description Component Description Power Power supply RS232 Communication interface with the PC Alarm In Receive alarm input signals Hig...

Страница 30: ...00 Installation Guide 2006 2010 by HIKVISION All rights reserved 28 Figure 4 2 Back Panel Connect the alarm box into the PC via RS232 interface Figure 4 3 Figure 4 4 Figure 4 3 Serial Port on PC s Bac...

Страница 31: ...iVMS 2000 Installation Guide 2006 2010 by HIKVISION All rights reserved 29 Figure 4 4 Connect alarm box to the PC...

Страница 32: ...t the iVMS 2000 installation CD into the PC CD ROM and run on the CD The install shield dialog box will be displayed Figure 2 1 and dialog box as Figure 2 2 will be displayed a few seconds later the t...

Страница 33: ...rved 31 Figure 2 2 Welcome Interface Step3 Click Change C to modify software installed location Figure 2 3 and click Next to continue Figure 2 4 or click Back to return to Welcome Interface or click C...

Страница 34: ...box as Figure 2 4 to start iVMS 2000 installation Figure 2 5 or click Back B to return to Select Installation Path Figure 2 3 Click Cancel to exit the Installation Figure 2 4 Ready to Install Figure 2...

Страница 35: ...nstall WinPcap If WinPcap has already installed on the PC warning message box will prompt Figure 2 7 Click OK to reinstall WinPcap or click Cancel to skip WinPcap installation and go to Installation C...

Страница 36: ...rface for WinPcap Step7 In Figure 2 9 click I Agree and start WinPcap installation if you accept the license agreement or click Back to return to Figure 2 8 Click Cancel to skip WinPcap installation a...

Страница 37: ...y HIKVISION All rights reserved 35 Figure 2 10 Installing WinPcap Step8 After WinPcap is installed an Installation Complete Interface Figure2 11 will pop up Click Finish to complete the installation F...

Страница 38: ...on Complete Interface will pop up Figure 2 12 click Finish to complete the iVMS 2000 installation process Figure 2 12 iVMS 2000 Installation Complete Interface Note For Windows Operating System below...

Страница 39: ...elect All programs WinPcap Uninstall WinPcap in the start menu of the Windows operating system and click Uninstall in the prompt dialog box Figure 2 13 to uninstall the WinPcap Figure 2 13 WinPcap Uni...

Страница 40: ...MS 2000 Uninstall iVMS 2000 in the start menu of Windows OS and click Uninstall in the prompt dialog box Figure 2 15 to start to uninstall the iVMS 2000 Figure 2 15 iVMS 2000 Un install Prompt Step4 A...

Страница 41: ...iVMS 2000 Installation Guide 2006 2010 by HIKVISION All rights reserved 39 First Choice for Security Professionals...

Отзывы: