HIKVISION iDS-TP40-16B Скачать руководство пользователя страница 18

User Manual of iDS-TP40-16B Traffic Incident Detection Server 

17 


Chapter 3 Getting Started 

3.1 Activation 

You need to active the device and set the password for first-time login. You can activate via SADP or 
web browser. 

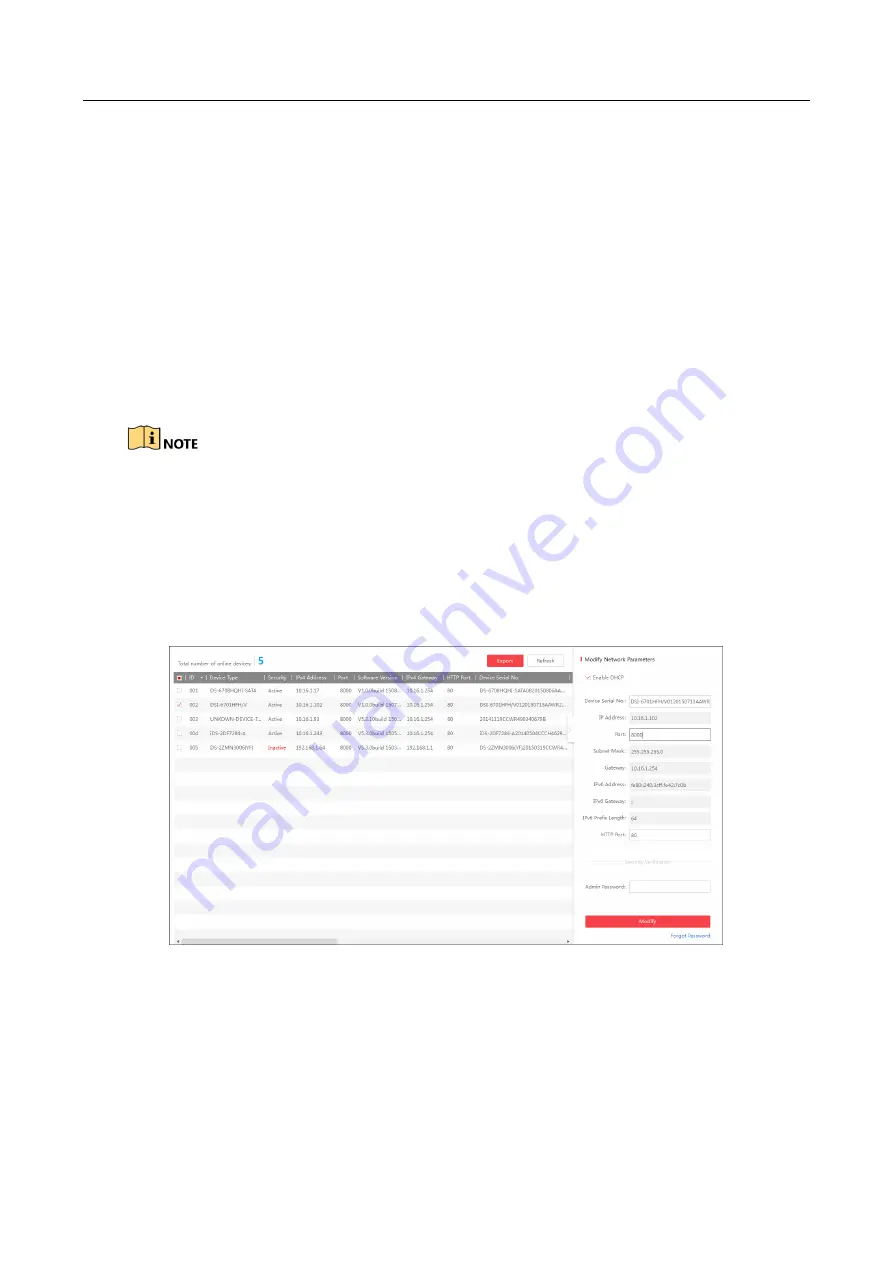
3.1.1 Activating via SADP 


SADP software is enclosed on the compact disc. You can also download it from the company 
website. 

Step 1


Install SADP software. After launching the SADP software, it automatically searches the 
online devices every 1 minute from the subnet where your computer locates. It displays the 
total number and information of the searched devices in the device list. Device information 
including the device type, IP address, port number, gateway, etc. will be displayed as the 
figure below. 


Figure 3-1


SADP Activation 

Step 2


Select the device which you need to activate by checking the checkbox and the device 
information will be displayed in a list on the right side. In Activate the Device panel, create a 
password for the device and confirm the password. The system will judge password strength 
automatically, and we highly recommend you to use a strong password to ensure your data 
security. 

Содержание iDS-TP40-16B

Страница 1: ...iDS TP40 16B Traffic Incident Detection Server User Manual UD07079B...

Страница 2: ...arks and logos mentioned below are the properties of their respective owners Legal Disclaimer TO THE MAXIMUM EXTENT PERMITTED BY APPLICABLE LAW THE PRODUCT DESCRIBED WITH ITS HARDWARE SOFTWARE AND FIR...

Страница 3: ...orized repair or maintenance Preventive and Cautionary Tips Make sure the power supply voltage is correct before using the device Do not drop the device or subject it to physical shock Do not place th...

Страница 4: ...User Manual of iDS TP40 16B Traffic Incident Detection Server 3 Improper use or replacement of the battery may result in hazard of explosion Please use the manufacturer recommended battery type...

Страница 5: ...SADP 17 3 1 2 Activating via Web Browser 19 3 2 Login 20 Chapter 4 Network Configuration 21 4 1 Viewing Network Parameters of Smart Analysis Units 21 4 2 Configuring Network of Traffic Incident Detec...

Страница 6: ...Character Overlay 41 8 4 Configuring Scene 43 8 4 1 Configuring Lane 43 8 4 2 Configuring Incident Rule 45 8 4 3 Configuring Preset Scene 50 8 5 Configuring Manual Evidence Capture 52 8 6 Configure Sc...

Страница 7: ...ing pedestrian driving on the lane line illegal lane change objects dropped down occupy emergency lane congestion flow roadblock construction Multiple traffic data collection vehicle type lane traffic...

Страница 8: ...User Manual of iDS TP40 16B Traffic Incident Detection Server 7 Conformity 1 International electronic product certification including CCC CE and FCC etc 2 Production permit...

Страница 9: ...10 100 1000M self adaptive network interface VGA Interface 4 USB 3 0 2 USB 2 0 Indicator UID alarm power and status Button Power and reset Power 1 1 redundant hot plugging power module Dimensions W D...

Страница 10: ...4 USB Interface 2 USB 2 0 5 Alarm Indicator Solid red main board error 6 UID Indicator Turns blue when UID is enabled to quickly locate the server 7 UID Button Turns on off UID indicator 2 3 Rear Pane...

Страница 11: ...chassis to avoid unbalanced load Circuit overload Circuit overload protection should be taken into consideration for scenario when the circuit of device accepts other power connection that may affect...

Страница 12: ...100 to 240 V power modules To install a power modules 1 Align the module with the rail 2 Clip the rear of module into the slot and push the module along the rail 3 Push the module further until its f...

Страница 13: ...hassis for installation Fix M5 cage nuts inside the chassis 6 in the front 4 in the back 2 Assemble the first and second parts of the outer rails 3 Pull out the second part of the rail marked with bac...

Страница 14: ...t Detection Server 13 Figure 2 4 Install Outer Rails Installing Server on Chassis 1 Make sure the inner rails are installed on the server and the outer rails are installed on the chassis 2 Align the i...

Страница 15: ...ver on Chassis 3 Push the server along the outer rails and 2 clicks can be heard Push the server until it is completely mounted into the chassis 4 Optional Fix the server on the chassis using 2 groups...

Страница 16: ...al of iDS TP40 16B Traffic Incident Detection Server 15 Figure 2 6 Fix the Server When pulling the server out of the chassis move the plastic paddle up on the left and move the plastic paddle down on...

Страница 17: ...User Manual of iDS TP40 16B Traffic Incident Detection Server 16 2 5 2 Typical Application Figure 2 7 Typical Application...

Страница 18: ...minute from the subnet where your computer locates It displays the total number and information of the searched devices in the device list Device information including the device type IP address port...

Страница 19: ...cially in the high security system resetting the password monthly or weekly can better protect your product Step 3 Click Activate to activate the device A The device is activated hint window pops up w...

Страница 20: ...n setting IP address keep the device IP address and the computer IP address in the same network segment Admin is device s administrator user We recommend you to create a new user to operate for protec...

Страница 21: ...u can log in to the device via web browser for further operations such as live view local configuration etc Step 1 In the address bar of the web browser enter the IP address of the device and press th...

Страница 22: ...Information Step 2 View the information of the smart analysis units including the IP Address Serial No Version Fan Status Online Status Status and UID Indicator Step 3 Optional Click Reboot to reboot...

Страница 23: ...s They share one IP address for debugging LAN1 represents G3 interface LAN2 represents G4 interface G3 and G4 are in different network segments for device management and can be configured in the same...

Страница 24: ...ameters 3 Click Save and the note pops up as below Figure 4 5 Note 1 4 Click OK to save the settings Step 3 Configure LAN1 or LAN2 1 Click LAN1 or LAN2 to enter the configuration page Figure 4 6 LAN1...

Страница 25: ...User Manual of iDS TP40 16B Traffic Incident Detection Server 24 Figure 4 7 Note 2 4 Click OK to save the settings...

Страница 26: ...Step 2 Enter the Listening Server IP Address Listening Server Port and SDK Port Step 3 Click Save to save the settings 5 2 Time Configuration Purpose You can synchronize time by NTP or manually Step...

Страница 27: ...unction such as the server at the National Time Center IP Address 210 72 145 44 If the device is set in a customized network NTP software can be used to establish a NTP server for time synchronization...

Страница 28: ...ch control center you can add control centers or areas to it Devices can only be added to the control centers and cameras can only be added to areas Devices can be understood as cameras Figure 6 1 Gro...

Страница 29: ...lect Group Step 6 Select the group to add the control center or area You cannot add a control center to an area or add an area to an area Or the note pops up to remind you to check if the selected one...

Страница 30: ...erver 29 Figure 6 5 Add Group Step 8 Click Save to save the settings 6 3 Adding Device Purpose You can add device to administrator or a control center Step 1 Go to Resource Management Figure 6 6 Resou...

Страница 31: ...ter the name of the device IP Address Enter the IP address of the device Protocol Port If you select ONVIF the port is 80 If you select SDK the port is 8000 User Name Enter the user name of the device...

Страница 32: ...erver 31 Figure 6 8 Resource Management Step 2 Click Add Step 3 Select Add Camera Figure 6 9 Add Camera Step 4 Click Area to select the area to add the camera You must select the area belonging to the...

Страница 33: ...Incident Detection Server 32 Figure 6 10 Select Area Step 5 Click Camera to add the camera which has been added in the upper level control center 1 Check the camera s to be added 2 Click OK to add the...

Страница 34: ...devices cameras will be listed on the right Figure 6 12 Device Camera List Step 2 Check the added device camera and click Modify or click a device name to enter the modification page Figure 6 13 Devic...

Страница 35: ...Step 1 Go to Resource Management Step 2 Click the control center or area containing the added device camera from the left tree and the device camera list will be shown on the right Figure 6 15 Device...

Страница 36: ...pose You can export the added control center area device information to the local PC Step 1 Go to Resource Management Step 2 Click Export Figure 6 17 Export Step 3 Click OK to export the table to the...

Страница 37: ...e with the ID of the area or control center containing the device The protocol of the device is marked as 1 or 2 1 means ONVIF and 2 means SDK 6 10 Importing Control Center Area Device Information Pur...

Страница 38: ...template to the local PC Step 5 Edit the template You can refer to step 4 of Chapter 6 9 Exporting Control Center Area Device Information for reference Step 6 Click Browse to select the edited templa...

Страница 39: ...Go to Live View The added devices cameras are listed on the left Camera List Step 2 Double click the camera name to realize live view Figure 7 1 Live View Step 3 Optional Capture manual evidence 1 Cli...

Страница 40: ...eed dome supports manual evidence capture The traffic incident detection server shall be armed on DS TP50 12DT terminal server or iVMS 8600 platform first The captured pictures will be stored in the d...

Страница 41: ...lect the camera for location configuration Direction Select the direction of the lane monitored by the selected camera Camera No Enter the camera No Camera Location No Enter the camera location No Cam...

Страница 42: ...position or select No to disable the function X Picture Composition Mode Select the composition mode for the captured pictures Up to 4 pictures can be captured once Step 3 Optional Check the channel s...

Страница 43: ...nt occupying one line If the content occupies more than one line it will break lines according to the configured percentage E g if you enter 60 then the overlay content will break lines when it reache...

Страница 44: ...s overlaying the capture time accurate to milliseconds Capture Time means overlaying the capture time accurate to seconds The two options cannot be selected at the same time 3 Click Save to save the s...

Страница 45: ...tep 3 Select the scene Step 4 Click Lane Configuration tab Figure 8 5 Lane Configuration Step 5 Select the Number of Lane s Up to 6 lanes are selectable Step 6 Draw lane lines 1 Click Draw Left Lane L...

Страница 46: ...Yellow Line are selectable 5 Click Save to save the settings Step 8 Click Save to save the settings 8 4 2 Configuring Incident Rule Purpose The traffic incident detection server can detect multiple ty...

Страница 47: ...ane s for the configured duration the alarm will be triggered Captured pictures will be output in the configured composition mode The pictures will be uploaded to client via SDK arming or listening mo...

Страница 48: ...ne Configure the following parameters When it detects that a vehicle is driven on the lane line the alarm will be triggered Four pictures including a close up picture will be output in the configured...

Страница 49: ...e 8 13 Objects Dropped Down The dropped objects shall be at least 16 16 px in the scene Or it cannot be detected Occupy Emergency Lane Configure the following parameters When it detects that a vehicle...

Страница 50: ...l be triggered Captured pictures will be output The pictures will be uploaded to client via SDK arming or listening mode Figure 8 17 Roadblock Construction Configure the following parameters When it d...

Страница 51: ...or incident rule configuration Step 3 Select the scene Step 4 Click Preset Scene tab Figure 8 19 Preset Scene Configuration Step 5 Configure the scene location 1 Click the directional buttons or opera...

Страница 52: ...e Evidence Capture Timeout If you select the picture type as close view and no license plate is recognized within the configured timeout a close view picture will be captured forcedly 3 Click Picture...

Страница 53: ...ual evidence capture Step 3 Select the Number of Picture s Up to 4 pictures can be captured once Step 4 Click Picture Configuration to configure the detailed information of captured pictures Refer to...

Страница 54: ...o to Camera Configuration Scene Patrol Figure 8 24 Scene Patrol Configuration Step 2 Select the channel Step 3 Check Enable Patrol Schedule Step 4 Click a day in a week and configure the schedule Up t...

Страница 55: ...t step 4 to configure the other periods Step 6 Repeat the steps above to configure the other days in a week Or check the day s to copy the same configuration Or check Select All to copy the configurat...

Страница 56: ...pose You can view the CPU usage rate network IO and temperature of the server Step 1 Go to Network Management Local Performance Figure 9 1 Performance in Line Chart Mode Step 2 View the performance in...

Страница 57: ...r can be stored in log files which can be viewed and exported at any time Step 1 Go to System Management Log Management Alarm Log Operation Log Step 2 Set the Start Time and End Time Step 3 Click Sear...

Страница 58: ...iles will be saved in the local PC in the format of txt 9 3 Upgrading Software Purpose You can upgrade the smart analysis units of the server Step 1 Go to System Management Software Upgrade Figure 9 5...

Страница 59: ...load File Step 5 After the file is uploaded click Next to confirm the operation Figure 9 8 Confirm the Operation Step 6 Click OK to start upgrading Figure 9 9 Start Upgrading Step 7 After the file is...

Страница 60: ...he server to default settings Step 1 Go to System Management System Configuration Default Configuration Figure 9 11 Default Configuration Step 2 Select the restoring type Simply Restore Restore all pa...

Страница 61: ...toring to the default settings 9 5 Managing User Accounts Purpose There is a default account in the DVR Administrator You can configure a new password for the admin Step 1 Go to System Management Syst...

Страница 62: ...User Manual of iDS TP40 16B Traffic Incident Detection Server 61 Step 4 Click Save to save the settings 0100001071010...

Страница 63: ...User Manual of iDS TP40 16B Traffic Incident Detection Server 62...

Отзывы: