HIKVISION DS-Pro Series Скачать руководство пользователя страница 21

DS-Pro Series Workstation User Manual 

20 

Chapter 4 HDD Installation 

Purpose 

The following section introduces the HDD installation. 2.5-inch HDD and 3.5-inch HDD are 
supported. 

Before you start 

Disconnect the power from the device before installing a hard disk drive (HDD). A factory 
recommended HDD should be used for this installation.   

Tools Required: Screwdriver. 
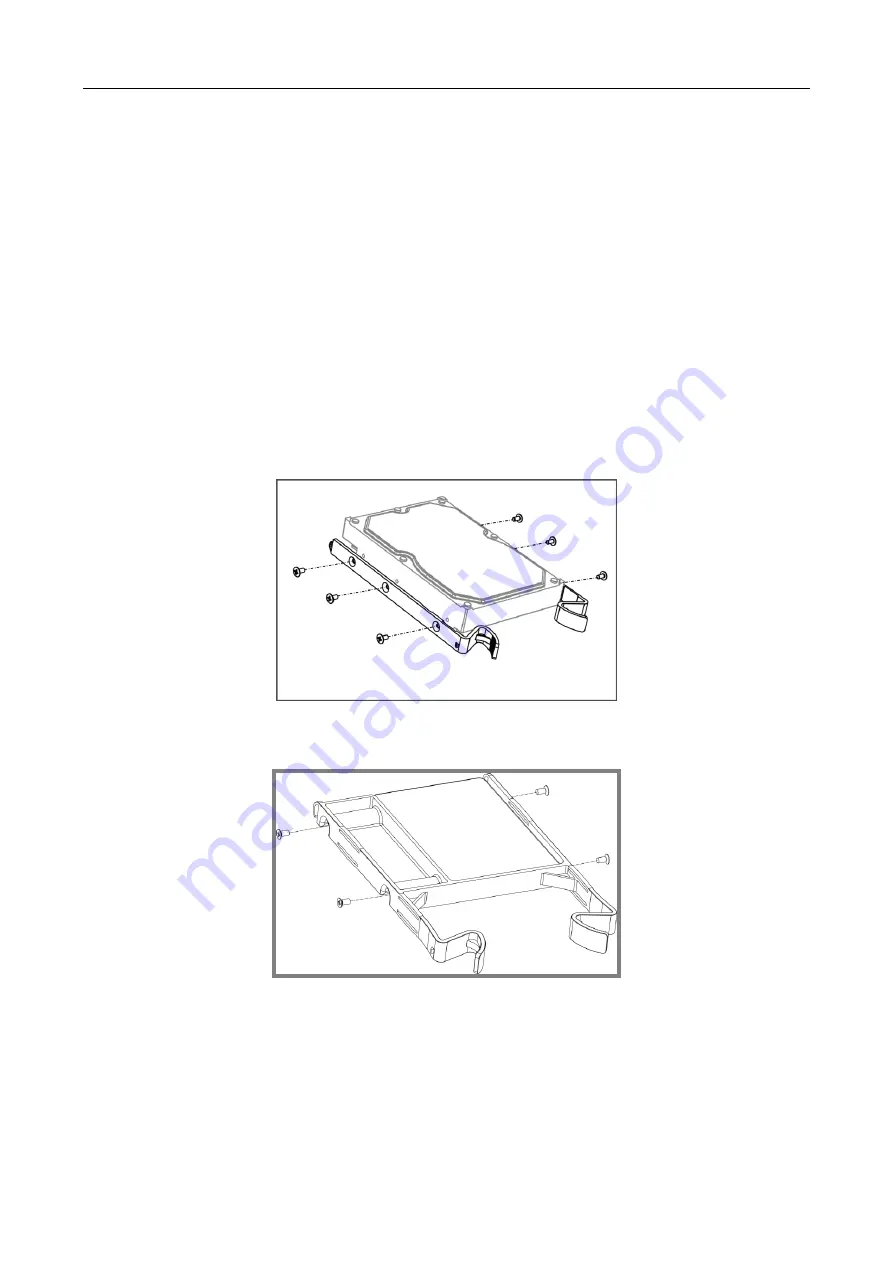
Step 1


For 3.5-inch HDD, fix mounting ears to HDD with screws. 


Figure 4-1


Fix Mounting Ears to 3.5-inch HDD 

For 2.5-inch HDD, fix HDD adaptor to HDD with screws 


Figure 4-2


Fix HDD Adaptor to 2.5-inch HDD 

Step 2


Unlock the front panel with the attached key, and press the buttons on both sides of the 
front panel to open it. 

Содержание DS-Pro Series

Страница 1: ...0 DS Pro Series Workstation User Manual...

Страница 2: ...hapter 1 Panels Description 6 1 1 Front Panel 6 1 2 Rear Panel 7 Chapter 2 Install Operation System 8 2 1 Install Windows System 8 2 2 Install Linux System 13 Chapter 3 Start Device up 18 3 1 Windows...

Страница 3: ...NT WILL OUR COMPANY ITS DIRECTORS OFFICERS EMPLOYEES OR AGENTS BE LIABLE TO YOU FOR ANY SPECIAL CONSEQUENTIAL INCIDENTAL OR INDIRECT DAMAGES INCLUDING AMONG OTHERS DAMAGES FOR LOSS OF BUSINESS PROFITS...

Страница 4: ...rence 2 This device must accept any interference received including interference that may cause undesired operation EU Conformity Statement This product and if applicable the supplied accessories too...

Страница 5: ...t may be found in this document are defined as follows Symbol Description Provides additional information to emphasize or supplement important points of the main text Indicates a potentially hazardous...

Страница 6: ...turn off the power at once and unplug the power cable and then please contact the service center Preventive and Cautionary Tips Before connecting and operating your device please be advised of the fo...

Страница 7: ...l lock Lock unlock front panel 2 Indicator HDD Unlit No HDD is detected Solid blue No data transmission in HDD Flashing blue Data is being read from or written to HDD Tx Rx Flickers blue when network...

Страница 8: ...r for VGA output Display local video output and menu 6 Audio input RCA connector for audio input 7 USB 3 0 interface Four Universal Serial Bus USB 3 0 ports for additional devices such as USB mouse an...

Страница 9: ...mended to use USB external DVD drive to install Windows Server 2012 and CentOS system 2 1 Install Windows System Step 1 Create a bootable USB flash drive by using software like Refus Step 2 Insert the...

Страница 10: ...ual 9 Figure 2 2 Start Installing Step 6 Click I don t have a product key You are recommended to activate Windows after finishing Windows installation Figure 2 3 Activate Windows Step 7 Select I accep...

Страница 11: ...Workstation User Manual 10 Figure 2 4 Notices and License Terms Step 8 Click Custom Install Windows only advanced Figure 2 5 Select Installation Type Step 9 Select a partition Step 10 Click Next to st...

Страница 12: ...ries Workstation User Manual 11 Figure 2 6 Select a Partition Installation will take about 20 minutes Figure 2 7 Installing Windows Step 11 Device will automatically reboot after finishing Windows ins...

Страница 13: ...User Manual 12 Figure 2 8 Restart Device Step 12 After reboot customize Windows settings or use express settings by clicking Customize or Use Express settings Figure 2 9 Express Settings After the set...

Страница 14: ...operation system on device Before you start Download the Ubuntu16 04 03 64 bit operation system from Ubuntu official site Prepare a 2 0 or 3 0 USB device of not more than 64 GB capacity and format it...

Страница 15: ...the example of selecting none to describe the steps Step 5 Click Continue Figure 2 12 Preparing to install Ubuntu Step 6 Select Installation Type We take the example of selecting Erase disk and instal...

Страница 16: ...Figure 2 13 Installation Type Step 9 Click Continue on popup message box to confirm the operation Figure 2 14 Installation Type Step 10 Set region and click Continue Figure 2 15 Select Region Step 11...

Страница 17: ...p 12 Enter user information to create a user Figure 2 17 Create User Step 13 Click Continue to start installing operation system Figure 2 18 Installation Step 14 After installation finished click Rest...

Страница 18: ...DS Pro Series Workstation User Manual 17 Installation Complete...

Страница 19: ...ly UPS be used in conjunction with the device Step 2 Turn on the power switch in rear panel Step 3 After the device starts up enter device user name and password to log in Default user name password a...

Страница 20: ...sed in conjunction with the device Step 2 Turn on the power switch in rear panel Step 3 After the device starts up enter device user name and password to log in Default user name password user user We...

Страница 21: ...talling a hard disk drive HDD A factory recommended HDD should be used for this installation Tools Required Screwdriver Step 1 For 3 5 inch HDD fix mounting ears to HDD with screws Figure 4 1 Fix Moun...

Страница 22: ...Manual 21 Figure 4 3 Open Front Panel Step 3 Insert the HDD until it is fixed firmly Figure 4 4 Insert HDD Step 4 Optional Repeat the steps above to install other HDDs Step 5 Close the front panel and...

Страница 23: ...22 UD09392N...

Отзывы: