background image

Rail Network Video Recorder Quick Start Guide 

17 

4.


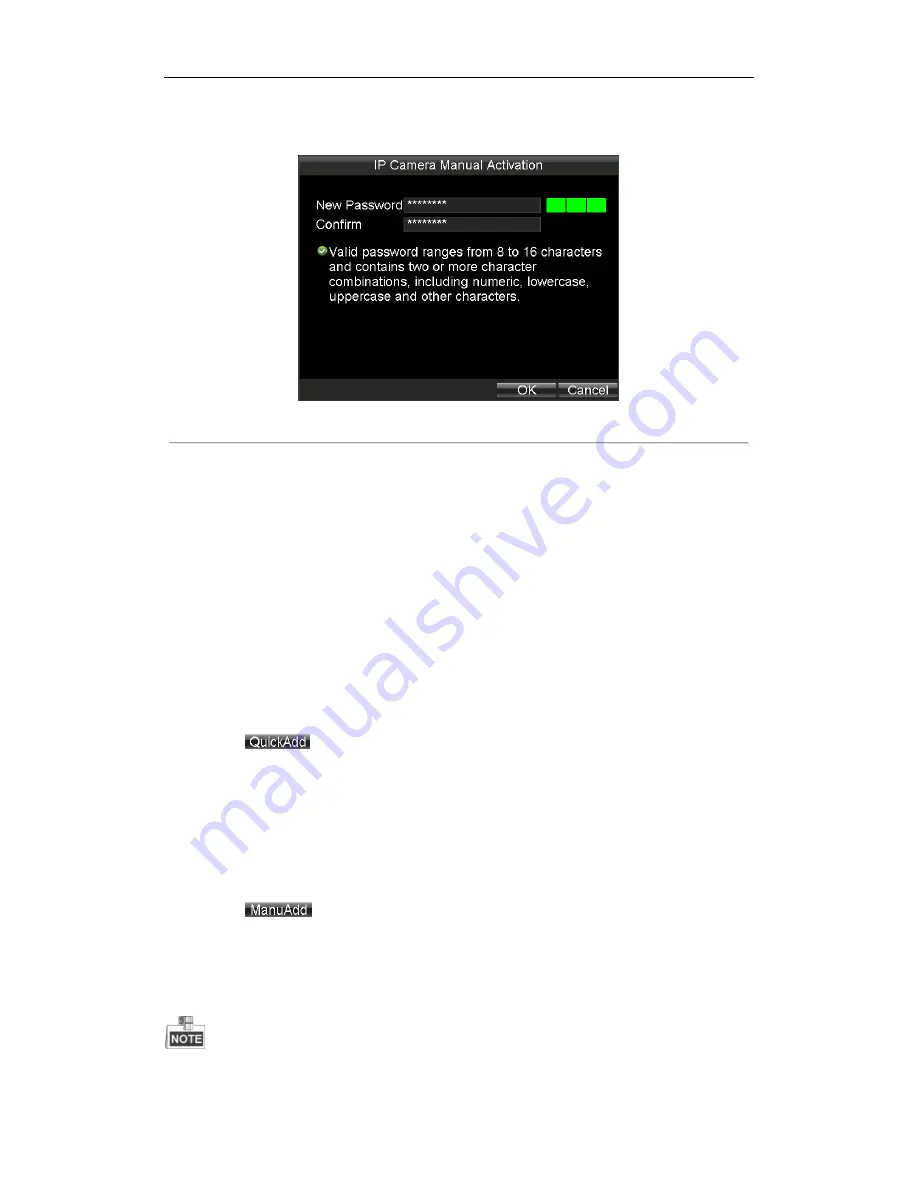
Create a password by inputting the same password in both 

New Password

 and 

Confirm

5.


Click 

OK 

to save the password and activate the password. 


Figure 3. 16


Manual Activation 


3.6.2


Adding IP Camera 

Purpose: 

The online IP cameras in the same network segment with the system would be displayed on a list. 

Quick Adding 

Purpose: 

Quick  adding  is  designed  for  the  IP  cameras  with  the  same  password  with  your  Rail  NVR  and  is  in  the  same 

network segment with your Rail NVR.   

Steps: 

1.


Enter IPC Settings interface. 

2.


Click to select the IPC you want to add. 

3.


Click the 

  button to add it. 

Manual Adding 

Purpose: 

You can manually add the IP cameras that are not in the same network segment with your Rail NVR. 

Steps: 

1.


Enter IPC Settings interface. 

2.


Click the 

  button to enter Add IP Camera Manually interface. 

3.


Select the 

Channel No.

 for the IP camera. 

4.


Input the required information, including the 

IP Address

Protocol

Port No.

User Name

, and 

Password

5.


Click the 

Protocol

 button, and you can customize the protocol according to the actual needs. 

6.


Click 

OK 

to add the IPC. 


Up to 16 IP cameras can be added to the system. 

Содержание DS-MP3516-RS

Страница 1: ...Rail Network Video Recorder Quick Start Guide UD 6L0204B1163A01...

Страница 2: ...logos mentioned below are the properties of their respective owners Legal Disclaimer TO THE MAXIMUM EXTENT PERMITTED BY APPLICABLE LAW THE PRODUCT DESCRIBED WITH ITS HARDWARE SOFTWARE AND FIRMWARE IS...

Страница 3: ...ated with a minimum distance 20 cm between the radiator and your body FCC conditions This device complies with part 15 of the FCC Rules Operation is subject to the following two conditions 1 This devi...

Страница 4: ...onnement Under Industry Canada regulations this radio transmitter may only operate using an antenna of a type and maximum or lesser gain approved for the transmitter by Industry Canada To reduce poten...

Страница 5: ...ation Do not connect several devices to one power adapter as adapter overload may cause over heating or a fire hazard Please make sure that the plug is firmly connected to the power socket If smoke od...

Страница 6: ...Refers to pressing the mouse s left button for once Right Click Refers to pressing the mouse s right button for once Double Click Refers to quickly pressing the mouse s left button for twice Main Menu...

Страница 7: ...3 1 Wiring 9 3 2 HDD Installation 10 3 3 Start up 13 3 4 Activating Your Device 14 3 5 Network Management 15 3 6 IP Camera Management 15 3 6 1 Activating IP Camera 16 Quick Activation 16 Manual Activ...

Страница 8: ...lities including audio and video decoding 3G Wi Fi wireless network transmission satellite positioning service secure data storage and hard drive vibration damping It can cooperate with other devices...

Страница 9: ...en GNSS module is abnormal Turns green when the GNSS module works normally Blinks in green after the positioning successful ANT 3G indicator Turns green when 3G module works normally Blinks slowly in...

Страница 10: ...with power supply which should be 110 VDC Network connection LAN 2 is connected to a network switcher IP Camera Make sure network communication between IP cameras to be added and your Rail NVR is well...

Страница 11: ...2 5 inch HDD You can ask technical support for information of factory recommended For single HDD installation the thickness of the HDD should be 9 5mm or 7mm for double HDD installation the thickness...

Страница 12: ...eparate the HDD box in to parts Figure 3 5 HDD Box Parts 6 Place the first HDD into the HDD box and tightly insert the first HDD into the bottom with the PCB facing downward Figure 3 6 Install the Fir...

Страница 13: ...the figure to fix the HDD Do the same things to fix the other HDD at the back side Figure 3 8 Fix HDDs 9 Tighten the 4 set screws on the side of the HDD box shown as the following figure Figure 3 9 Fi...

Страница 14: ...e two set screws of the hard disk box as shown in the figure Figure 3 11 Tighten Screws 12 Insert the HDD box back to the Rail NVR and then tighten the screws clockwise Figure 3 12 Insert HDD Disk Bac...

Страница 15: ...rting Figure 3 13 Startup Picture 3 4 Activating Your Device Purpose For the first time access you need to activate the device by setting an admin password No operation is allowed before activation St...

Страница 16: ...s well you need to configure network parameters of LAN 2 Before you start Connect the LAN 2 to a network switch with a network cable Port 1 and Port 2 respectively represent LAN 1 and LAN 2 LAN 1 is f...

Страница 17: ...added are active status Or you need to follow the steps to activate it Two methods are provided to activate IP camera including quick activation and manual activation Before you start Ensure network...

Страница 18: ...ame network segment with your Rail NVR Steps 1 Enter IPC Settings interface 2 Click to select the IPC you want to add 3 Click the button to add it Manual Adding Purpose You can manually add the IP cam...

Страница 19: ...fore it can be used with your Rail NVR Steps 1 Enter the HDD Management interface Main Menu HDD Figure 3 17 HDD Management 2 Select the Hard Disk you want to format from the drop down list 3 Click the...

Страница 20: ...hedule 5 Click Apply to save the settings and click OK to exit 3 9 Playback Purpose You can specify a period and then start playing back all the video segments in the period continually Steps 1 Enter...

Страница 21: ...n Steps 1 Insert the key into the Lock slot in front panel 2 To shut down device rotate it from to 3 11 Reboot Steps 1 Enter Maintenance interface Main Menu Maintenance 2 Click Reboot and click Yes in...

Страница 22: ...Rail Network Video Recorder Quick Start Guide 21...

Отзывы: