HIKVISION DS-KB8112-IM Скачать руководство пользователя страница 25

Video Intercom Vandal-Resistant Door Station

·

Quick Start Guide


15 


5.2


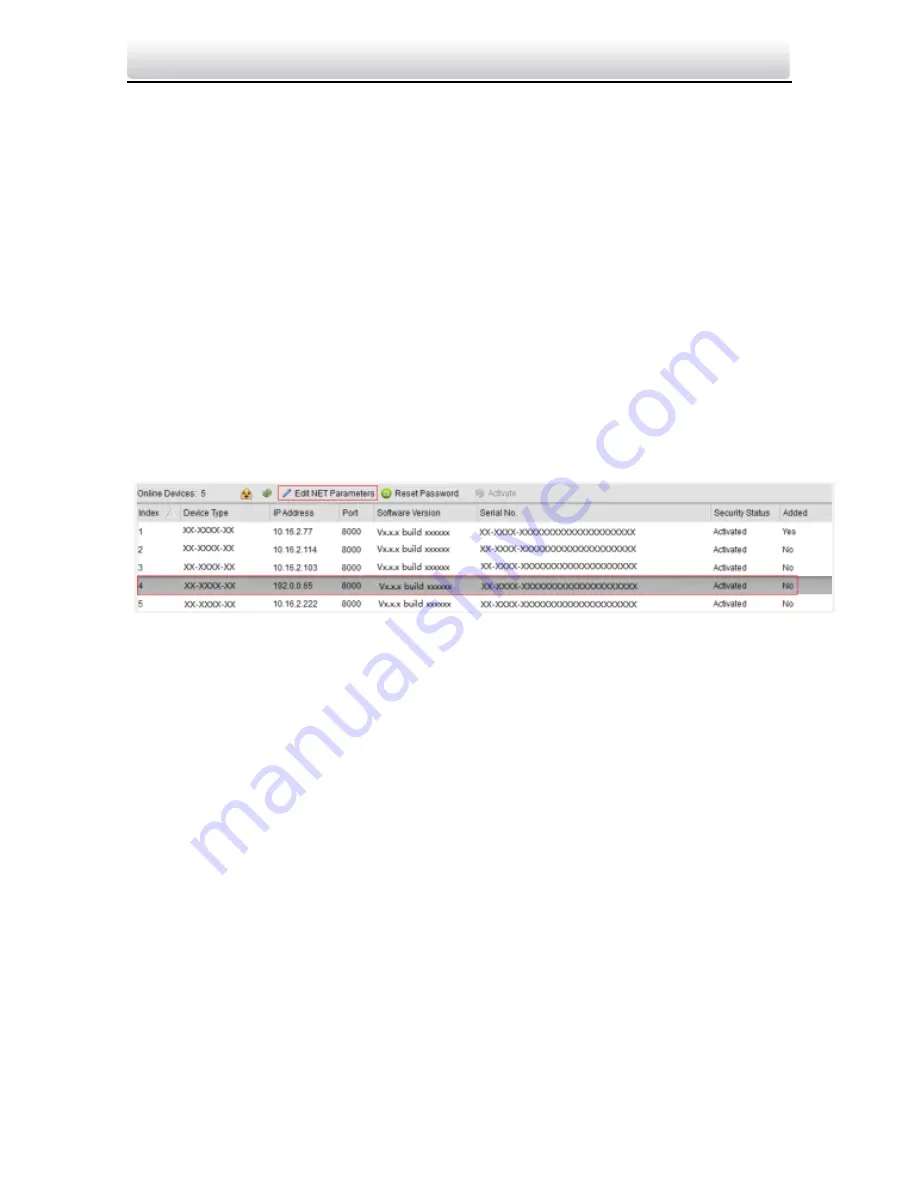
Editing Network Parameters 

Purpose: 

To operate and configure the device via LAN (Local Area Network), 

you need connect the device in the same subnet with you PC. You can 

edit network parameters via batch configuration tool, iVMS-4200 

software, and web browser. Here take editing network parameters via 

batch configuration tool as example.   

Steps: 

1.


Select an online activated device and click 

Edit NET Parameters

.   


Figure 5-4


Click Edit NET Parameters Button 

2.


Change the device IP address and gateway address to the same 

subnet with your PC. Or enable 

DHCP

 to get the IP address 

automatically. 

3.


Input the password and click 

OK

 to activate the network 

parameters modification.   

Содержание DS-KB8112-IM

Страница 1: ...Video Intercom Vandal Resistant Door Station Quick Start Guide UD03855B B...

Страница 2: ...al Technology Co Ltd Hikvision reserves all rights to this manual This manual cannot be reproduced changed translated or distributed partially or wholly by any means without the prior written permissi...

Страница 3: ...LAW IN NO EVENT WILL HIKVISION ITS DIRECTORS OFFICERS EMPLOYEES OR AGENTS BE LIABLE TO YOU FOR ANY SPECIAL CONSEQUENTIAL INCIDENTAL OR INDIRECT DAMAGES INCLUDING AMONG OTHERS DAMAGES FOR LOSS OF BUSIN...

Страница 4: ...ed and used in accordance with the instructions may cause harmful interference to radio communications However there is no guarantee that interference will not occur in a particular installation If th...

Страница 5: ...of as unsorted municipal waste in the European Union For proper recycling return this product to your local supplier upon the purchase of equivalent new equipment or dispose of it at designated colle...

Страница 6: ...Video Intercom Vandal Resistant Door Station Quick Start Guide vi This device meets the CAN ICES 3 B NMB 3 B standards requirements...

Страница 7: ...ry or equipment damage Warnings All the electronic operation should be strictly compliance with the electrical safety regulations fire prevention regulations and other related regulations in your loca...

Страница 8: ...not assume any responsibility for problems caused by unauthorized repair or maintenance Cautions Do not drop the device or subject it to physical shock and do not expose it to high electromagnetism ra...

Страница 9: ...f the device cover Please use a soft and dry cloth when clean inside and outside surfaces of the device cover do not use alkaline detergents Please keep all wrappers after unpack them for future use I...

Страница 10: ...Exit Button Wiring 6 3 2 4 Alarm Device Input Wiring 7 4 Installation 8 4 1 1 Wall Mounting Plate 8 4 1 2 Wall Mounting 9 5 Remote Operation 12 5 1 Activating Device 12 5 1 1 Activation via Web Brows...

Страница 11: ...s an intelligent device the vandal proof door station is mainly applied in the villa for improving the living security 1 2 Features Basic Functions Video intercom function supporting the communication...

Страница 12: ...ion via NTP and batch configuration function Supports Web remote access and OSD display Supports motion detection Additional Features ISAPI Internet Server Application Programming Interface and ONVIF...

Страница 13: ...Door Station Quick Start Guide 3 2 Appearance 1 2 3 5 4 Figure 2 1 Door Station Overview Table 2 1 Components Description No Description 1 Microphone 2 Built in Camera 3 Low Illumination Supplement Li...

Страница 14: ...Terminals and Interfaces Table 3 1 Descriptions of Terminals and Interfaces Name No Interface Description Power Supply 1 12 VDC 12 VDC Power Supply Input LAN 2 LAN Network Interface PoE Supported ALA...

Страница 15: ...ription 3 2 1 Door Lock Wiring Terminal NC COM is set as default for connecting magnetic lock electric bolt terminal NO COM is set as default for connecting electric strike To connect electric lock it...

Страница 16: ...e output of terminal AI to be door status via Batch Configuration Tool or iVMS 4200 client software or the web browser Figure 3 3 Door Magnetic Wiring 3 2 3 Exit Button Wiring To connect exit button i...

Страница 17: ...n Wiring 3 2 4 Alarm Device Input Wiring When you set the output of terminal AI to be custom via Batch Configuration Tool or iVMS 4200 client software or the web browser you can connect any alarm inpu...

Страница 18: ...upply Please make sure your power supply matches your door station Make sure all the related equipment is power off during the installation Make sure the wall is strong enough to withstand 4 times the...

Страница 19: ...e wall with 4 expansion screws Expansion Screws Wall Mounting Plate Figure 4 2 Install the Plate 2 Insert terminal blocks into the interfaces of the door station body and connect the network cable Int...

Страница 20: ...to the protective shield tightly Protective Shield Door Station Main Body Figure 4 4 Fix the Body to the Shield 4 Hook the door station to the wall mounting plate tightly Hooks Figure 4 5 Hook the Doo...

Страница 21: ...Video Intercom Vandal Resistant Door Station Quick Start Guide 11 Set Screw Rubber Plug Figure 4 6 Secure the Door Station...

Страница 22: ...tion via iVMS 4200 client software are supported Here take activation via Batch Configuration Tool and Activation via Web Browser as example to introduce the device activation Please refer to the user...

Страница 23: ...mbers and special characters in order to increase the security of your product And we recommend you to reset your password regularly especially in the high security system resetting the password month...

Страница 24: ...er case letters numbers and special characters in order to increase the security of your product And we recommend you to reset your password regularly especially in the high security system resetting...

Страница 25: ...ch configuration tool iVMS 4200 software and web browser Here take editing network parameters via batch configuration tool as example Steps 1 Select an online activated device and click Edit NET Param...

Страница 26: ...figure the activated device via batch configuration tool and iVMS 4200 client software remotely you should add the device to the tool or the software first 3 ways for adding the device are supported a...

Страница 27: ...1 Select an active online device or hold the Ctrl or Shift key to select multiple devices in the online devices list Figure 5 6 Online Devices Interface 2 Click the button to pop up the login dialog...

Страница 28: ...Steps 1 Click the button to pop up the adding devices dialog box Figure 5 8 Adding Button 2 Select IP Address in the adding mode drop down list 3 Input the IP address and set the port No user name and...

Страница 29: ...quirement Operating System Microsoft Windows XP SP1 and above version CPU 2 0 GHz or higher RAM 1G or higher Display 1024 768 resolution or higher Web Browser Internet Explorer 8 0 to 11 Steps 1 Open...

Страница 30: ...pts to install the plug in Figure 5 11 Downloading Plug in 6 Reopen the web browser after the installation of the plug in and repeat steps 2 to 4 to login The default IP address of the device is 192 0...

Страница 31: ...tation or the center the master station via the door station by pressing or holding the call button Default settings of the call button when you press the call button it calls the resident and when yo...

Страница 32: ...d on the connected indoor station When live view of door station is displayed on other devices or door station is calling resident the door station will detect the brightness of video When the brightn...

Страница 33: ...ng and echo The distance between two devices is recommended to be longer than 10 meters Devices mentioned here refer to indoor station outdoor station and master station Wiring Cables Cable Specificat...

Страница 34: ...Video Intercom Vandal Resistant Door Station Quick Start Guide 24...

Отзывы: