background image

32 


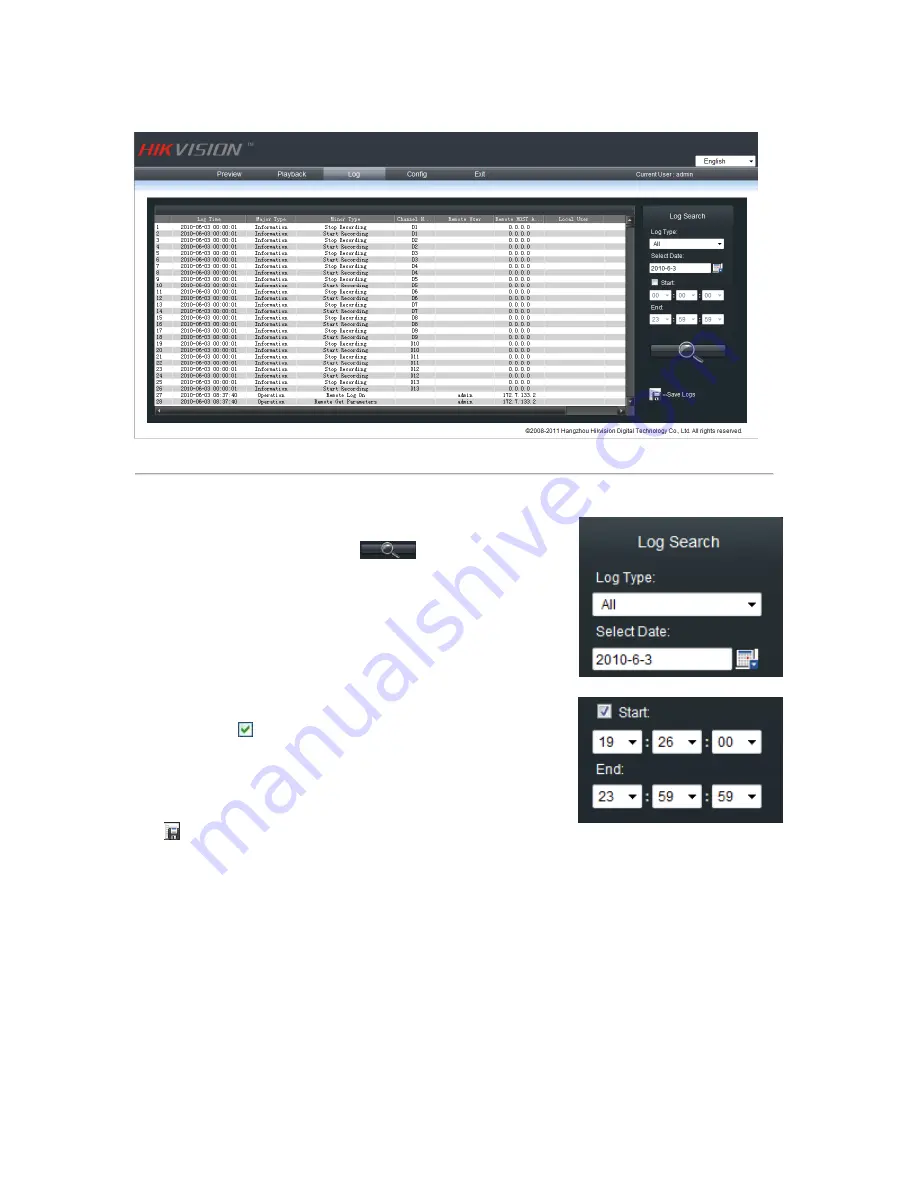
Click “Log” to enter log query menu: 


Figure 8.1


Click

  can export the logs as Excel or TXT file. 


Note:


Up to


2000 logs can be listed; if the items are more than 2000, please choose a certain period and search again. 


Select the log type and date, and click

  to list all 

matched logs. 

Enable “Start” as 

  to search the log file in a certain period 

of a day. 

Содержание DS-9500NI-S series

Страница 1: ...DS 9500NI S Series NVR USER S MANUAL Version 1 2 0 ...

Страница 2: ... WARRANTIES OF MERCHANTABILITY AND FITNESS FOR A PARTICULAR PURPOSE REGARDING THE HIKVISION SOFTWARE HIKVISION DOES NOT WARRANT GUARANTEE OR MAKE ANY REPRESENTATIONS REGARDING THE USE OR THE RESULTS OF THE USE OF THE HIKVISION SOFTWARE IN TERMS OF ITS CORRECTNESS ACCURACY RELIABILITY CURRENTNESS OR OTHERWISE THE ENTIRE RISK AS TO THE RESULTS AND PERFORMANCE OF THE HIKVISION SOFTWARE IS ASSUMED BY ...

Страница 3: ...o a rack or shelf Major shocks or jolts to the unit as a result of dropping it may cause damage to the sensitive electronics within the unit Use the NVR in conjunction with an UPS if possible Power down the unit before connecting and disconnecting accessories and peripherals A factory recommended HDD should be used for this device Improper use or replacement of the battery may result in hazard of ...

Страница 4: ...ecording 22 5 2 2 Capturing Image 23 5 3 Video Parameters Setting 23 C H A P T E R 6 24 PTZ Control 24 C H A P T E R 7 26 Playback 26 7 1 Playback Query 27 7 2 Play Recording File 28 7 3 Capturing Image and Download 29 7 4 Remote Backup 30 C H A P T E R 8 31 Log Search 31 C H A P T E R 9 33 Configuration 33 9 1 Local Configuration 34 9 2 IP Camera Configuration 34 9 2 1 Quick Add of IP camera 35 9...

Страница 5: ... 6 E Mail Settings 52 9 6 Channel Configuration 53 9 6 1 Channel Display Settings 53 9 6 2 Video Mask 53 9 7 Account Management 54 9 8 Remote Upgrade 55 9 9 HDD Settings 56 C H A P T E R 10 58 Appendix 58 Glossary 59 FAQ 60 List of Compatible IP Cameras 61 List of Hikvision IP Cameras Supported by DS 9500NI S NVR 61 List of Third party IP Cameras Supported by DS 9500NI S NVR 62 ...

Страница 6: ...5 C H A P T E R 1 Introduction ...

Страница 7: ...on is functioning properly HDD HDD indicator blinks red when data is being read from or written to HDD Ready Ready indicator turns blue when NVR is functioning properly Backup Backup indicator blinks blue when data is being backup 2 Power Button Powers NVR on off 3 USB Ports Universal Serial Bus USB ports for additional devices such as USB mouse and USB Hard Disk Drive HDD 4 Channel Status Indicat...

Страница 8: ...ng properly HDD HDD indicator blinks red when data is being read from or written to HDD Ready Ready indicator turns blue when NVR is functioning properly Backup Backup indicator blinks blue when data is being backup 2 USB Ports Universal Serial Bus USB ports for additional devices such as USB mouse and USB Hard Disk Drive HDD 3 Power Button Powers NVR on off 4 Backup Button Backup video files 5 Ch...

Страница 9: ...es 3 USB Ports Universal Serial Bus USB ports for additional devices such as USB mouse and USB Hard Disk Drive HDD 4 Power Button Powers NVR on off 5 Channel Status Indicators Blue indicates recording red indicates network connection purple indicates recording network connection 1 2 Starting and Shutting Down Your NVR Power On If the power LED indicator on the front panel is off please plug the po...

Страница 10: ...Methods of Shutdown Shutdown with Power Switch Please try to avoid shutting down the unit by turn off the power switch on the back panel especially during recording Shutdown by Unplug Power Supply Please try to avoid shutting down the unit by unplug power supply especially during recording Note It is highly recommended that an Uninterruptible Power Supply UPS be used in conjunction with the unit ...

Страница 11: ...10 C H A P T E R 2 Network Parameters Configuration ...

Страница 12: ... with serial command Please connect the RS 232 port of NVR with the COM port of PC directly power on the NVR and PC and follow the steps Step 1 Enter Hyper Terminal Click Start Programs Accessories Communications Hyper Terminal in Windows system and the dialogue box below will appears as Figure 2 1 1 Figure 2 1 1 Step 2 Name the connection and define the icon Input a name e g HK select an icon and...

Страница 13: ... dialogue box as follow Fig 2 1 3 Figure 2 1 3 The parameters should be Bits per second 115200 Data bits 8 Parity None Stop bits 1 Flow control None Press Apply and OK after the setup Press Enter under Hyper Terminal interface When root dvrdvs appears the connection is established ...

Страница 14: ...luded You can see an icon named as HK here 2 2 Network Configuration by Hyper Terminal Enter Hyper Terminal Click Start Programs Accessories Communications Hyper Terminal HK then the Hyper Terminal interface will appear as figure below Type Enter and the prompt root dvrdvs will appear which means connection between RS232 interface of PC and RS232 interface of NVR is established successfully by Hyp...

Страница 15: ...Ip Setup NVR IP address Command format setIp IP mask e g setIp 192 168 1 11 255 255 255 0 getPort Show the current port of NVR Command format getPort Enter setPort Setup NVR port Command format setPort Port e g setPort 9000 getGateway Show current NVR gateway address Command format getGateway Enter setGateway Setup NVR gateway Command format setGateway Gateway e g setGateway 192 168 1 1 ...

Страница 16: ...15 C H A P T E R 3 ActiveX Control Installation ...

Страница 17: ...Enter The system will remind you to install the ActiveX control After the installation you can configure and manage the NVR remotely The ActiveX control has English and Chinese to selections It can be used under 1024 768 1152 864 1280 1024 display resolutions Note Please use IE 6 0 or IE 7 0 as browser and upgrade OS to the latest version ...

Страница 18: ...17 C H A P T E R 4 User Login and Exit ...

Страница 19: ...he IE browser Figure 4 1 On the top right corner language is selectable between Chinese and English Input the correct user name password and port click Login to enter preview interface or it will pop up an error box The default user name is admin password is 12345 and port is 8000 After login click Exit to log off and return to the login interface ...

Страница 20: ...19 C H A P T E R 5 Preview ...

Страница 21: ...ision 4 windows division 9 windows division 16 windows division Stop all preview Capture image Start all recording Stop all recording Previous page Next page Open Close audio 5 1 Preview 5 1 1 Windows Division When live preview the windows division can be selected by click the button on play control area It can support 1 4 9 and 16 windows division The change between different windows division mod...

Страница 22: ...ing to the selected window divisions Click to switch to the next page click to the previous page Or just click and to start preview by page Double click to maximize Click the selected window can maximize the window to full screen double click again to resume Full screen display Click to change the multi channel preview to full screen click to resume When previewing select the channel and click to ...

Страница 23: ...view Click Config enter local configuration menu where can change the directory of saving recording file and the size of file packing Click button on playlist to start recording of this channel if the icon is not it will note Recording failed Click icon again to stop recording and the saving file folder will pop up automatically When multiple channels are under previewing user may click to start a...

Страница 24: ...k Config to enter local configuration menu where can modify the saving capturing image directory Select a previewing window click to capture image If capture image successfully the saving folder will pop up automatically Select the previewing channel and adjust the brightness contrast saturation and Hue for it Click to increase and click to decrease Click or can also adjust the value Click icon to...

Страница 25: ...24 C H A P T E R 6 PTZ Control ...

Страница 26: ...n preview With the direction buttons it can achieve 8 directions control Also zoom focus iris light and wiper are adjustable Click to enable auto scan click again to stop it If preset point is set the point can be called by selecting in the draw down list and clicking ...

Страница 27: ...26 C H A P T E R 7 Playback ...

Страница 28: ...l list Playback video Playback control Playback status Calendar Download Backup Timeline Playback control buttons description Button Description Button Description Play Stop Slow down Speed up Play by single frame Snapshot Video clip Open Close audio 7 1 Playback Query Step 1 Select a channel on the channel list Channel 1 is the default ...

Страница 29: ...hown in the time line area Drag the timeline to select the specific time Different file types will be indicated with different colors 7 2 Play Recording File Step 2 Select a date in calendar After searching file click to play When playback the playback status will indicate the channel number time and status ...

Страница 30: ...time in the pop up box and click Go This will start the file playback from the specified time Drag timeline and set to the specified time to play back the video When playback click to pop up saving file window After the selection the status will become click again to stop saving Click Config to enter local configuration menu where can change saving directory of captured image and recorded file ...

Страница 31: ...arching file click to pop up a new page where list all the files for the specific day Select one file and click to start download click again to stop download During download the window will display the file number and download progress After searching files click to pop up a new page where list all the files for the specific day Select the backup device enable backup player or not select the file...

Страница 32: ...31 C H A P T E R 8 Log Search ...

Страница 33: ...ogs as Excel or TXT file Note Up to 2000 logs can be listed if the items are more than 2000 please choose a certain period and search again Select the log type and date and click to list all matched logs Enable Start as to search the log file in a certain period of a day ...

Страница 34: ...33 C H A P T E R 9 Configuration ...

Страница 35: ...ream for recording Substream for viewing live images Network Transmission Feature Set real time and fluency of network feature Path for saving recording files Select a folder to save the recordings Path for saving preview captured images Select a folder to save the pictures captured while preview Path for saving playback captured images Select a folder to save the pictures captured while playback ...

Страница 36: ...channels to DS 9508NI S model and 4 channels to DS 9516NI S model 9 2 1 Quick Add of IP camera DS 9500NI S series NVR provides a function of remote auto searching IP camera When there are supported IP cameras in the same network segment of a LAN with NVR you may add it in one button with default user name password and port number Note Before applying Quick Add function please make sure that IP cam...

Страница 37: ...ed IP cameras in the same network segment of a LAN with NVR you may add it in one button with default user name password and port number Note Before applying Single Add function please make sure that IP camera is compatible with NVR and default user name password port number are not changed First select a Channel No then click and the on line IP cameras will be listed as figure below shown ...

Страница 38: ...anually Add IP camera First select a Channel No to enable IP camera Config menu shown on the right Input the IP address port user name and password click Modify to finish adding an IP camera that will be listed in the IP Camera Information area Clicking Reset button will restore the configurations of IPC back to the previous ones Clicking button will delete the selected IP camera ...

Страница 39: ...38 9 3 Recording Settings Click Remote Config and select to enter remote settings menu where you can configure recording alarm network settings and etc Figure 9 5 ...

Страница 40: ...ent and Sub stream Stream Type Video and Video Audio Resolution Recording Resolution Bit rate Type Variable and Constant Frame Type BBP BP and Single P 9 3 2 Schedule Recording Step1 Enable Schedule Recording Note When NVR is succeed to connect to IP camera it will start schedule recording which means recording for 7 24 ...

Страница 41: ...ect All Day recording if necessary You may also set period recording by disable All Day Recording there are 8 time periods in one day Then you can select schedule recording from the drop down menu beside the periods Then you may also select copy the settings to whole week or to one day Note Please make sure that each time period is not overlapped ...

Страница 42: ...sing its own software Step1 Select Channel No for motion detection recording Step2 Enable motion detection by tick the box Step3 Then you can click settings buttons to set area arm schedule and linkage In the Advanced Record Settings you may configure parameters of Pre Record time Post Record time Recordings Duration Redundant Recording and whether to record audio ...

Страница 43: ...may also set period recording by disable All Day Recording there are 8 time periods in one day Then you can select Motion Detection from the drop down menu beside the periods Then you may also select copy the settings to whole week or to one day Note 1 Please make sure that each time period is not overlapped 2 The valid time of motion detection recording is the intersection of arm schedule and rec...

Страница 44: ...nel Step2 Select the type of alarm input NO or NC Note NO is the default status The settings will become effective after rebooting If you are using IP camera that is not from Hikvision please setup this function by using its own software Step3 Enable Alarm Handle to activate Arm Schedule Linkage Method ...

Страница 45: ...ls you want Step6 Enter schedule recording interface Click to enable Recording Step4 Set the fortify time for alarm input Click Settings in Fortify Time menu Select Weekday as some day of the week or the whole week for recording time The All Day Record or 8 Segments can be selected as well Note The time of each segment can not be overlapped ...

Страница 46: ...on 9 3 3 Motion Detection Recording Step2 The same with the Step 2 of Section 9 3 3 Motion Detection Recording Step3 The same with the Step 3 of Section 9 3 3 Motion Detection Recording Step4 The same with the Step 4 of Section 9 3 3 Motion Detection Recording Step7 Select one day in a week and select All Day recording if necessary You may also set period recording by disable All Day Recording the...

Страница 47: ... mailbox Trigger Alarm Output Trigger alarm output of the device if the device is 9000 series triggering alarm output of IP channel can be selected as well 9 4 2 Signal Level Alarm Step1 The same with the Step1 of Section 9 3 4 Alarm Recording Step2 The same with the Step2 of Section 9 3 4 Alarm Recording Step3 The same with the Step3 of Section 9 3 4 Alarm Recording Step4 The same with the Step4 ...

Страница 48: ... of preset sequence and pattern Step1 Select the channel number for video loss Select Step2 Enable Video Loss to activate settings of Fortify Time and Linkage Step3 Set the fortify time for video loss Click Settings in Fortify Time menu Select Weekday as some day of the week or the whole week for the fortify time The All Day Record or 8 Segments can be selected as well Note The time of each segmen...

Страница 49: ...able on IP cameras from Hikvision Step4 Set linkage for video loss Click Settings in the Linkage menu Step1 Select the channel number for video tampering Select Step2 Enable Video Tampering Alarm to activate settings of Area Settings Arm Schedule and Linkage ...

Страница 50: ...p4 Set the fortify time for video tampering Click Settings in Arm Schedule menu Select Weekday as some day of the week or the whole week for the arm schedule The All Day Record or 8 Periods can be selected as well Note The time of each segment can not be overlapped Step5 Set linkage for video tampering Click Settings in the Linkage menu Step3 Set the video tampering area and sensitivity The sensit...

Страница 51: ... the exception type and handle method Select to enter configuration interface Select Configure the network according to the actual situation If there is DHCP server in the network enable Obtain Auto and reboot the device to get the IP address under this network segment automatically Select Advance to enter advanced configuration You can configure preferred DNS server1 and spare DNS server2 IP addr...

Страница 52: ...t IP address will be displayed in the blank DDNS IP Click Enable DDNS If the IP Server IP is selected as protocol then input the address where the IP server is running If the Dyndns is selected as protocol Server Name Input the IP address of the server such as members dyndns org Domain the domain name that user applied for the device such as test dynlia com User name password and verify the accoun...

Страница 53: ...d to private network the IP address of NTP server built by NTP software can be input the blank Server Address Select If server authentication is needed enable it i e and input user name and password Input the sender and recipient information if it needs to send picture you can enable Attachment i e Note Currently the function of captured picture attachment is invalid for DS 9500 NI S Select Input ...

Страница 54: ... function is only available on IP cameras from Hikvision 9 6 2 Video Mask Note This function is only available on IP cameras from Hikvision Select You can configure channel name OSD and related parameters here Step1 Select channel number and enable video mask i e Select ...

Страница 55: ...to two levels user and operator For Remote Configuration privilege operator has Voice Talk right user does not for Channel Configuration privilege operator has all the rights user has local playback remote playback rights Step2 Set the mask area Click Settings to enter area set menu Enable Start Draw i e select the mask area by clicking and dragging the mouse Note Max 4 areas can be configured in ...

Страница 56: ...store parameters to factory defaults and import settings to as well as export settings from NVR Remote Log Search Remotely view logs that are saved on the NVR Remote Advanced Operation Remotely manage hard disk drives initializing and setting properties for HDDs Ability to remote update system firmware and stop of the relay output Voice Talking Ability to use two way radio between the remote clien...

Страница 57: ...DD Property Settings Select one disk and configure its property by selecting Read Write Read Only or redundant from drop down menu shown as figure right Note Read Write Writing in or Read from this disk is allowed when selecting this option Write Only Unable to write in this disk to protect existed recordings from being overwritten when selecting this option Redundant Redundant recording in this d...

Страница 58: ...k HDD Group attribute button to enter setup page First select a HDD group and then tick channels you want to record in this HDD group and then click OK to finish Note Recording the images of one channel in one HDD group is recommended ...

Страница 59: ...58 C H A P T E R 10 Appendix ...

Страница 60: ...network service that provides the capability for a networked device such as a router or computer system using the Internet Protocol Suite to notify a domain name server to change in real time ad hoc the active DNS configuration of its configured hostnames addresses or other information stored in DNS MTU Maximum Transmission Unit Unit is represented by bytes MTU of most network devices is 1500 If i...

Страница 61: ...the motion detection If there are no recorded video after setting the motion detection please check 1 Check that the recording schedule is setup correctly by following the steps listed in Schedule Recording 2 Check that the motion detection area is configured correctly See Motion Detection 3 Make sure that channels are being triggered for motion detection See Motion Detection Why doesn t the NVR d...

Страница 62: ...IF QCIF G722 HIK H 264 HIK RTSP PS V2 0 build 090316 G711 Standard H 264 Standard RTSP RTP V2 0 build 090608 Standard MPEG4 Standard RTSP RTP V2 0 build 090629 DS 2CD862 MF E Support XVGA 72 0P VGA 720P VGA CIF CIF G722 HIK H 264 HIK RTSP PS V2 0 build 090316 G711 Standard H 264 Standard RTSP RTP V2 0 build 090608 Standard MPEG4 Standard RTSP RTP V2 0 build 090629 365 Platfo rm SD IP Camera DS 2CD...

Страница 63: ...2 kbps CBR support 64 128 256 512 1024 1536 2048 3072 self defined 32 8192 kbps Allow NVR to receive motion detection alarm information but not to set motion detection zone AlarmIn 1 alarm input AlarmOut 1 alarm output Q1755 5 02 H 264 suppor t MJEPG not support G711U Law sup port G726 support A AC not support 1920x1080 1280x720 800x450 4 80x270 320x180 frame rate 25 20 15 10 8 6 5 4 3 2 1 VBR sup...

Страница 64: ...1M 1 5M 2M 3M 4M 5M kbps Allow NVR to receive motion detection alarm information but not to set motion detection zone Alarm IN 2 alarm inputs Alarm Out not support SD 615 M V 1 1020 MPEG4 supp ort RTSP MJEPG not support H 264 not support G711 support D1 CIF QCIF 640 480 1280 1024 frame rate 5 10 15 25 Note the resolution actually supported is 640 480 1280 1024 VBR support 64 128 256 384 512 768 1M...

Страница 65: ...port RTSP MJEPG not support G711U Law support D1 2CIF CIF QCIF 640 480 12 80 720 1280 960 frame rate 1 2 4 6 8 10 12 15 20 30N 25P Note the resolution actually supported is 640 480 1280 720 1280 960 CBR support 256 512 1M 2M 3M 4M 5M 6M 7M 8M kbps Allow NVR to receive motion detection alarm information but not to set motion detection zone Alarm IN 2 alarm inputs Alarm Out not support Normal IP Cam...

Отзывы: