HIKVISION DS-73HUHI-F4/N Series Скачать руководство пользователя страница 9


  9


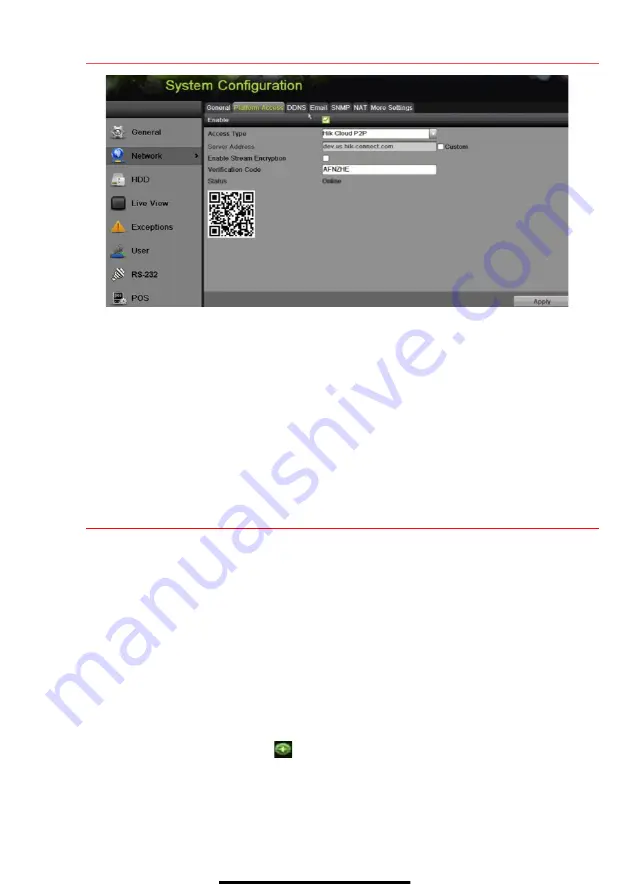
S E T   U P   H I K - C O N N E C T   P 2 P   C L O U D   S E R V I C E

  ( c o n t i n u e d )


2.


To see a device’s video stream on the Hik-Connect or iVMS-4500 mobile app, add the device. 

1)  Login to Hik-Connect mobile app with your user name, e-mail, or mobile number and password. 

2)  On the Home screen, click the “

+

” button (upper right corner). 

3)  Enter the device’s information. 

  If you have the device’s 

QR Code

: Use the QR Code Scanner to scan the device’s 

QR Code

  If you do not have the device’s 

QR Code

: Enter the device information manually: 

a.


Click the Edit (pencil) icon on top right corner. 

b.


Enter device serial number (device must be online), then click the 

OK

 button. 

c.


When the device appears on the “Results” screen, click the 

Add

 button. 

d.


Enter device’s 6-character Verification Code (all upper case), then click the 

OK

 button. 

e.


Click the 

Finish

 button.   


10 

A D D I N G   C A M E R A S  


Adding Analog Cameras 

Analog cameras are enabled by default; no further action is required. 


Disabling Analog Cameras To Increase Number of IP Cameras 

Disabling an analog camera allows substitution of a network (IP) camera in its place, up to 10 IP 

cameras maximum for DS-7308HUHI-F4/N and up to 18 IP cameras maximum for 

DS-7316HUHI-F4/N. 

1.


Go to MENU > CAMERAS > ANALOG (TAB). 

2.


Analog Camera List will display all enabled cameras. 

3.


Disable analog cameras in the Analog Cameras Enable Status section: 

-


Uncheck the 

camera

 checkbox of any camera(s) you wish to disable. 

-


Check the 

Analog 

checkbox to disable/enable all analog cameras. 

4.


Press APPLY to save settings. 


Adding IP Cameras 

1.


Right click a window in 

Live View

 mode to display the menu. 

2.


Online cameras in the same network segment will be detected and displayed in the camera list. 

3.


Select camera and click the        button to add it (using DVR’s admin password), or click the 

One-Touch Adding

 button to add first two cameras in list of three or more (w/same admin 

password). 

NOTE: 

Make sure the camera to add has been activated by setting the admin 

password, and the camera’s admin password is the same as the DVR’s. 


Содержание DS-73HUHI-F4/N Series

Страница 1: ...cessories too are marked with CE and comply therefore with the applicable harmonized European standards listed under the EMC Directive 2004 108 EC the RoHS Directive 2011 65 EU 2012 19 EU WEEE Directive Products marked with this symbol cannot be disposed of as unsorted municipal waste in the European Union For proper recycling return this product to your local supplier upon the purchase of equival...

Страница 2: ...items are in your box DVR Mouse Remote Power Supply HDD Screws Installed HDD HDD Cables Ear Mounts QSG DVD ROM Installed Installed M E N U T R E E Use this menu tree to navigate the embedded menus F R O N T P A NE L Figure 1 DS 73xxHUHI F4 N Front Panel ...

Страница 3: ...ls no light and functions red light 9 Jog Dial Use to scrub video forward backward quickly R E A R P A NE L Figure 2 DS 7316HUHI F4 N Rear Panel No Item Description 1 AUDIO IN RCA connector 2 AUDIO OUT RCA connector 3 LINE IN RCA connector 4 VIDEO OUT BNC interface 5 HDMI 2 HDMI video output connector 6 RS 232 DB 9 serial interface 7 eSATA Connector for external eSATA storage 8 Power In 100 to 240...

Страница 4: ...are required Also reset password regularly 2 Click OK to save password and activate device Password Strength Levels STRENGTHLEVEL DESCRIPTION Level 0 Risky DVRswill not acceptpassword Password is fewer than eight characters contains only one type of character is the same as the user name or is the mirror writing of the user name Level 1 Weak DVRs will accept password Password contains number lower...

Страница 5: ...ttention box pops up Export the GUID Password Recovery File 1 Generate and save GUID Globally Unique Identifier recovery key to be used to reset password It is unique to each machine 1 Insert a USB flash disk into the DVR s USB port 2 Click Yes to export GUID recovery key Reset Password interface pops up 3 Navigate to the USB flash disk 4 Click the New Folder button to create a folder on the USB f...

Страница 6: ...ION HDD 2 Use the checkboxes to select the HDDs that need to be initialized 3 Press INIT Factory installed HDDs come initialized Initializing again will erase any record video This does not affect settings 5 S E T D A TE A N D T I ME 1 Go to MENU SYSTEM CONFIGURATION GENERAL DATE TIME Date and time settings TIME ZONE Time zone and daylight savings time settings ENABLE NTP Network Time Protocol set...

Страница 7: ...the pull down Select NIC menu to select the network interface card you want to configure for the external computer LAN 8 Set the IPv4 network IP address subnet mask and default gateway to match the IP subnet of the external computer LAN 9 Change the Preferred DNS Server value to 8 8 8 8 leave Alternate DNS Server blank 7 S E T RE M O TE V I E WI N G P O R T S After assigning the IP information cli...

Страница 8: ...SA is not associated with www portforward com and is not responsible for any activity between the user and www portforward com Avoid accidentally downloading any software from www portforward com 2 Proceed to the Routers section on the website for step by step instructions 9 S E T UP HI K C O N NE C T P 2 P C L O U D S E R V I CE NOTE Ports 9010 and 9020 must not be blocked for the Hik Connect Clo...

Страница 9: ...bled by default no further action is required Disabling Analog Cameras To Increase Number of IP Cameras Disabling an analog camera allows substitution of a network IP camera in its place up to 10 IP cameras maximum for DS 7308HUHI F4 N and up to 18 IP cameras maximum for DS 7316HUHI F4 N 1 Go to MENU CAMERAS ANALOG TAB 2 Analog Camera List will display all enabled cameras 3 Disable analog cameras ...

Страница 10: ...nected camera Camera disconnected click icon to get camera s exception info Delete the IP camera Play connected camera s live video Camera connected DVR CAMERA CHANNELS Cameras connected to DVR PLAY Play camera s live video EDIT Pencil Change IP address in LAN range CAMERA LIST White Added cameras LAN CAMERAS LIST Yellow Detected cameras will appear here NOTE To change camera name go to OSD ...

Страница 11: ...tion Detection Areas To define the image areas that Motion Detection will monitor for each camera do the following 1 Go to MENU RECORDING CONFIGURATION MOTION DETECT 2 Use Camera pull down menu to select camera to configure Icons in the upper right of screen show each camera s record and alarm status Alarm video loss tampering motion detection sensor alarm or VCA alarm Record manual record continu...

Страница 12: ...d Record Quality Main Stream 1 Go to RECORDING CONFIGURATION RECORD QUALITY MAIN STREAM and set the following items Stream Type enables disables audio streaming from the cameras if the camera does not have audio capabilities Stream Type will have only Video option Resolution sets recording resolution Bitrate Type Variable saves HDD space Constant provides more stable stream CAMERA Select camera EN...

Страница 13: ...or camera w built in mic Video Stream determines which stream is recorded Leave at default Main Stream Substream 1 Go to RECORDING CONFIGURATION RECORD QUALITY SUBSTREAM to set up the Sub Stream to stream to mobile devices and display multiple cameras locally NOTE If the upload speed is not sufficient lower the frame rate bitrate and or resolution for more fluent mobile viewing More Setting 1 Clic...

Страница 14: ... to desired time PLAYBACK TYPE MENU Select type of record to play FULL SCREEN Goes to full screen for multiple channel playback PLAY STOP Begin playback toggles between Play and Stop CAMERA LIST Select camera s to play back CALENDAR Select date to play back TIMELINE Click on timeline to jump to desired playback time PRE RECORD Seconds to record before recording starts POST RECORD Seconds to record...

Страница 15: ...he incident 5 Click START CLIPPING button 1 Select the ending time of the incident 2 Click END CLIPPING button same button as START CLIPPING Clip will be marked 3 Repeat steps 1 6 as many times as required 4 Click FILE MANAGEMENT button to display a new window containing all marked clips 5 Select the desired clips 6 Click EXPORT to save files to the inserted USB device Lock Video Clips 1 Click on ...

Страница 16: ...Hikvision USA Inc All Rights Reserved Specifications subject to change without notice QSG DS 73xxHUHI F4 N 032317NA CAMERA LIST Select cameras to view CALENDAR Select dates to view PLAY STOP Toggles between Play and Stop START STOP CLIPPING Toggles between Start Clipping and Stop Clipping LOCK Locks selected video clips to prevent them from being deleted FILE MANAGEMENT Displays list of saved clip...

Отзывы: