background image

DS-6400HDI-T Decoder User Manual 

35 


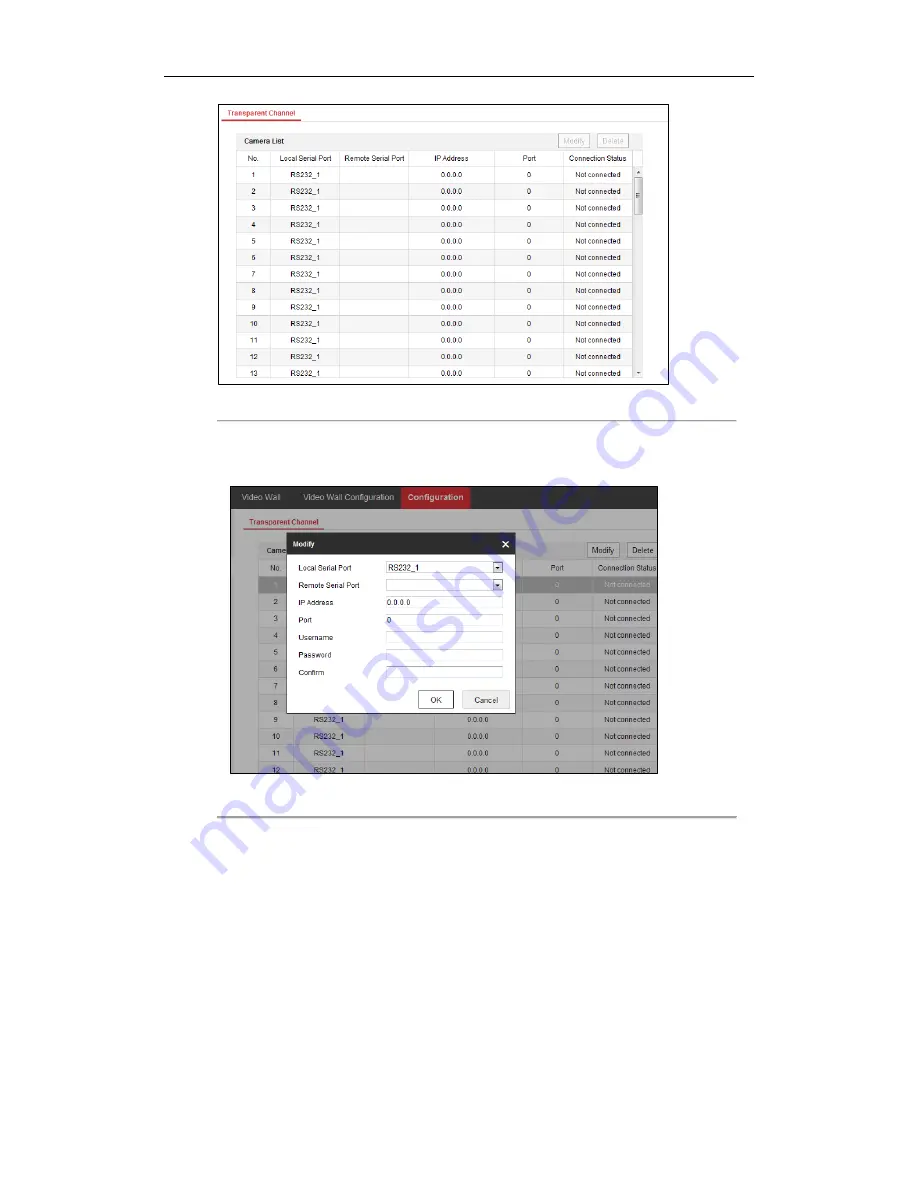
Figure 4.25 Transparent Channel Interface 


2.


Select a transparent channel from the list to configure.  

3.


Click 

Modify

 to modify the parameters of the selected transparent channel. 


Figure 4.26 Modifying Interface 


4.


Select the 

Local Serial Port

 and the 

Remote Serial Port 

to RS-485 or RS-232.  

Local Serial Port:

 the serial port used as the transparent channel by the decoder. 

Remote Serial Port:

 the serial port used as the transparent channel by the encoding device.  

5.


Click

 Delete

 to pop up the following dialog box and click 

OK 

to delete the selected channel. 


Lo-Call 1890 866 900


www.cctvireland.ie


[email protected]

Содержание DS-6400HDI-T

Страница 1: ...HD Video Audio Decoder User Manual UD 6L0203D1174A01 Lo Call 1890 866 900 www cctvireland ie shop cctvireland ie...

Страница 2: ...f their respective owners Legal Disclaimer TO THE MAXIMUM EXTENT PERMITTED BY APPLICABLE LAW THE PRODUCT DESCRIBED WITH ITS HARDWARE SOFTWARE AND FIRMWARE IS PROVIDED AS IS WITH ALL FAULTS AND ERRORS...

Страница 3: ...ence that may cause undesired operation EU Conformity Statement This product and if applicable the supplied accessories too are marked with CE and comply therefore with the applicable harmonized Europ...

Страница 4: ...and region Please refer to technical specifications for detailed information Input voltage should meet both the SELV Safety Extra Low Voltage and the Limited Power Source with 100 240 VAC or 12 VDC a...

Страница 5: ...roperly secured to a rack or shelf Major shocks or jolts to the unit as a result of dropping it may cause damage to the sensitive electronics within the unit Use the device in conjunction with an UPS...

Страница 6: ...26 4 1 2 Configuring Time Settings 26 4 1 3 Configuring RS485 RS232 Serial Port 28 4 1 4 Configuring Basic Network Settings 29 4 1 5 Configuring DDNS Settings 30 4 1 6 Managing User Account 32 4 1 7 I...

Страница 7: ...Displaying Video 51 5 4 3 Windowing and RoamingSettings 53 5 4 4 Configuring Playback 55 5 4 5 Configuring Cycle Decoding 55 5 4 6 Window Configuration 56 CHAPTER 6 Appendix 58 Appendix A Specificatio...

Страница 8: ...DS 6400HDI T Decoder User Manual 7 CHAPTER 1 Introduction Lo Call 1890 866 900 www cctvireland ie shop cctvireland ie...

Страница 9: ...ivate H 264 standard H 264 MJPEG MPEG2 and MPEG4 video stream formats PS RTP and private customized data encapsulation formats PAL and NTSC image standards DS 6401HDI T provides the HDMI VGA BNC video...

Страница 10: ...ccess to the encoding devices with storage capability and directly obtain the record files from the encoder and finally decode for local output Network One 10 100 1000Mbps self adaptive Ethernet inter...

Страница 11: ...DS 6400HDI T Decoder User Manual 10 CHAPTER 2 Panels and Connections Lo Call 1890 866 900 www cctvireland ie shop cctvireland ie...

Страница 12: ...LED indicator 2 LINK Network connection LED indicator 3 Tx Rx Data transmitting receiving status LED indicator 4 HDMI Video Output HDMI output of decoded video 5 VGA Video Output VGA output of decode...

Страница 13: ...output connectors are provides on the rear panel 1 2 3 4 5 6 1 2 3 4 7 6 8 9 10 11 12 13 5 Interface Connections 1 LINE IN OUT Two way audio input output 3 5mm connector 2 LAN 10 100 1000 Mbps Ethern...

Страница 14: ...y audio input output 3 5mm connector 4 AUDIO OUT DB15 connector for audio out connecting to audio output device with the DB15 to BNC adapter 5 LAN 10 100 1000 Mbps Ethernet interface 6 USB Interface R...

Страница 15: ...DS 6400HDI T Decoder User Manual 14 CHAPTER 3 Initial Network Parameters Configuration Lo Call 1890 866 900 www cctvireland ie shop cctvireland ie...

Страница 16: ...of DS 6400HDI T is admin and the default IP address is 192 0 0 64 It is highly recommended to change the default user name and password after initial use 3 1 Searching Active Devices Online Search on...

Страница 17: ...nel on the right side or click to show the network parameter panel 3 2 Modifying Network Parameters Steps 1 Select the device to be modified in the device list and the network parameters of the device...

Страница 18: ...ED We highly recommend that you create a strong password of your own choosing using a minimum of 8 characters including upper case letters lower case letters numbers and special characters in order to...

Страница 19: ...figure below Figure 3 4 Control Panel 2 Click the Device Management icon to enter the Device Management interface as shown in the figure below Figure 3 5 Control Panel 3 Check the device status from...

Страница 20: ...aracters in order to increase the security of your product We recommend that you reset your password regularly especially in the high security system resetting the password monthly or weekly can bette...

Страница 21: ...evice IP address to the same subnet with your computer by either modifying the IP address manually or checking the DHCP checkbox 9 Input the password to activate your IP address modification Lo Call 1...

Страница 22: ...DS 6400HDI T Decoder User Manual 21 CHAPTER 4 Decoder Configuration and Operation by Web Browser Lo Call 1890 866 900 www cctvireland ie shop cctvireland ie...

Страница 23: ...d configure it by Web browser or the iVMS 4200 Video Wall Client Software In this chapter the operation and management of the decoder by the Web browser is provided The tested Web browsers include IE...

Страница 24: ...ecially in the high security system resetting the password monthly or weekly can better protect your product If the device is already activated enter the user name and password in the login interface...

Страница 25: ...the password is not strong enough the following message box pops up to remind you to change the weak or risky password to strong password Figure 4 7 Note Interface 1 Click Cancel to login the device a...

Страница 26: ...Decoder User Manual 25 2 Input the password in Password and Confirm text fields to finish the strong password settings Click Cancel to login the device Lo Call 1890 866 900 www cctvireland ie shop cc...

Страница 27: ...ugin Version etc Step Click Configuration System Settings Basic Information to view Device Type Device Serial No Firmware Version DSP Version etc The device name can be edited Figure 4 9 Checking Devi...

Страница 28: ...n by checking the checkbox and configure the following settings NTP Server IP address of NTP server NTP Port Port of NTP server Figure 4 11 Configure Time by NTP If the device is connected to a public...

Страница 29: ...tion System Settings RS232 to enter the following interface Figure 4 13 Configure RS 232 Settings 2 Configure the RS232 parameters including the baud rate data bit stop bit and parity type 3 Select th...

Страница 30: ...ave to save the settings 4 1 4 Configuring Basic Network Settings Purpose You can set the network parameters for the decoder in the parameter configuration interface Steps 1 Click Configuration Networ...

Страница 31: ...types are selectable IPServer DynDNS PeanutHull HiDDNS and NO IP DynDNS 1 Enter Server Address for DynDNS e g members dyndns org 2 Enter the User Name and Password registered in the DynDNS website 3 I...

Страница 32: ...ine com 2 Enter the Domain Name of the device You can register the alias of the device domain name in the HiDDNS server first and then enter the alias to the domain name in the decoder you can also en...

Страница 33: ...ice Domain Name device name 4 1 6 Managing User Account The user accounts can be managed in this interface Steps 1 Click Configuration System User Management to enter the account management interface...

Страница 34: ...es of the device can be imported from or exported to local device for backup which maintains convenient parameters configuration Steps 1 Click Configuration System Maintenance to enter the parameters...

Страница 35: ...restore a part of the factory settings of the decoder Figure 4 23 Default Settings Reboot the decoder 1 Click Reboot if you are sure to reboot the device Figure 4 24 Reboot the Device 4 1 9 Transparen...

Страница 36: ...Modifying Interface 4 Select the Local Serial Port and the Remote Serial Port to RS 485 or RS 232 Local Serial Port the serial port used as the transparent channel by the decoder Remote Serial Port t...

Страница 37: ...DS 6400HDI T Decoder User Manual 36 Figure 4 27 Deleting Interface Lo Call 1890 866 900 www cctvireland ie shop cctvireland ie...

Страница 38: ...terface Figure 4 28 Enter Video Wall Configuration Interface 2 You can use the default video wall layout or click to add a new layout Enter the number of screens in row and column and up to 16 20 spli...

Страница 39: ...teps 1 Click Video Wall to enter video wall interface Figure 4 32 Video Wall Interface Table 4 1 Description of Video Wall No Description 1 Camera the camera added in the Web 2 Scene the Web supports...

Страница 40: ...Number Check the checkbox of Get Stream by Stream Media to lower the network load of the device Figure 4 34 Adding Camera Interface 3 Select one of the areas or one channel of the encoding device and...

Страница 41: ...gure 4 37 Deleting Camera Interface 4 3 2 Decoding on the Video Wall Steps 1 Drag the channel from the left side list to realize the decoding in the selected window Figure 4 38 Decode the Video on the...

Страница 42: ...op decoding 5 Click Decoding Status to check the decoding status Figure 4 41 Decoding Channel Status 4 3 3 Video Wall Roaming Steps 1 Drag one camera from the left side list to the Video Wall layout w...

Страница 43: ...Decoding at Bottom Roaming and fluent video cannot be realized in the window with the signal outputted via BNC interfaces 4 3 4 Setting Scene Purpose Different video wall layouts are saved as differe...

Страница 44: ...log box Figure 4 45 Save as Interface 3 Input the Name and click OK to save the scene Figure 4 46 Scene List 4 Select one of the scenes you have set Click to call the scene 5 Click to rename the scene...

Страница 45: ...DS 6400HDI T Decoder User Manual 44 Figure 4 48 Delete the Scene Lo Call 1890 866 900 www cctvireland ie shop cctvireland ie...

Страница 46: ...DS 6400HDI T Decoder User Manual 45 CHAPTER 5 Decoder Configuration and Operation by Client Software Lo Call 1890 866 900 www cctvireland ie shop cctvireland ie...

Страница 47: ...ain interface after accessing to the software Figure 5 1 Main Interface The software is capable of many functions for controlling and managing many devices In this manual only the operation related to...

Страница 48: ...d on the list Select the decoder and click Add to Client to add the decoder Figure 5 4 Add Device by Detecting the Online Device Please refer to the User Manual of iVMS 4200 Video Wall Client Software...

Страница 49: ...yout Settings 2 You can use the default video wall layout or click to choose one mode to edit Video Wall layout Figure 5 7 Add Screen Information Three modes are available respectively Add Video Wall...

Страница 50: ...to finish video wall adding 6 Choose Modify Video Wall to edit current video wall s layout name and decoding outputs Figure 5 9 Modify Video Wall 7 Choose Delete Video Wall and the information dialog...

Страница 51: ...a device and click to edit the parameters for the device click to add decoding devices or click to delete the device For the DS 6401HDI T models the VGA BNC and HDMI video output interfaces are provid...

Страница 52: ...ck and drag the camera from the left side list to the display window of video wall The video stream from the camera will be decoded and displayed on the Video Wall You can select a decoding window and...

Страница 53: ...menu as shown below The menu differs depending on the devices Figure 5 16 Right click Menu Stop Start Decoding stop start the decoding Start Pause Successive Decoding start pause the cycle decoding T...

Страница 54: ...t also for other devices 5 3 2 Windowing and Roaming Settings Purpose Windowing is to open a new window on the screen s The window can be within a screen or span multiple screens Roaming means that yo...

Страница 55: ...ys in the top layer Double click again to restore the original roaming size 4 Select a window or open a window and click to set the split screen with 1 4 9 16 available Figure 5 19 Split Screen 5 Sele...

Страница 56: ...rch condition on the search panel click to show the date and click More Search Conditions to specify more conditions and click Search to find the video file The following icons are available for contr...

Страница 57: ...gure 5 23 Window Configuration 3 Configure the parameters as needed The window status shows the current status of the selected window Alarm Window display the video triggered by the event or alarm inp...

Страница 58: ...DS 6400HDI T Decoder User Manual 57 Functions like 3D DNR Enable Defog and Enable Low Illumination are not supported by DS 6400HDI T series Lo Call 1890 866 900 www cctvireland ie shop cctvireland ie...

Страница 59: ...DS 6400HDI T Decoder User Manual 58 CHAPTER 6 Appendix Lo Call 1890 866 900 www cctvireland ie shop cctvireland ie...

Страница 60: ...DS 6400HDI T Decoder User Manual 59 Appendix A Specifications Model DS 6404HDI T DS 6408HDI T Lo Call 1890 866 900 www cctvireland ie shop cctvireland ie...

Страница 61: ...ch 4CIF 32 ch 8MP 4 ch 5MP 8 ch 1080p 16 ch 720p 32 ch 4CIF 64 ch Split Screen Display 1 4 9 16 1 4 9 16 Screen Spanning Mode 1 2 1 3 1 4 2 1 2 2 1 2 1 3 1 4 2 1 2 2 2 3 3 2 2 4 4 2 Fluent Decoding D...

Страница 62: ...1080p 32 ch 720p 64 ch 4CIF 100 ch Split Screen 1 4 9 16 1 4 9 16 1 4 9 16 Screen Spanning Mode 1 2 1 3 1 4 2 1 2 2 2 3 2 4 2 5 3 2 3 3 4 2 5 2 1 2 1 3 1 4 2 1 2 2 2 3 2 4 2 5 3 2 3 3 4 2 5 2 3 4 4 3...

Страница 63: ...rrect Why cannot play back the record files in DVR with decoder 1 Check the DVR network connection 2 Check the parameters of the playback file 3 Check if there are files existed in the selected time d...

Страница 64: ...Manufacturer Model Supported Video Format Panasonic SP306H H 264 MPEG4 SP336H Sony SNC CH220 SNC RH124 Axis P5532 Q7404 Sanyo VCC HD2500P SAMSUNG SND 5080P Bosch NBC265P Zavio D5110 Arecont AC1305M Pe...

Отзывы: