HIKVISION DS-5024 Series Скачать руководство пользователя страница 6

3

Chapter4. Basic Operation

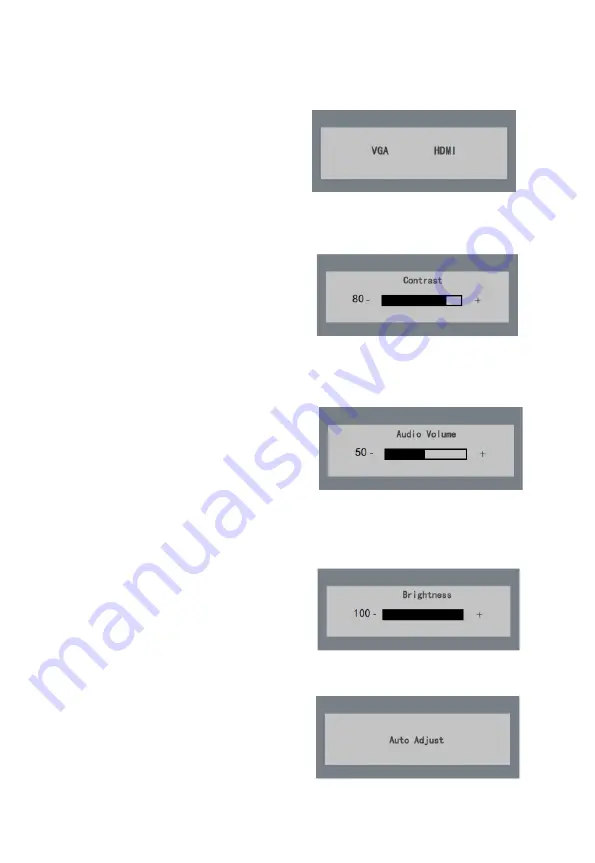
4.1 Input Source Selection(optional)

Turn on the display unit when the power supply is on

and input source is confirmed.
Press


key


of


the


remote


controller


to


enter


the


menu


as


shown


on


the


right.


DS-D50

19

/22 

/24

inch


LCD


display


unit


includes


2


input


sources


as


HDMI


and


VGA


signal.


Press


direction


keys


to


select


the


input


source


and


press


MENU


to


accomplish


the


input


source


selection.

Figure 4.1 Input Source

4.2 Input Audio Volume Adjustment(optional)

Turn on the display unit when the power supply is on

and input source is confirmed.
Press

key of the remote controller to enter the menu

as shown on the right.

press

or

to adjust the value

of volume.

press

MENU

to accomplish the volume

adjustment.

Figure 4.2 Audio Volume

4.3 Auto Adjust

Turn on the display unit when the power supply is on

and input source is confirmed.
Press

AUTO

key of the remote controller to enter the

menu as shown on the right(In VGA Signal).

Figure 4.3 Input Source

Press 


key of the remote controller to enter the menu 

as shown on the right. press 

 or 

 to adjust the value 

of contrast. Press 

MENU 

to accomplish the contrast 

adjustment. 

Figure 4.1 Input Source 


4.1 Contrast

4.2


Figure 4.2 

Brightness

Brightness

Press


key


of


the


remote


controller


to


enter


the


menu


as


shown


on


the


right.

press


or


to


adjust


the


value


of


Brightness

.


press


MENU


to


accomplish


the

 Brightness 

adjustment.

Содержание DS-5024 Series

Страница 1: ...19 22 2 24 inch LCD Display Unit User Manual PN G6AUM185000001...

Страница 2: ...itate to contact us This manual may contain several technically incorrect places or printing errors and the content is subject to change without notice The updates will be added into the new version o...

Страница 3: ...XCLUSION OF IMPLIED WARRANTIES IS NOT PERMITTED BY SOME STATES THE ABOVE EXCLUSION MAY NOT APPLY TO YOU IN NO EVENT WILL HIKVISION ITS DIRECTORS OFFICERS EMPLOYEES OR AGENTS BE LIABLE TO YOU FOR ANY C...

Страница 4: ...9 Viewing Angle Horizontal 90 Vertical 65 DS D5022 24 Viewing Angle Horizontal 170 Vertical 160 2Wx2 Speakers efficient output 1 2 Power Supply Connection Insert the 3 pin power device into well groun...

Страница 5: ...keys on lower right corner of the display unit vary according to different situations Figure 2 1 Rear Panel of Device POWER IN Power Input HDMI IN VGA IN VGAAnalog Signal Input AUDIO IN Audio Inpu 1...

Страница 6: ...ontroller to enter the menu as shown on the right press or to adjust the value of volume press MENU to accomplish the volume adjustment Figure 4 2 Audio Volume 4 3 Auto Adjust Turn on the display unit...

Страница 7: ...you want 3 Press or to adjust the value It applies for adjusting contrast brightness color temp and other parameters Contrast Brightness Press or to set the contrast the range varies from 0 100 Color...

Страница 8: ...You can select Auto Adjust and press or to adjust the VGA parameters automatically or adjust it manually 3 Select H Position and press or to adjust the H Position 4 Select V Position and press or to...

Страница 9: ...y to enter the Language interface press or to switch the language you want 3 Select OSD H Pos OSD V Pos to adjust the position of OSD with or 4 Select OSD Timer to adjust the OSD duration with or 5Sec...

Страница 10: ...Mode interface press or to switch the mode between PC GAME MOVIE 3 Press or to adjust the Audio Volume from0 100 optional 4 Press or to change the Signal Source between VGA and HDMI optional 5 Press...

Страница 11: ...Purpose You can reset settings to the factory defaults Steps 1 Press MENU key to enter the main menu interface 2 Press key 4 times and press MENU key to reset settings to the factory defaults Figure 4...

Страница 12: ...er Supply AC 100 240V 50 60Hz Consumption 25W Standby Power Consumption 0 5W Operation Temperature 0 C 40 C 32 F 104 F Operation Humidity 10 85 Storage Temperature 20 C 55 C 4 F 131 F Storage Humidity...

Страница 13: ...10 Structure Figure 18 10 44 60 1 95 411 20 231 80 445 58 274 99 84 63 200 13 147 62 41 97 17 89 75 00 75 00 70 50 40 50 180 29 130 6...

Страница 14: ...nput Port 1 AC Input Port 1 Power Supply AC 100 240V 50 60Hz Consumption 30W Standby Power Consumption 0 5W Operation Temperature 0 C 40 C 32 F 104 F Operation Humidity 10 85 Storage Temperature 20 C...

Страница 15: ...12 Structure Figure 511mm...

Страница 16: ...Port Power Supply AC 100 240V 50 60Hz Consumption 30W Standby Power Consumption 0 5W Operation Temperature 0 C 40 C 32 F 104 F Operation Humidity 10 85 Storage Temperature 20 C 55 C 4 F 131 F Storage...

Страница 17: ...14 Structure Figure...

Страница 18: ...13...

Отзывы: