background image

User Manual of Network Speed Dome 

© Hikvision Digital Technology Co., Ltd. All Rights Reserved.


88


Chapter 8


Playback 

Purpose: 

This  section  explains  how  to  view  the  remotely  recorded  video  files  stored  in  the 
network disks or SD cards. 

Task 1

: To play back the video files 

Steps: 

1.


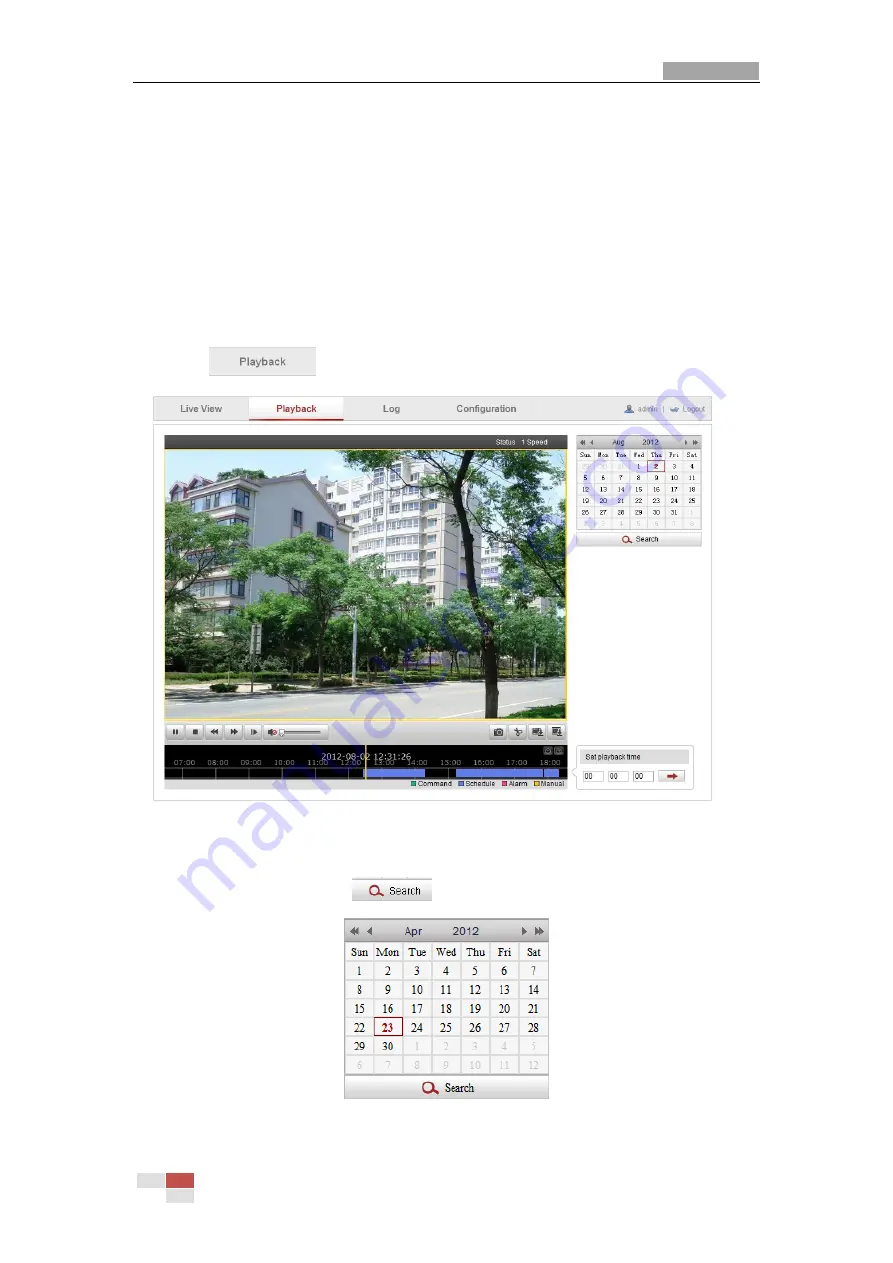
Click 

  on the menu bar to enter playback interface. 


Figure 8-1


Playback Interface 


2.


Select the date and click 


Figure 8-2


Search Video 

www.cctvireland.ie

Содержание DS-2DF7284-AEL

Страница 1: ...IR High definition Network Speed Dome UD 6L0201D1167A01 HIKVision DS 2DF7284 AEL 2MP Ultra low Temperature IR Network Speed Dome USER MANUAL www cctvireland ie...

Страница 2: ...improve or update the products or procedures described in the manual DISCLAIMER STATEMENT Underwriters Laboratories Inc UL has not tested the performance or reliability of the security or signaling a...

Страница 3: ...accept any interference received including interference that may cause undesired operation EU Conformity Statement This product and if applicable the supplied accessories too are marked with CE and co...

Страница 4: ...10 or 12VDC 10 depending on models according to the IEC60950 1 and Limited Power Source standard The power consumption cannot be less than the required value Do not connect several devices to one pow...

Страница 5: ...d to the laser beam Do not place the product in extremely hot cold temperatures please refer to the product specification for the device operating temperature dusty or damp environment To avoid heat a...

Страница 6: ...w 21 4 1 Power up Action 21 4 2 Live View Page 21 4 3 Starting Live View 22 4 4 Recording and Capturing Pictures Manually 24 4 5 Operating PTZ Control 24 4 5 1 PTZ Control Panel 25 4 5 2 Setting Calli...

Страница 7: ...ring Display Settings 61 6 5 2 Configuring OSD Settings 67 6 5 3 Configuring Text Overlay Settings 69 6 6 Configuring and Handling Alarms 70 6 6 1 Configuring Motion Detection 70 6 6 2 Configuring Vid...

Страница 8: ...peed Dome Hikvision Digital Technology Co Ltd All Rights Reserved 7 10 6 4 Upgrading the System 100 10 7 RS 485 Settings 102 Appendix 103 Appendix 1 SADP Software Introduction 103 Appendix 2 Port Mapp...

Страница 9: ...er Web Browser Internet Explorer 7 0 and above version Apple Safari 5 02 and above version Mozilla Firefox 3 5 and above version and Google Chrome8 and above versions 1 2 Appearance Figure 1 1 Appeara...

Страница 10: ...s the lens zooms telephoto and wide 3D Positioning In the client software use the left key of mouse to click on the desired position in the video image and drag a rectangle area in the lower right dir...

Страница 11: ...ll time at the preset are programmable Pattern A pattern is a memorized series of pan tilt zoom and preset functions By default the focus and iris are in auto status during the pattern is being memori...

Страница 12: ...e the speed dome via a LAN you need to connect the network speed dome in the same subnet with your computer and install the SADP or client software to search and change the IP of the network speed dom...

Страница 13: ...version etc shown in Figure 2 3 Use the client software to list the online devices Please refer to the user manual of client software for detailed information 2 Change the IP address and subnet mask t...

Страница 14: ...the WAN directly Connecting the network speed dome via a router Steps 1 Connect the network speed dome to the router 2 Assign a LAN IP address the subnet mask and the gateway Refer to Section 2 1 2 De...

Страница 15: ...onnect the network speed dome to a modem or a router Connecting the network speed dome via a router Steps 1 Connect the network speed dome to the router 2 In the speed dome assign a LAN IP address the...

Страница 16: ...address is dynamically assigned via PPPoE so the IP address always changes after rebooting the speed dome To solve the inconvenience of the dynamic IP you need to get a domain name from the DDNS prov...

Страница 17: ...esolution Steps 1 Install and run the IP Server software in a computer with a static IP 2 Access the network speed dome through the LAN with a web browser or the client software 3 Enable DDNS and sele...

Страница 18: ...ork speed dome e g 192 0 0 64 and press the Enter key to enter the login interface 3 Select English as the interface language on the top right of login interface 4 Input the user name and password and...

Страница 19: ...anual of IR Network Speed Dome Hikvision Digital Technology Co Ltd All Rights Reserved 18 Figure 3 2 Download and Install Plug in Figure 3 3 Install Plug in 1 Figure 3 4 Install Plug in 2 www cctvirel...

Страница 20: ...d log in again after installing the plug in 3 2 Accessing by Client Software The product CD contains the client software You can view the live video and manage the speed dome with the client software...

Страница 21: ...w Interface Notes If you use third party VMS software please contact technical support of our branch for camera firmware For detailed information about client software of our company please refer to t...

Страница 22: ...n and other information The COMMUNICATION refers to the baud rate parity data bit and stop bit of the dome e g 2400 N 8 1 indicates the dome is configured with the baud rate of 2400 no parity 8 data b...

Страница 23: ...etc PTZ Control Panning tilting focusing and zooming actions of the speed dome The lighter wiper one touch focus and lens initialization control Preset patrol pattern Set and call the preset patrol p...

Страница 24: ...the two way audio or recording with audio functions please set the Stream Type to Video Audio referring to Section 6 4 1 Configuring Video Settings Full screen Mode You can double click on the live vi...

Страница 25: ...ace of the actual product as standard Please refer to the following sections for more information Configuring remote recording in Section 7 2 Configuring Recording Schedule Setting the image quality o...

Страница 26: ...s buttons to realize lens control Figure 4 4 PTZ Control Panel Table 4 2 Descriptions of PTZ Control Panel Button Description Zoom in out Focus near far Iris Adjust speed of pan tilt movements 4 5 2 S...

Страница 27: ...from the list and click to call the preset Figure 4 6 Calling a Preset For convenient preset selection refer to the following steps to navigate to the preset you want Steps 1 Select any preset from th...

Страница 28: ...need to use the OSD On Screen Display menu when controlling the speed dome remotely To display the OSD menu on the live view screen you can call the preset number 95 4 5 3 Setting Calling a Patrol Pur...

Страница 29: ...staying on one patrol point The speed dome moves to another patrol point after the patrol time Patrol Speed It is the speed of moving from one preset to another 5 Click to save a preset into the patr...

Страница 30: ...ed on the pattern settings interface There are up to 4 patterns for customizing Setting a Pattern Steps 1 In the PTZ control panel click to enter the pattern settings interface 2 Select a pattern numb...

Страница 31: ...nd auto flip will be invalid and the 3D positioning operation is not supported 4 6 Configuring Live View Parameters Main stream Sub stream Third stream You can select or as the stream type of live vie...

Страница 32: ...User Manual of IR Network Speed Dome Hikvision Digital Technology Co Ltd All Rights Reserved 31 image size can be 4 3 16 9 original or auto www cctvireland ie...

Страница 33: ...itial Position Steps 1 Enter the Initial Position Configuration interface Configuration Advanced Configuration PTZ Initial Position Figure 5 1 PTZ Configuration 2 Click the PTZ control buttons to find...

Страница 34: ...n there is a large amount of zoom the pan tilt speed will be slower for keeping the image from moving too fast on the live view image Preset Freezing This function enables the live view to switch dire...

Страница 35: ...off Memory The dome can resume its previous PTZ status or actions after it restarted from a power off You can set the time point of which the dome resumes its PTZ status You can set it to resume the...

Страница 36: ...ol buttons to find the left right up down limit stops you can also call the defined presets and set them as the limits of the dome 4 Click Set to save the limits or click Clear to clear the limits 5 4...

Страница 37: ...ll Day to set the schedule as all day or click Customize and input the Start Time and End Time for each task and click Enter on your keyboard to enter the time 4 Choose the task type from the drop dow...

Страница 38: ...od of inactivity park time Note Scheduled Tasks function is prior to Park Action function When these two functions are set at the same time only the Scheduled Tasks function takes effect Steps 1 Enter...

Страница 39: ...nced Configuration PTZ Privacy Mask Figure 5 9 Draw the Privacy Mask 2 Click the PTZ control buttons to find the area you want to set the privacy mask 3 Click click and drag the mouse in the live vide...

Страница 40: ...of Enable Privacy Mask to enable this function Note You are allowed to draw up to 24 areas on the same image 5 7 Configuring Smart Tracking Purpose The speed dome tracks the moving objects automatica...

Страница 41: ...om 0 to 300 seconds Notes Setting the duration to 0 means that there s no duration when speed dome tracks Not all the speed dome models support this function Please take the browser interface of the a...

Страница 42: ...Configuration Figure 6 1 Local Configuration Interface 2 Configure the following settings Live View Parameters Set the protocol type stream type image size and live view performance Protocol Type TCP...

Страница 43: ...512M or 1G Save record files to Set the saving path for the manually recorded video files Save downloaded files to Set the saving path for the downloaded video files in interface Picture and Clip Set...

Страница 44: ...wing settings Server Address IP address of NTP server NTP Port Port of NTP server 123 by default Interval The time interval between the two synchronizing actions by NTP server It can be set from 1 to...

Страница 45: ...e you can use the Time Zone function to adjust the time The time will be adjusted according to the original time and the time difference between the two time zones From the Time Zone drop down menu as...

Страница 46: ...Settings 6 3 Configuring Network Settings 6 3 1 Configuring TCP IP Settings Purpose TCP IP settings must be properly configured before you operate the speed dome over network IPv4 and IPv6 are both s...

Страница 47: ...MTU is 500 9676 The default value is 1500 The Multicast sends a stream to the multicast group address and allows multiple clients to acquire the stream at the same time by requesting a copy from the...

Страница 48: ...Port Or Configuration Advanced Configuration Network Port Figure 6 9 Port Settings 2 Set the HTTP port RTSP port and port of the speed dome HTTP Port The default port number is 80 RTSP Port The defaul...

Страница 49: ...d be assigned by your ISP 4 Click to save and exit the interface 6 3 4 Configuring DDNS Settings Purpose If your speed dome is set to use PPPoE as its default network connection you can use the Dynami...

Страница 50: ...er Name and Password registered on the DynDNS website 5 Click to save the settings Figure 6 12 DynDNS Settings IP Server Steps 1 Enter the Server Address of the IP Server 2 Click to save the settings...

Страница 51: ...ck to save the settings 6 3 5 Configuring SNMP Settings Purpose You can use SNMP to get speed dome status and parameters related information Before you start Before setting the SNMP please use the SNM...

Страница 52: ...ttings Note The configuration of the SNMP software should be the same as the settings you configure here 4 Click to save and finish the settings 6 3 6 Configuring 802 1X Settings Purpose The speed dom...

Страница 53: ...ficate from a Certificate Authority The network camera requests access to the protected LAN via the authenticator a switch The switch forwards the identity and password to the authentication server RA...

Страница 54: ...Note The camera reboots when you save the settings 7 After the configuration connect the camera to the protected network 6 3 7 Configuring QoS Settings Purpose QoS Quality of Service can help solve th...

Страница 55: ...anced Configuration Network FTP Figure 6 19 FTP Settings 2 Configure the FTP settings including server address port user name password directory and upload type Setting the directory in FTP server for...

Страница 56: ...is a networking architecture that provides compatibility among networking equipment software and other hardware devices The UPnP protocol allows devices to connect seamlessly and to simplify the imple...

Страница 57: ...Settings Purpose The system can be configured to send an Email notification to all designated receivers if an alarm event is detected e g motion detection event video loss tamper proof etc Before you...

Страница 58: ...nder SMTP Server The SMTP Server IP address or host name e g smtp 263xmail com SMTP Port The SMTP port The default TCP IP port for SMTP is 25 Enable SSL Check the checkbox to enable SSL if it is requi...

Страница 59: ...ring Video and Audio Settings 6 4 1 Configuring Video Settings Steps 1 Enter the Video Settings interface Configuration Basic Configuration Video Audio Video Or Configuration Advanced Configuration Vi...

Страница 60: ...ames per second fps A higher frame rate is advantageous when there is movement in the video stream as it maintains image quality throughout Max Bitrate Set the max bitrate to 32 16384 Kbps The higher...

Страница 61: ...type and then configure the ROI settings Fixed Region The fixed region encoding is the ROI encoding for the manually configured area And you can choose the Image Quality Enhancing level for ROI encod...

Страница 62: ...ing level for the ROI encoding Steps 1 Check the check box of Enable under Dynamic Tracking 2 Adjust the ROI level from 1 to 6 The higher the value the better the ROI quality 3 Click Save to save the...

Страница 63: ...Image Display Settings 2 Set the image parameters of the speed dome Figure 6 27 Display Settings Image Adjustment Brightness This feature is used to adjust brightness of the image The value ranges fro...

Страница 64: ...tter Priority The value of shutter needs to be adjusted manually The iris and gain values will be adjusted automatically according to the brightness of the environment Figure 6 29 Manual Shutter Gain...

Страница 65: ...distance The value can be set to 1 5m 3m 6m 10cm and 50cm The minimum focus value varies depending on the models of speed dome Day Night Switch Day Night Switch The Day Night Switch mode can be set to...

Страница 66: ...iguration of IR light you can enter the OSD menu by calling the special preset 95 Backlight Settings BLC If there s a bright backlight the subject in front of the backlight appears silhouetted or dark...

Страница 67: ...r You can select this mode when the speed dome is installed in indoor environment Fluorescent Lamp You can select this mode when there are fluorescent lamps installed near the speed dome Sodium Lamp Y...

Страница 68: ...be set to OFF LEFT RIGHT UP DOWN or CENTER This function varies depending on the models of speed dome Video Standard You can set the Video Standard to 50hz PAL or 60hz NTSC according to the video syst...

Страница 69: ...set Title Identifies preset being called Camera Name Identifies the name of speed dome You can customize the on screen display of time Steps 1 Enter the OSD Settings interface Configuration Advanced C...

Страница 70: ...ze the text overlay Steps 1 Enter the Text Overlay Settings interface Configuration Advanced Configuration Image Text Overlay 2 Check the checkbox in front of textbox to enable the on screen display 3...

Страница 71: ...such as Notify Surveillance Center Send Email Trigger Alarm Output etc For example when an external alarm is triggered the network speed dome sends a notification to an e mail address 6 6 1 Configurin...

Страница 72: ...image to draw a motion detection area Note You can draw up to 8 motion detection areas on the same image 4 Click to finish drawing Note You can click to clear all of the areas 5 Move the slider to se...

Страница 73: ...nt to set the arming schedule as shown in Figure 6 42 3 Click to set the time period for the arming schedule 4 After you set the arming schedule you can click to copy the schedule to other days Option...

Страница 74: ...t types of linkage method Figure 6 43 Linkage Method Check the checkbox to select the linkage method Notify surveillance center send email upload to FTP trigger channel and trigger alarm output are se...

Страница 75: ...cord a video when an event occurs Note You have to set the recording schedule to realize this function Please refer to Section 7 2 Configuring Recording Schedule for settings the recording schedule Tr...

Страница 76: ...Check the checkbox to select the linkage method taken for the video loss alarm Notify surveillance center send email and trigger alarm output are selectable Please Step 3 Set the Alarm Actions for Mot...

Страница 77: ...guring Motion Detection 5 Check the checkbox to select the linkage method taken for the tampering Notify surveillance center send email and trigger alarm output are selectable Please refer to Step 3 S...

Страница 78: ...guring Motion Detection 5 Check the checkbox to select the linkage method taken for the alarm input Refer to Step 3 Set the Alarm Actions for Motion Detection in Section 6 6 1 Configuring Motion Detec...

Страница 79: ...m output optional 4 The Delay time can be set to 5sec 10sec 30sec 1min 2min 5min 10min or Manual The delay time refers to the time duration that the alarm output remains in effect after alarm occurs 5...

Страница 80: ...HDD error network disconnected IP address conflicted and illegal login to the speed domes Steps 1 Enter the Exception Settings interface Configuration Advanced Configuration Events Exception 2 Check t...

Страница 81: ...User Manual of IR Network Speed Dome Hikvision Digital Technology Co Ltd All Rights Reserved 80 Figure 6 49 Exception Settings 3 Click to save the settings www cctvireland ie...

Страница 82: ...Network Disk 2 Enter the IP address of the network disk and the default format of file path is dvr share as shown in Figure 7 1 Note The network disk file path name share is user defined while creati...

Страница 83: ...refer to the steps of NAS disk initialization 7 2 Configuring Recording Schedule Purpose There are two kinds of recording for the speed domes manual recording and scheduled recording For the manual r...

Страница 84: ...t 9 59 55 The Pre record time can be configured as No Pre record 5 s 10 s 15 s 20 s 25 s 30 s or not limited Note The pre record time changes according to the video bitrate Post record The time you se...

Страница 85: ...overlapped Up to 4 segments can be configured 2 Select a Record Type The record type can be Normal Motion Detection Alarm Motion Alarm Motion Alarm Normal If you select Normal the video will be recor...

Страница 86: ...ded when the motion and alarm are triggered at the same time Besides configuring the recording schedule you have to configure the settings on the Motion Detection and Alarm Input Settings interfaces P...

Страница 87: ...ing Snapshot checkbox to enable continuous snapshot Check the Enable Event triggered Snapshot checkbox to check event triggered snapshot 3 Select the quality of the snapshot 4 Set the time interval be...

Страница 88: ...for more details to configure FTP parameters 2 Check checkbox in Motion Detection Settings or Alarm Input interface Please refer to Step 3 Set the Alarm Actions Taken for Motion Detection in Section...

Страница 89: ...Purpose This section explains how to view the remotely recorded video files stored in the network disks or SD cards Task 1 To play back the video files Steps 1 Click on the menu bar to enter playback...

Страница 90: ...files Speed up Download captured pictures Display playback status Playback by frame Note You can choose the file paths locally for downloaded playback video files and pictures in Local Configuration...

Страница 91: ...ading interface 3 Check the checkbox in front of the video files that you need to download 4 Click to download the video files Notes The progress ratio displays the downloading ratio of the video file...

Страница 92: ...ights Reserved 91 3 Set the start time and end time Click Search The corresponding picture files are listed on the left 4 Check the checkbox in front of the files that you need to download 5 Click to...

Страница 93: ...e you start Please configure network storage for the speed dome or insert a SD card in the speed dome Steps 1 Click on the menu bar to enter log searching interface Figure 9 1 Log Searching Interface...

Страница 94: ...User Manual of IR Network Speed Dome Hikvision Digital Technology Co Ltd All Rights Reserved 93 4 To export the log files click to save the log files in your computer www cctvireland ie...

Страница 95: ...access to create modify or delete other accounts Up to 32 user accounts can be created Figure 10 1 User Information Add a User Steps 1 Click to add a user 2 Input the new User Name select Level and in...

Страница 96: ...ure 10 2 Add a User Modify a User Steps 1 Left click to select the user from the list and click 2 Modify the User Name Level or Password 3 In the Basic Permission field and Camera Configuration field...

Страница 97: ...igital Technology Co Ltd All Rights Reserved 96 Figure 10 3 Modify a User Delete a User Steps 1 Left click the user name you want to delete and click 2 Click on the pop up dialogue box to delete the u...

Страница 98: ...uthentication Figure 10 5 RTSP Authentication 2 Select the Authentication type basic or disable in the drop down list to enable or disable the RTSP authentication 3 Click to save the settings 10 3Conf...

Страница 99: ...ure 10 8 IP Address Filter 10 5Viewing Device Information Enter the Device Information interface Configuration Basic Configuration System Device Information Or Configuration Advanced Configuration Sys...

Страница 100: ...ce interface Configuration Basic Configuration System Maintenance Or Configuration Advanced Configuration System Maintenance 2 Click to reboot the network speed dome Figure 10 10 Reboot the Device 10...

Страница 101: ...onfiguration Basic Configuration System Maintenance Or Configuration Advanced Configuration System Maintenance 2 Click to select the local configuration file and then click to start importing configur...

Страница 102: ...Click to select the local upgrade file and then click to start remote upgrade Note The upgrading process will take 1 to 10 minutes Please don t disconnect power of the speed dome during the process T...

Страница 103: ...t Steps 1 Enter RS 485 parameter setting interface Configuration Advanced Configuration System RS485 Figure 10 14 RS 485 Settings 2 Set the RS 485 parameters and click to save the settings By default...

Страница 104: ...he SADP software it automatically searches the online devices every 15 seconds from the subnet where your computer locates It displays the total number and information of the searched devices in the O...

Страница 105: ...displayed in the Modify Network Parameters panel on the right side 2 Edit the modifiable network parameters e g IP address and port number 3 Enter the password of the admin account of the device in t...

Страница 106: ...the router as in the following figure including IP address and subnet mask settings Figure A 2 2 Set the LAN parameters 3 Set the port mapping in the virtual severs of Forwarding You need to forward...

Страница 107: ...r to the steps as below Steps 1 As the settings mentioned above forward the port 80 8000 8200 8210 and 554 for the network speed dome at 192 168 1 23 2 Forward the port 81 8001 8201 8211 and 555 for t...

Страница 108: ...www cctvireland ie...

Отзывы: