background image

APPLIANCE OPERATION MANUAL

13-

PROCEDURE TO START PARBOILING - Induction

Automatic parboiling is activated by turning the knob anti clockwise briefly, the `A` symbol will appear. The 

required onboiling stage is selected by turning knob clockwise which is shown on the display. The `A` symbol 

appears after 1 second upon releasing the knob.

The onboiling stage can be adjusted within 15 seconds after activation without cutting off the parboiling boost. 

If another selection is made after 15 seconds the knob can be used to select an even lower onboiling stage 

which however cuts off the Automatic parboiling function at the same time.

Turning the knob higher on boiling stage (even after the above 15 seconds) can be selected. This leads to the 

parboiling time being automatically brought in line with the currently selected onboiling stage.

Once the parboiling has ended only the selected cooking stage is indicated on the display

BOOSTER FUNCTIONS - Induction

The `Booster` function for the burner is enabled by turning the knob clockwise. When this function is enabled, 

the display shows the letter `P`.

By means of this function the cooking zone is enabled to receive power > 100%.

The Boosting time is limited to 10 minutes to protect cooking utensils. After the booster is switched off 

automatically, the cooking zone continues operation on nominal power. The booster can be reactivated provided 

that the temperature sensors in the electronics and in the coils have the capacity.

When a pan is removed from the cooking zone during boosting, the no pan symbol is displayed and boosting 

time continues to count down. When a pan is replaced within the boost time it will reactivate.

If the booster temperature limit of the electronics or coil on the boosted cooking zone is exceeded, the booster 

is cut off automatically and reset to nominal power. While one of the two temperature limits remains exceeded 

the booster cannot be activated. In this case the booster is indicated when the knob is turned clockwise which is 

followed by an automatic reduction on the display.

Child lock function on HP5CI is activated by turning control knob clockwise until an “L” symbol appears. Repeat 

this process to unlock.

This is the same process for the HT3CI using the far right control knob.

ELECTRIC INDUCTION COOKING

SELECTED MODELS ONLY

PLEASE READ AND KEEP FOR FUTURE REFERENCE

Содержание PROFESSIONAL SERIES HP4.2C N/L

Страница 1: ...APPLIANCE OPERATION MANUAL ...

Страница 2: ...wn on the knob to engage ignition system 2 Turn to the max position to activate gas 3 Continue pressing down on knob firmly hold this position for 2 3 seconds TO USE YOUR NEW HIGHLAND COOKTOP OFF MIN MAX MED LOW ...

Страница 3: ...cretion may replace or repair any defective component s to affect a repair due to any faulty workmanship and material The warranty does not cover breakage of outer glass panels attributed to external damage 5 The warranty provided is a Repair Warranty and in an extreme event if a repair can not take place a replacement will be provided of an equivalent current model where the balance of the warran...

Страница 4: ...APPLIANCE OPERATION MANUAL 4 4 MODELS COVERED PROFESSIONAL SERIES HP5CI N L HP6 2SS N L HP6 2C N L HP5C N L HP4 2SSN L HP4 2C N L TRINITY SERIES HT1SS N L HT1CN L HT3CI N L HT3C N L HT3SS N L ...

Страница 5: ... Safety when in use 05 General Assembly 06 07 Electric control 08 Electric Induction cooking 09 13 Legend and Manual ignition for gas 14 Care and Maintanence 16 17 Fault finding abnormal operation 18 Installation instructions 19 20 Servicing instructions 21 23 Product specifications 25 27 ...

Страница 6: ...urners in our cook top range allows you to choose the appliance or number of appliances to meet your cooking needs This appliance has been constructed and distributed in compliance with the essential requirements of the following EEC DIRECTIVES EUROPEAN NORMS Australian New Zealand Standards CE Marking 93 68 Low Voltage 73 23 EMC 89 336 Materials that can touch food 89 109 Safety Standards EN 60 3...

Страница 7: ... use the burners as a room heater 5 Do not allow clothing to pass over or near to the flame 6 Do not leave handles of saucepans protruding out into the room or over adjacent burners Always check that the pot is stable and will not be likely to tip its contents before you release your grip 7 Do not store items of interest to children in the cabinets above the appliance Children climbing or standing...

Страница 8: ...ATION Assembly of the Wok burner 1 Ensure that the locating pin A on the distributor ring is securely located in the recess hole of the WOK burner body This is easily achieved by placing the distributor ring on the WOK body and then rotating the distributor until the locating bezzle A drops into the recess with a firm level fit being then accomplished 2 The black dress ring should then be fitted o...

Страница 9: ...ery five years and or you should contact your dealer for any recommended maintenance GENERAL ASSEMBLY PROCEDURE FOR INSTALLATION PLEASE READ AND KEEP FOR FUTURE REFERENCE NOTE ALWAYS ENSURE ALL PARTS ARE CLEAN AND DRY PRIOR TO OPERATING ANY BURNER It is important that the burner assembly sequence on the previous page is performed prior to initial operation of the cook top or light back may occur w...

Страница 10: ...ther the whole of the element inner and outer rings or just the inner ring Turning the knob anti clockwise adjusts the inner element from Min to Max Turning the knob clockwise adjusts the total element from Min to Max ELECTRIC CONTROL HILITE ELEMENT SELECTED MODELS ONLY PLEASE READ AND KEEP FOR FUTURE REFERENCE ...

Страница 11: ...he pan heats up The result is a fast cost effective and accurate cooking method Induction compatible vessels must be used SAFETY CUT OUT Induction If the induction burner is accidentally left on the control automatically turns it off after a certain time has elapsed The table below indicates the time interval which depends on the power level setting LEVEL TIME LIMIT HOURS PARBOILING LIMIT MIN 1 6 ...

Страница 12: ...urface as a storage or worktop area Do not use the appliance if the ceramic surface is accidentally damaged contact your local service agent Only clean the hob in accordance with the cleaning and maintenance instructions Never allow sugar or acidic food stuffs to be spilled onto the ceramic cooking surface as it eats into the glass and can be difficult to remove once it has cooled Do not install t...

Страница 13: ...shows the letter P By means of this function the cooking zone is enabled to receive power 100 The Boosting time is limited to 10 minutes to protect cooking utensils After the booster is switched off automatically the cooking zone continues operation on nominal power The booster can be reactivated provided that the temperature sensors in the electronics and in the coils have the capacity When a pan...

Страница 14: ...at the cook top has not been installed properly or the openings for air circulation are not large enough ERROR TABLE CODE DESCRIPTION POSSIBLE CAUSE ERROR CLEARING ER22 Key evaluation defective control unit cuts off after 3 5 7 5 sec Short circuit or discontinuation in the range of the key evaluation Exchange control unit Er47 Communication error between knob control and induction None or faulty c...

Страница 15: ...ding to the scale of the EN Standards is one size smaller than the nominal diameter of the burner If no pan is detected or if an unsuitable pan is detected the no pan symbol is displayed If the no pan symbol appears when a pan is actually on the burner this generally means that the size or shape of the pan concerned is unsuitable In this case check whether the type of pan is suitable for induction...

Страница 16: ...ximum output MED The burner is operating at medium output SIMMER The burner is operating at lowest output setting MANUAL IGNITION GAS If there is no power to the appliance or your area is experiencing a power black out simply strike a match or spark igniter next to the required burner and follow steps in chapter 4 above NOTE THE FLAME FAILURE SYSTEM IS INDEPENDENT OF POWER AND WILL STILL OPERATE W...

Страница 17: ... be removed and cleaned with a soft bristled brush and warm soapy water or they can be placed in the dishwasher 3 Stainless Steel Should be cleaned with a commercial stainless cleaner 4 Ceramic Glass After cooking it is recommended that the ceramic glass be cleaned with a commercial glass cleaner eg Windex to remove any light spills or grease CARE AND MAINTENANCE PLEASE READ AND KEEP FOR FUTURE RE...

Страница 18: ...PRESENT ON THE WOK BURNER REFER TO THE CORRECT ASSEMBLY INSTRUCTIONS UNIT OCCASIONALLY EMITS A SPARK EVEN WHEN NOT BEING OPERATED Gas THIS USUALLY MEANS SOME MOISTURE ON THE SWITCHING MECHANISM DUE TO SPILLAGE OR STEAM IT SHOULD SELF RECTIFY FLAME ON WOK BURNER PRESENT UNDER SKIRT AND LARGE BILLOWING FLAME IN MIDDLE OF BURNER Gas WOK BURNER IS INCORRECTLY ASSEMBLED OR FOOD HAS BLOCKED PORTS REFER ...

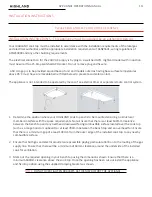
Страница 19: ... and is to be mounted ensuring no structural members interfere with the space requirements Note Ensure that there is at least 630mm clearance between the bench top and any overhead downward facing combustible surface located over the cook top such as a range hood or cupboard or at least 780mm between the bench top and an overhead fan Ensure that there is a minimum gap of a least 100mm from the out...

Страница 20: ...n 4 Turn each gas control on and adjust to obtain a clear blue flame with no yellow tipping For adjustments refer to the attached servicing instructions The first time you ignite the burners they may not ignite immediately This is due to air in the gas lines that should clear within a few seconds If satisfactory performance cannot be obtained contact the local gas authority for advice and assistan...

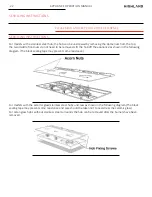
Страница 21: ...round the sides For the stainless steel hob it can be removed by taking off the dome nuts and lifting the hob up Remove the burner caps and ventures as shown in the following image Unscrew the retaining rings in the burners and then remove the burner bases Disconnecting the spark electrode leads in the process Remove the three screws that hold the Wok sealing ring in place and remove the sealing r...

Страница 22: ...eed to be removed Lift the hob off the appliance as shown in the following diagram The black sealing tape may present some resistance For models with the ceramic glass stainless steel hobs unscrew as shown in the following diagram The black sealing tape may present some resistance and care should be taken not to overstress the ceramic glass For ceran glass hobs without stainless steel surrounds th...

Страница 23: ...djustable screw which can only be accessed by removing the switch harness retaining clip and then removing the harness The outer burner and inner burner injectors for the Wok burner can only be accessed by removing the hob from the appliance Adjustment of the main burner Venturi can be affected by loosening the fixing screw shown Ensure that the fixing screw is re tightened following adjustment BU...

Страница 24: ...To convert the burner you will need to replace the main injector auxiliary injector and the by pass screw See above table for sizes The bypass screws for the wok requires replacing to achieve the correct minimum settings Remove the bypass screws and replace as follows 0 9mm goes to 0 52mm main burner 0 45mm goes to 0 3mm auxiliary burner The turn down setting for the A B and C burners is adjusted ...

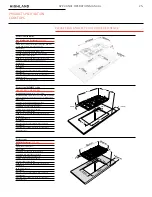
Страница 25: ...l panel and Scotchbrite finish 6 Heat Zones 2 x 22 MJ D size dual ring gas wok burners 2 x 8 5MJ B size single ring gas burners 1 x 6 5MJ A size single ring gas burner 1 x 13MJ C size single ring gas burner Electronic under knob ignition 240V auto re ignition and flame failure safety device Connection 10 amp plug supplied Gas Supply Must be ordered as either Natural Gas or LPG unit Pan Supports Sm...

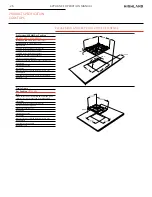
Страница 26: ...treous enamelled coated cast iron trivets Dishwasher safe Trinity Single Gas Cooktop HT1SS N L Hob 3 0mm thick stainless steel with 0 9mm AISI304 grade stainless steel control panel and Scotchbrite finish 1 Heat Zone 1 x 22 MJ D size dual ring gas wok burner Electronic under knob ignition Flame failure safety device Connection 10 amp plug supplied Gas Supply Must be ordered as either Natural Gas o...

Страница 27: ...04 grade s steel control panel and trim in Scotchbrite finish Hob HT3SSN L 3 0mm thick s steel with 0 9mm AISI304 grade stainless steel control panel and Scotchbrite finish 3 Heat Zones 1 x 22 MJ D size dual ring gas wok burner 1 x 12 5 MJ C size single ring gas burner 1 x 6 5 MJ A size single ring gas burner Electronic under knob ignition 240V auto re ignition and flame failure safety device Conn...

Страница 28: ...PHONE 61 3 9700 9100 EMAIL info prks com au ADDRESS 83 Bangholme Rd Dandenong VIC 3175 www highland com au ...

Отзывы: