


18
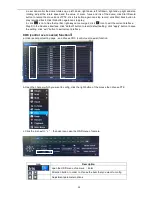
Step2: select channel, double-click and a dialog box will pop-up as Fig 3-14, user can edit week schedule:
Fig. 3-14 schedule-week schedule
Click “add” button to add a certain day schedule; click “delete” button to delete the selected schedule;
Copy: user can copy the specify schedule to other dates.
Click “OK” button to save the setting, click “Exit” button to exit current interface.
User can apply the schedule setting of certain channel to other or all channels, just only select channel
and click “Copy” button.
Step3: click “default” button to resort default setting; click “apply” button to save the setting; click “exit”
button to exit current interface.
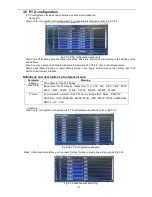
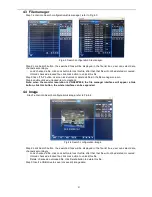
3.4.2 Motion
Step1: enter into system configuration
schedule configuration
motion; refer to Fig 3-15:
Fig. 3-15 schedule configuration-motion
Step2: the setup steps of motion are familiar with schedule; user can refer to 4.4.1 Schedule for details.
Note: the default schedule of motion detection is full-selected, that is, the color of schedule setting
interface is blue.
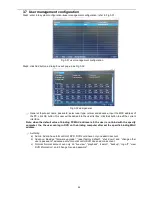
3.4.3 Sensor
Step1: enter into system configuration
schedule configuration
alarm; refer to Fig 3-16:
Step2: the setup steps of alarm are familiar with schedule; user can refer to 4.4.1 Schedule for details.
Note: the default schedule of sensor is full-selected, that is, the color of schedule setting interface
is blue.
Fig. 3-16 schedule configuration-sensor