background image

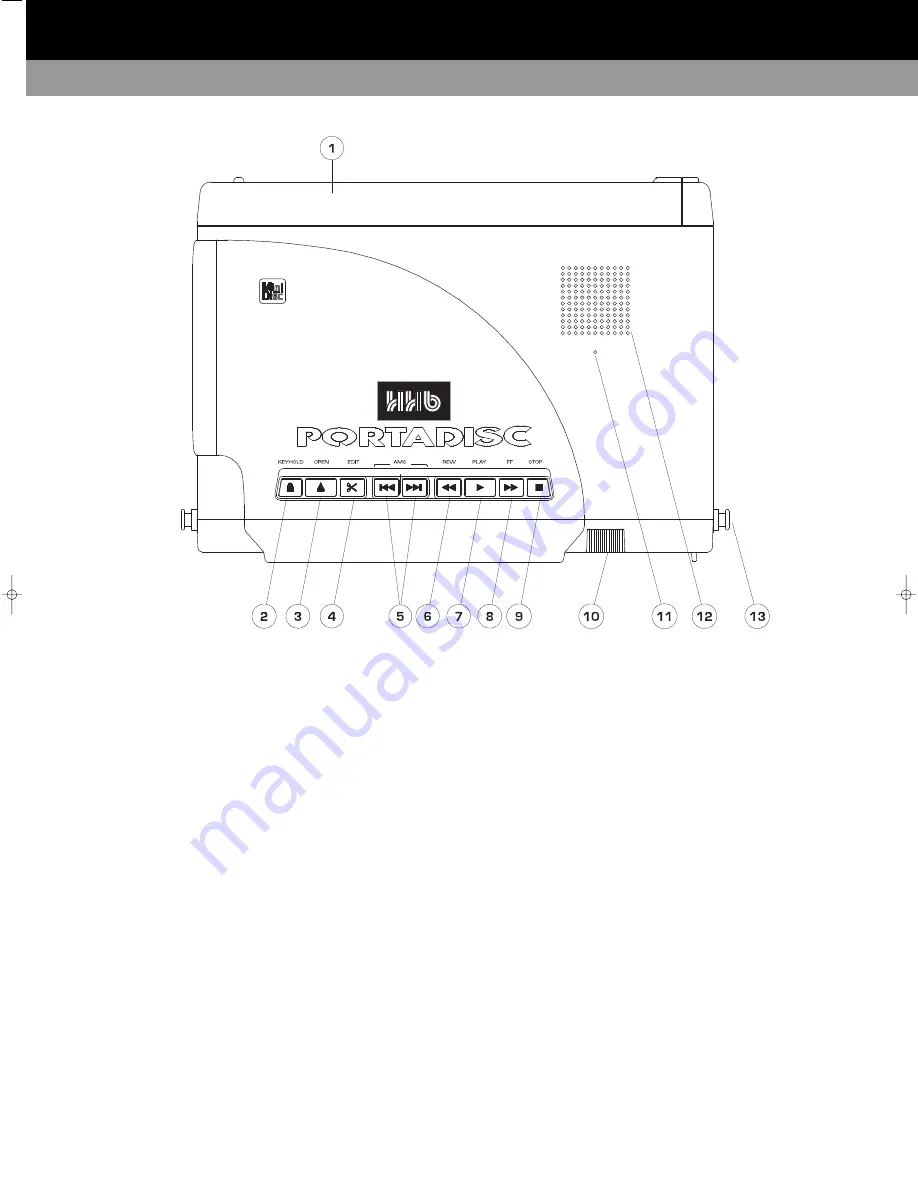
1

BATTERY COMPARTMENT

This cover slides off (from right to left in this
view) and underneath is the battery caddy,
holding 8 x AA batteries.

2

KEYHOLD

Use this button to avoid any accidental operation
during recording. Each time you press the button
for more than two seconds, the hold function
changes from ‘Key Hold ON’ to ‘Key Hold OFF’ and
vice versa. The following buttons can still operate
even when the keyhold function is on: KEY HOLD,
LIGHT, MARK, DISPLAY and POWER. The remote
control connection will not be affected by this
function; i.e., it is always enabled.

3

OPEN

Press this button to eject the MD disc. This
function is disabled during recording.

4

EDIT

Use this button to enter the different edit modes.

5

AMS

Use the        button to move back one or more
tracks and the        button to move forward one
or more tracks. These buttons are also used in
editing and naming.

6

REWIND

Rewinds the track during playback.

7

PLAY

Use this button to start playing back the track.

8

FAST FORWARD

Fast forwards the track during playback.

9

STOP

Use this button to stop the playback or recording
operation.

10

RECORD VOLUME CONTROL

Dual concentric control for independent left and
right level adjustment.

11

INTERNAL MONO MICROPHONE

12

MONITOR SPEAKER

13

SHOULDER STRAP ATTACHMENT POINTS

6

TOP PANEL

PORTADISC MDP500 MiniDisc Recorder

▲ ▲

PDISC_OP.QXD  6/11/00 12:43 pm  Page 7

Содержание Portadisc MDP500

Страница 1: ...ará en la web de HHB www hhb co uk La version Française de ce manuel d utilisation est disponible sur le site web de HHB à www hhb co uk Eine deutsche Version dieser Bedienungsanleitung ist im Internet unter der Adresse www hhb co uk erhältlich HHB MDP500 PORTABLE MINIDISC RECORDER ...

Страница 2: ...2 ...

Страница 3: ...5 Mic Attenuation Mode Basscut Mode Limiter Mode Phantom Mode Recording From Line Sources 16 Recording From Digital Sources 16 Recording From Mono Internal Mic 16 Basic Recording 16 17 Mono Recording Setup Menu 17 One Touch Setup How To Save How To Open Useful Recording Functions 17 18 6 Seconds Pre Recording Input Monitor Function Peak Hold Meter Overwrite Mode Threshold Level Functions 18 19 Rec...

Страница 4: ...The editing facility offers editing options such as Divide Combine Move and Erase in addition to naming program titles and discs The PORTADISC features 3 way power source and power management with external 12 14V DC 8 x AA alkaline batteries or 8 x Nickel Metal Hydride NiMH rechargeable batteries supplied The supplied batteries are high capacity 1550mAh NiMH cells for optimum performance Switchabl...

Страница 5: ...able safe operation The following points should always be observed in order to reduce the risk of fire or electric shocks Do not expose the recorder to extreme conditions of smoke water moisture or excessive vibration Do not insert objects other than MD discs or batteries or liquids into the recorder Do not remove the PORTADISC s covers except the battery compartment This recorder employs a laser ...

Страница 6: ...bled 3 OPEN Press this button to eject the MD disc This function is disabled during recording 4 EDIT Use this button to enter the different edit modes 5 AMS Use the button to move back one or more tracks and the button to move forward one or more tracks These buttons are also used in editing and naming 6 REWIND Rewinds the track during playback 7 PLAY Use this button to start playing back the trac...

Страница 7: ... the recorder and three recording presets MIC REC LINE REC and DIGI REC 21 REC LEVEL Adjusts the analog recording level manually for mic and line inputs This control does not affect the signal level when the AGC function is set to ON The outer control adjusts the left hand channel and the inner control adjusts the right hand channel A friction lock between the two controls allows them to move toge...

Страница 8: ...TORS Balanced XLR To connect either MIC or LINE inputs 35 REMOTE CONNECTOR Parallel remote control connector 36 USB CONNECTOR USB interface port for a compatible computer 37 OPTICAL I O CONNECTORS TOSlink SPDIF digital optical connectors 38 BATTERY COMPARTMENT 39 DC INPUT CONNECTOR To connect the standard accessory AC adaptor or an optional car adaptor DC12 14V 40 MINIDISC SLOT A disc must be inse...

Страница 9: ...ate and time 46 BATTERY INDICATOR Indicates the battery capacity remaining or whether the unit is connected to an external power source DC IN Throughout these operating instructions the following notation will be used When a button press is being illustrated in the text it will be written in bold type for example Press the RECORD button When a word that will be shown on the PORTADISC s display is ...

Страница 10: ...wn if it is left in STOP mode and none of the buttons have been touched for more than 10 minutes This function can be enabled by recalling AUTO POWER DOWN from the SYSTEM menu button BATTERY LIFE INDICATOR When the PORTADISC is operated with batteries the battery icon will be shown in the bottom right hand corner of the display The PORTADISC will automatically power down if there is insufficient b...

Страница 11: ...e symbol indicates the MD recorder manufacturer this is 30 for the PORTADISC The stamped date is displayed in the DATE menu when DISPLAY is pressed once more NOTE Recorded clock and date information is not available until the Table of Contents TOC has been updated This update only occurs when a disc is ejected If functions on the PORTADISC behave abnormally at any time it is a good idea to initial...

Страница 12: ...ENDING DIGITAL AUDIO TO EXTERNAL DIGITAL EQUIPMENT VIA COAXIAL OR OPTICAL OUTPUTS NOTE Ensure the digital output is turned ON see page 24 for details CONNECTING WITH A COMPUTER VIA THE USB INTERFACE REMOTE CONTROL The pin layout for the parallel remote connector is as follows Parallel remote connector pin configuration of Mini DIN remote control MIC LINE IN L MIC L MIC LINE IN R MIC R MIC LINE IN ...

Страница 13: ...ORTADISC in play mode the following information will be displayed each time you press the DISPLAY button Playback track number and playback time Playback track number and track time remaining Level margin Time stamped current time of the day if there is no time stamp recorded on the disc Date stamped the current date if there is no time stamp recorded on the disc DISPLAY DURING RECORD MODE With th...

Страница 14: ...stay on permanently NOTE We recommend minimal use of the display light when the PORTADISC is powered by batteries This will maximise battery life DISPLAY CONTRAST 1 Press SETUP until DISPLAY CONTRAST is displayed 2 Press F1 to choose the setting you want from 1 2 3 4 and 5 5 is the darkest 3 Press the F2 button to confirm and then press F3 to exit this page 14 DISPLAY CONTRAST 3 SET EXIT ...

Страница 15: ...ass cut setting OFF Off 75Hz Attenuate below 75Hz 150Hz Attenuate below 150Hz LIMITER MODE This mode selects the limiter function and automatic gain control In GANGED mode limiting on either channel will affect the other channel by the same amount thereby maintaining the stereo image 1 Press the INPUT button once again to recall LIMITER mode 2 Press F1 and F3 to choose the limiter setting from ON ...

Страница 16: ...all SOURCE mode 2 Press F1 or F3 to choose INTMIC Then press F2 to set up The internal mono microphone is suitable for use identing tracks etc NOTE If one channel is set to INTMIC the other channel will automatically be set to the same If you subsequently decide to change this setting you must first select the required source for both the left and right channels using F1 and F3 before pressing F2 ...

Страница 17: ...recall them by opening the user memories HOW TO SAVE 5 user memories are available named USER 1 to USER 5 1 Make your record mode setting using the INPUT button and the SYSTEM button 2 Press the SETUP button until SAVE SETUP is displayed 3 Press F1 to choose the user memory from USER 1 5 Then press F2 to save HOW TO OPEN You can open your pre set record mode which you saved in the user memories fr...

Страница 18: ... displayed 2 Press F1 to select the overwrite setting from ON or OFF 3 Press the F2 button to set up Then press F3 to exit the mode 4 Press PAUSE then select the track that you want to record over using the AMS and buttons NOTE If no track is selected recording will begin automatically over track 1 5 Slide the RECORD switch to the right to enter record pause mode Overwrite will be briefly displaye...

Страница 19: ...s follows The PORTADISC will automatically start recording when the threshold level setting is exceeded Recording will automatically pause when the audio level drops below the threshold level setting for more than 30 seconds The PORTADISC must be in record pause mode for the auto start function to operate 1 Press the SYSTEM button until AUTO START CUT is displayed 2 Press F1 to choose YES Then pre...

Страница 20: ...ess F2 to set up 3 Play back the track you want to repeat While playing back the track A B will be shown in the top right hand corner of the display 4 During playback press the F2 button at the time that you want the repeat function to start As this point has now been registered as A Repeat A will be shown momentarily on the display 5 Continue playback or press the FF button to reach the place whe...

Страница 21: ...HE TRACKS AT ONCE The function erases all the tracks recorded on the MD disc The disc name and track names are also removed 1 Press the EDIT button until ALL ERASE is displayed 2 Press the F2 button 3 ALL ERASE will appear in the display window Press F2 once again to erase all the tracks 4 Once the all erase process has been completed Complete and then Blank Disc will be shown in the display ERASE...

Страница 22: ... end of the first track TRK002 and the beginning of the second track TRK003 repeatedly If you are happy with the sound played back skip to point 5 in this list 4 If the PORTADISC is not playing back the correct point in the audio press either F3 or STOP to cancel the function Then start the procedure again from point 1 5 Press F2 to confirm 6 The combining process has been completed and Complete w...

Страница 23: ...ish to name If you want to name the disc rather than a track continue pressing F1 until DISC appears on the display 3 Press F2 to set up 4 The digit furthest to the left on the display will start blinking to indicate that the digit is ready to edit If the track or disc already had a title this function can be over ridden with a new title 5 Press the F1 AMS or AMS buttons to scroll through availabl...

Страница 24: ...it This facility is provided to avoid any accidental operation during recording Each time you press the button for more than two seconds the hold function changes from Key Hold ON to Key Hold OFF and vice versa The following buttons can still operate even when the keyhold function is on KEY HOLD LIGHT MARK DISPLAY and POWER The remote control connection will not be affected by this function i e it...

Страница 25: ...on you are using is selected in order to record from the USB audio source normally found in options menu 4 Should you wish to play back via USB from the computer to the PORTADISC playback has to be selected to be USB audio Most PC output paths will default to less than unity gain To correct this open the output gain control panel on the PC and select from options playback USB Audio Device then wit...

Страница 26: ...sc Recorder These diagrams show the basic menu operations Changing a page displays the current settings with the three functions keys F1 F2 and F3 selecting the parameters When a parameter is flashing pressing SET will action this choice 26 ...

Страница 27: ...27 ...

Страница 28: ... allowed due to the SCMS copy protect function Din Unlock The digital source is not powered on or transmitting via SPDIF or the connection is faulty If this warning appears the PORTADISC will automatically enter a suspend record mode and will resume recording on a new track once the signal reappears Disc Error The loaded MD disc is damaged in some way Disc Full There is not enough space left on th...

Страница 29: ...D recording Even when a track is less than two seconds long the track will still occupy two seconds worth of space This means that the actual recordable time will be reduced Also if there are scratches on the MD disc the damaged area will be omitted from the recording This will also cause a reduction in the recordable time When over writing on a used MD disc 1 The time remaining display may not sh...

Страница 30: ...NOTES PORTADISC MDP500 MiniDisc Recorder 30 ...

Страница 31: ...hone EIN 122dB A weighted THD N 1kHz ref 0dBFS 0 02 bandwidth 22Hz to 22kHz I O CONNECTIONS Analog connectors Balanced mic line input Connector type XLR 3 Pin 2 Hot pin 3 Cold Pin 1 Ground Mic input level for 0dBFS level control at max 52dBu Line input level for 0dBFS level control at max 2dBu Phantom power mic inputs 48V 7mA Unbalanced line output Connector type RCA phono Output level 8dBu 0dBFS ...

Страница 32: ... 020 8962 5050 E Mail sales hhb co uk HHB Communications USA LLC 1410 Centinela Avenue Los Angeles CA 90025 2501 USA Tel 310 319 1111 Fax 310 319 1311 E Mail sales hhbusa com HHB Communications Canada Ltd 260 King Street East Toronto Ontario M5A 4L5 Canada Tel 416 867 9000 Fax 416 867 1080 E Mail sales hhbcanada com ...

Отзывы: