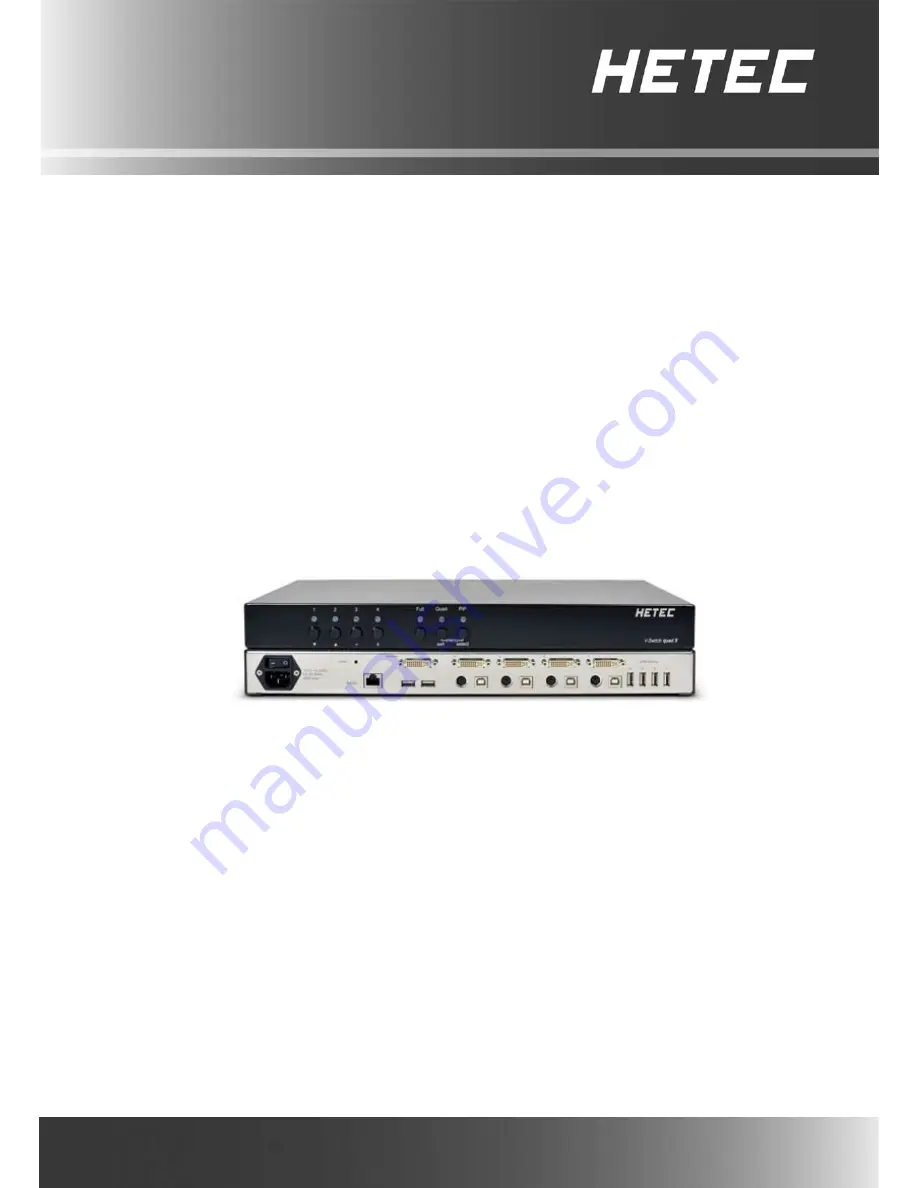
HETEC V-Switch quad II Скачать руководство пользователя страница 1

V-Switch quad II

Installation and Operation Manual


HETEC Datensysteme GmbH


Landsberger Straße 65


82110 Germering, Germany


Tel.: +49 (0)89 - 89 43 67 - 0


Fax: +49 (0)89 - 89 43 67 - 99


Email: [email protected]


Web: www.hetec.de

Содержание V-Switch quad II

Страница 1: ...Switch quad II Installation and Operation Manual HETEC Datensysteme GmbH Landsberger Stra e 65 82110 Germering Germany Tel 49 0 89 89 43 67 0 Fax 49 0 89 89 43 67 99 Email info hetec de Web www hetec...

Страница 2: ...mbH Version 1 00a Subject to amendments errors excepted This document or excerpts thereof may be reproduced only with HETEC s prior written approval All rights reserved HETEC Datensysteme GmbH Landsbe...

Страница 3: ...10 Connecting sources computers 11 Connecting USB devices 11 Powering up the system 11 ON SCREEN DISPLAY 12 OSD OVERVIEW 12 OSD MAIN MENU WINDOW 13 OSD NAVIGATION 13 OSD SYSTEM HOTKEY 14 HOTMOUSE FUN...

Страница 4: ...ange name 52 OSD HELP HOTKEY 53 ABOUT 53 CONTACT 53 hotmouse 54 ACTIVATING Hotmouse Cursor 54 Hotmouse Cursor IN FULLSCREEN MODE QUAD MODE 55 Hotmouse Cursor IN PIP MODE 56 Hotmouse Menu ACTIVATING 58...

Страница 5: ...splaying the entire screen contents of one source t FULLSCREEN MODE In Fullscreen mode one of the four sources is displayed in full screen size and maximum resolution PiP MODE Picture in Picture u Usi...

Страница 6: ...se keyboard touchscreen or trackball connection Transparent USB 2 0 V Switch quad II features a transparent high speed USB 2 0 matrix USB 2 0 devices e g printer external memory memory stick webcam 3D...

Страница 7: ...D Computer ports 4 x DVI I analog and digital 4 x PS 2 4 x USB Console ports 1 x DVI I 2 x USB for keyboard and mouse Transparent USB 2 0 ports 4 x transparent high speed USB 2 0 Maximum distance Vide...

Страница 8: ...ed power supply Installation Ensure that the device is disconnected from the mains before performing any installation work Unplug the device or disconnect the power supply Cables Only use the cables s...

Страница 9: ...responding channel computer port has been selected and is available for keyboard and mouse access When a LED flashes green there is no signal at the video input of the selected channel An LED lights u...

Страница 10: ...switch from Fullscreen mode to Quad mode PiP button Press this button to enable the PiP picture in picture function Selector You can also select the active channel using hotkey and the arrow keys The...

Страница 11: ...vely hold buttons 1 and 2 again to cycle through the following video modes VGA 640x480 60 SVGA 800x600 60 XGA 1024x768 60 UXGA 1600x1200 60 and the preferred video resolution found in the monitor EDID...

Страница 12: ...8 Four transparent high speed USB 2 0 ports 1 Power Plug for enclosed power cable 2 Reset Press this button using a suitable pointed object e g ballpoint pen for an entire reset of V Switch quad II 3...

Страница 13: ...firmware updates see page 69 6 USB for keyboard mouse touch or trackball console Two USB ports allow connecting keyboard mouse touch screen or trackball Using a USB Hub you can connect multiple keybo...

Страница 14: ...yet Connecting console monitor keyboard mouse touch screen trackball Connect your monitor to the monitor port of V Switch quad II via VGA DVI cable analog or DVI cable digital up to 20 meters For gre...

Страница 15: ...devices Connect your USB device to one of the four transparent USB ports to use it with computers connected to V Switch quad II It supports transparent USB devices such as printer external memory 3D m...

Страница 16: ...use key emulation Enlarge on touch FADE Smooth transitions MULTI MONITOR Assign mouse keyboard to video EDID Read and display EDID data of monitor VIDEO INPUT STATUS Display computers video input reso...

Страница 17: ...FT and RIGHT arrow or PLUS and MINUS keys to change the value in the current field Press ENTER to select a menu item Press ESC to return to the previous window higher menu level or exit the OSD Change...

Страница 18: ...IFT ALT and WINDOWS For double click hotkey commands you can choose one key which is double clicked to enter the command mode Selectable keys are STRG SHIFT ALT and SCROLL To change the hotkey mode or...

Страница 19: ...ctivate Hotmouse operation navigate to Enable Hotmouse and change the setting to Yes There are two modes of Hotmouse operation Hotmouse Cursor and Hotmouse Menu While Hotmouse Cursor supports only a l...

Страница 20: ...the period 1 to 30 seconds after which the selector will close automatically Default setting is 5 seconds Selector In Quad mode use hotkey Q to open the selector The selector indicates the active chan...

Страница 21: ...SELECT to open the OSD POSITION window Use this function to move the OSD window to any position on the screen OSD LANGUAGE Use arrow keys to navigate in the SYSTEM menu to the entry OSD LANGUAGE and...

Страница 22: ...d security level 0 To change the security level you must first enter a predefined password This six digit password is enclosed separately with the deliverables of V Switch quad II and should only be a...

Страница 23: ...ecurity level 7 with the following additional operations SYSTEM CONTROL CONSOLE FADE Setting of active channel using front panel buttons Hotkeys or Hotmouse Selecting channel with PiP button in Quad m...

Страница 24: ...evel 4 with the following additional settings in the OSD SYSTEM OSD LANGUAGE VIDEO BRIGHTNESS CONTRAST HORIZ POSITION VERT POSITION SCREEN WIDTH PHASE USB DEVICE 1 4 SECURITY LEVEL 2 As security level...

Страница 25: ...CT to open the TEST PATTERN window Use the Test Pattern feature to check monitor quality pixel errors contrast etc or the functionality of the V Switch quad II s video output It is recommended to use...

Страница 26: ...no signal input x is not shown in Quad mode b PiP images are not displayed on screen c these channels are not selectable in Fullscreen mode For example if you have connected three computers channel 1...

Страница 27: ...unit to the RS 232 port RJ 45 on the V Switch quad II rear panel To synchronize several devices special Y cables are required Settings for the connection are Transfer rate 57600 baud 8 data bits no pa...

Страница 28: ...all connected devices via DCP messages Special serial Y cables are used for this purpose see example on page 70 OSD SYSTEM CONTROL Important Each time you restart a V Switch quad II set to synchronize...

Страница 29: ...o synchronize V Switch quad II 1 sends every change in settings as a DCP message via the serial Y cable to the RX input of V Switch quad II 2 V Switch quad II 2 adopts the settings and sends a DCP mes...

Страница 30: ...s Queries are possible up to security level 7 The table below shows the maximum security levels for simple element settings These settings may be changed via DCP up to the specified protection level M...

Страница 31: ...quirements 12 single mode or 9 triple mode different sizes are available Single 3 5 7 10 15 20 25 28 33 38 44 50 Triple 3 5 7 10 15 20 25 28 33 50 equals the size of one quad screen one quarter of a f...

Страница 32: ...All other video sources are displayed three PiP images Triple gap PiP images are displayed with a gap in place of the active channel Triple no gap PiP images are displayed without a gap Triple tile Th...

Страница 33: ...modes Single fixed One channel is selected to be displayed as permanent PiP image Only the active channel full image can be switched Press front panel buttons 1 2 3 or 4 to switch the full image Singl...

Страница 34: ...reen images from two video sources are displayed side by side You can choose the left or the right image as the active channel To switch the active chan nel use the OSD hotkeys or front buttons Single...

Страница 35: ...es after a reset or when the system is powered up When the START menu is called up the current start configuration is displayed To modify your start configuration change parameters in the channel mode...

Страница 36: ...settings including the start mode set in MODE START RECALL Use arrow keys to navigate in the CONFIGURATION menu to the entry RECALL and press ENTER SELECT to open the RECALL window Use this feature to...

Страница 37: ...ered OSD LANGUAGE English SECURITY None security level 0 DISABLE CHANNEL All four channels are active CONTROL Off MODE PIP Size 15 Zoom factor 1 Display mode triple Active channel gap Offset from top...

Страница 38: ...ght and press ENTER SELECT for the new video format When the output mode is set to auto V Switch quad II chooses a resolution by reading the connected monitor s EDID data Choose the EDID menu item to...

Страница 39: ...OUT Use arrow keys to navigate in the CONSOLE menu to the entry KEYBOARD and press ENTER SELECT to open the KEYBOARD window Set the keyboard layout to the desired language English Deutsch German Espa...

Страница 40: ...first marker in the top left corner of the screen Touching the center of the markers as accurately as possible yields best calibration results Then repeat for the other three markers to complete cali...

Страница 41: ...ched to full image as soon as it is touched The full image gets exchanged with the other sources remaining visible as PiPs Right mouse button Press and hold your finger on the touchscreen to emulate t...

Страница 42: ...the mouse cursor and the position of your finger on the touchscreen may not match in certain cases when a computer switches resolution or changes the mouse position e g when the system is configured t...

Страница 43: ...tput are connected to V Switch quad II but only one keyboard and mouse to operate the computer If you use graphics cards with multiple video outputs you must assign the computer s mouse and keyboard t...

Страница 44: ...name serial number etc from the monitor s EDID memory If VIDEO OUTPUT is set to auto V Switch quad II uses the optimum output resolution offered by the EDID EDID Extended Display Identification Data i...

Страница 45: ...menu to the entry INPUT STATUS and press ENTER SELECT to open the INPUT STATUS window Go to Select input signal and define which video signal VGA or DVI is to be displayed If the setting DVI VGA is se...

Страница 46: ...position of computer screen with analog input only Use arrow keys to navigate in the VIDEO menu to the entry HORIZ POSITION or VERT POSITION and press ENTER SELECT to open the HORIZ POSITION or VERT...

Страница 47: ...n width number of horizontal pixels is defined by the VESA standard If the screen appears blurred change this setting to improve screen quality PHASE with analog input only Use arrow keys to navigate...

Страница 48: ...ide screen monitor aspect ratio 16 10 in Quad mode a video input with a different aspect ratio is normally displayed with black borders to the left and right If fit to screen is enabled the image is r...

Страница 49: ...de screen aspect ratio e g 4 3 PiPs are placed aside the full image of the active channel in the black bar on the right side The full image of the active channel is displayed left aligned on the scree...

Страница 50: ...rrow keys to navigate in COMPUTER menu to the MOUSE line and press ENTER SELECT to open the MOUSE window The upper half of the MOUSE window shows which mouse type USB PS 2 or PS 2 wheel has been recog...

Страница 51: ...pen the RESET PS 2 window Use arrow keys t u or and keys to select the channel 1 to 4 you wish to reset and confirm by pressing ENTER SELECT EDID DDC This window presents an overview of the status of...

Страница 52: ...esired line in the list shown on the right and press ENTER SELECT for the video format Use arrow keys t u to navigate to the second video mode entry and press ENTER SELECT to open the window with a li...

Страница 53: ...WRITE TO INPUT 1 write the monitor EDID to input 1 WRITE TO INPUT 2 write the monitor EDID to input 2 WRITE TO INPUT 3 write the monitor EDID to input 3 WRITE TO INPUT 4 write the monitor EDID to inp...

Страница 54: ...ransparent USB 2 0 switch Which USB device port is switched to which computer 1 to 4 connected to V Switch quad II or switched off OFF Port is not switched to a computer A USB device may be connected...

Страница 55: ...itching To execute the switching press ENTER SELECT This switching mode is recommended for USB devices with risk of data loss e g USB stick printer external memory 2 Manual switching without warning T...

Страница 56: ...board to rename the USB device or use the front panel buttons as described in the OSD Exit the menu The new name will automatically be saved and displayed in the other menus OSD USB DEVICE 1 4 CHANGE...

Страница 57: ...SELECT to open the corresponding window The HELP COMMAND LIST window lists keyboard commands and their functions The HELP ABOUT windows show the current revision levels of V Switch quad II hardware an...

Страница 58: ...ole rapidly four times in alternating horizontal direction u t u t or t u t u The Hotmouse Cursor can also be activated via touch screen tap the screen twice and leave your finger pressed on the touch...

Страница 59: ...image of the channel that you wish to activate and press the left mouse button Example Switch from channel 2 to channel 3 Hotmouse Cursor IN QUAD MODE Switching active channel mouse keyboard Activate...

Страница 60: ...annel from 2 to 3 Vertical positioning of PiP images Activate Hotmouse Cursor Move the Hotmouse Cursor to the PiP image area hold down the left mouse button and drag the PiPs to the desired vertical p...

Страница 61: ...pear in the Hotmouse Cursor Hold down the left mouse button and drag the Hotmouse Cursor to the left to increase PiP image size or to the right to reduce PiP image size Scaling PiP images up Hold left...

Страница 62: ...using the Hotmouse Cursor the Hotmouse Menu will reopen Menu appearance varies depending on display mode Quad Fullscreen PiP This menu allows you to carry out switching operations and change PiP sett...

Страница 63: ...ck the left mouse button to activate it You can also switch to a different mode with the left mouse button Hotmouse Menu in Quad mode Quad mode Hotmouse Menu FULLSCREEN MODE Use the mouse to navigate...

Страница 64: ...PiP zoom Change PiP mode triple triple gap single fixed single direct single scan and scan time The PiP modes are described in detail on page 27ff Triple gap PiP images are displayed with a gap in pl...

Страница 65: ...t panel buttons 1 2 3 or 4 to directly select the PiP channel you want Single dual The left half of the first channel is displayed at full size next to the left half of the second channel Use the acti...

Страница 66: ...d that the fault is due to the unit we will repair your unit free of charge during our warranty period Please pack the device carefully if possible in its original packaging and send it to HETEC Daten...

Страница 67: ...V Switch quad II Installation and Operation Manual ANNEX 63 DECLARATION OF CONFORMITY...

Страница 68: ...quipment is operated in a commercial environment Operation of this equipment in a residential area is likely to cause interference in which case the user at his own expense will be required to take wh...

Страница 69: ...efault HOTKEY Further examples Double click key Double click one key hotkey and right after press the command key within 2 seconds COMMAND Hotkey and in sequence As double click hotkey you can choose...

Страница 70: ...mands Open OSD Directly open OSD USB Device 1 4 Safe output resolution Directly open OSD PiP menu In the background display mode switches to PiP as long as menu is open Open Hotmouse Menu KEYBOARD COM...

Страница 71: ...with a free RS 232 COM port Your V Switch quad II The installation CD containing the confdevEn exe program The enclosed serial cable RJ45 DB9 adaptor RJ45 CAT5 cable Use the serial cable to connect th...

Страница 72: ...is connected to Remote OSD operation Click the green arrow to open the On Screen Display OSD of V Switch quad II remotely on your external Windows computer Now the main OSD menu is open and ready for...

Страница 73: ...re file Use the serial cable to connect the COM port of your computer to the RS232 port on V Switch quad II Start the executable firmware file Set the desired COM port and press Update All LEDs on the...

Страница 74: ...the rear panel of V Switch quad II This adaptor is connected to your external serial control device e g computer To the adaptor any CAT5 cable can be connected The CAT5 cable again is connected to the...

Страница 75: ...nd at http www w3 org XML The XML scheme for DCP can be found on the enclosed CD under the name dcp xsd For a detailed description on how to use DCP XML with V Switch quad II please see the DCP XML Ma...

Страница 76: ...uch The Bergquist Company XanQ USB R5W HT580 R by XanQ Technology Corporation used in the HETEC CompactConsole HE TFT RM17 rack console 3M MicroTouch MicroTouch EX II new release delivered since 2009...

Страница 77: ...50 22 50 CEA 861 E HDTVp 1280x720 60 60 CEA 861 E WXGA 1280x768 60 60 DMT UWXGA 1280x960 60 60 DMT UWXGA 1280x960 85 85 DMT SXGA 1280x1024 g 50 50 CVT SXGA 1280x1024 60 60 x DMT SXGA 1280x1024 g 72 7...

Страница 78: ...60 XGA B 1152 864 75 UWXGA 1280 960 60 UWXGA 1280 960 85 SUN 1152 900 66 WXGA 1280 768 60 WXGA 1366 768 60 WSXGA 1680 1050 60 WUXGAr 1920 1200 40 WUXGAr 1920 1200 50 WUXGAr 1920 1200 60 HDTVp 1280 72...

Страница 79: ...witch the display mode of any of the V Switch quad II units in the master slave system Different levels master or slave require different types of hotkeys For example keep the hotkey default setting 1...

Страница 80: ...CD 1 power cable 1 cable set HW KON DVI VGA 1 adapter DVI I VGA for console 1 short PS 2 keyboard mouse USB adaptor 2 cable set HW CPU VGA 1 video cable DVI VGA length 2 0 m 1 Y cable PS 2 for mouse...

Страница 81: ...HETEC Datensysteme GmbH Landsberger Stra e 65 82110 Germering Germany Tel 49 0 89 894367 0 Fax 49 0 89 894367 99 Email info hetec de Web www hetec de...

Отзывы: