


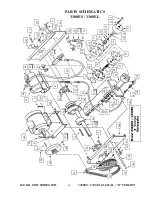

H.E.R.O. INDUSTRIES LTD.
330SES / 330SEL MANUAL - “B” VERSION
25
1
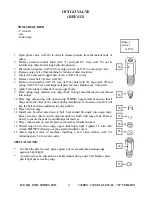
Open prime valve, (ref# 49) in order to release pressure from the material side of
pump.
2
Remove pressure control knob, (ref# 71) and pull P.C. stem, (ref# 76) out to
internal stop, thereby releasing hydraulic pressure.
3
Disconnect outgo tee, (ref# 35) from outgo swivel, (ref# 31) on the outgo valve.
4
Remove outgo valve from machine by turning counter clockwise.
5
Invert valve and secure upper part of valve, (ref# 30) in vise.
6
Remove lower half of valve, (ref# 24).
7
Remove crush washer, (ref# 25), seat, (ref# 26), ball, (ref# 27), cage, (ref# 28) and
spring, (ref# 29). Clean and inspect all parts for wear. Replace any worn parts.
8
Apply Teflon tape to threads of outgo upper body.
9
Place spring, large end first, into outgo body. Spring should fit into slot machined
into tunnel.
10 Place cage onto spring, with open end up.
NOTE:
Cage should be open so that it
drags down the sides of the tunnel during installation. If closed too much it will
trap the ball and cause pulsation in spray pattern.
11 Place ball into cage.
12 Install seat, bevelled side down to ball. Seat should fit snugly into outgo body.
Press on seat to ensure it will compress until it is flush with outgo body. Release
slowly to ensure the parts do not dislodge themselves.
13 Place crush washer on seat. Replace crush washer if badly crushed.
14 Thread outgo lower onto outgo upper until finger tight. Tighten 1/2 turn with
wrench.
NOTE:
Teflon tape or pipe sealant should be used.
15 Attach repaired valve to machine, installing a new crush washer, (ref# 23)
following steps 3-4 in reverse order.
SPECIAL NOTES:
* To check the ball for wear, place against a new seat and check sealing edge
against a bright light.
* A used seat may be checked in a similar manner using a new ball. Replace used
part if light pass at sealing edge
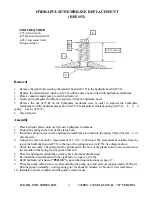
30
23
24
25
26
27
28
29
Outgo
swivel
ref# 31
OUTGO VALVE
(REF# 32)
TOOLS REQUIRED
-1" wrench
-vise
-Teflon tape


