background image

H.E.R.O. INDUSTRIES                            

        300S / 300SL LEGEND Owner’s Manual 

27 

                        HYDRAULIC HEAD INSERT REPLACEMENT


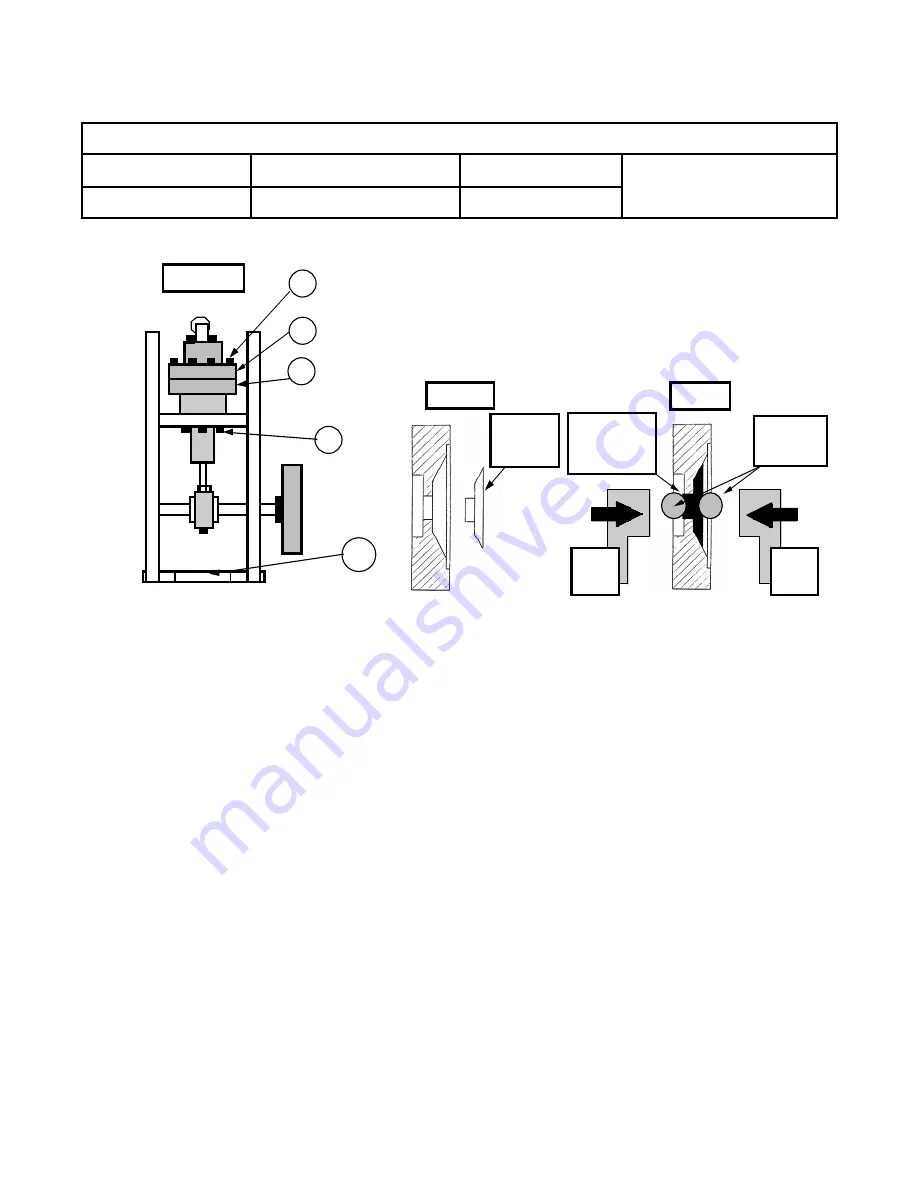
1. Tilt unit up onto its’ nose ( resting vertically on handle, ref# 130). See Fig. 1. 
2. Remove the eight bolts ( ref# 17) securing the paint head ( ref# 18) to the hydraulic head ( ref# 53). 
3. Place rags around the cylinder area to absorb hydraulic oil which will leak while performing step 4. 
4. Remove the six bolts ( ref# 59 ) securing the crossblock/cylinder/hydraulic head.  Bolts are 

accessed from the underside of crossblock. 

5. Remove hydraulic head ( ref# 53) to work bench.  
6. Remove old, broken or damaged insert ( ref# 55). 

NOTE: 

Insert should have no movement, when properly installed. If it is spinning or able to 

move back and forth, but has not come completely free of the hydraulic head, it may be possible 
to re-tighten using the same installation instructions to follow. See steps 8 – 10. 

7. Place new insert into the hydraulic head. See fig. 2. Insert will protrude through the hydraulic head 

by approximately 1/8”. To affix the insert the extra material of the insert must be flared to secure to 
the hydraulic head. 

8. Position a steel ball on the front and back of the insert. See figure 3. 
9. Position this assembly in the jaws of a vise. 
10. Slowly close the vise jaws. The vise acts as a press and the ball will cause the extra insert material 

to flair around the head. Continue closing vise until the insert is tight and can no longer be rotated 
or spin in the hydraulic head. Over tightening can create cracks or splits in the flange/flare, leading 
to repeat failures. Do Not over tighten.  

11. Re-assemble pump, in the reverse order of removal. Torque all bolts to 30 foot pounds. 
12. Once the repairs are completed , return unit to horizontal position, replenish lost oil and purge per 

instructions on page 19. 

Fig. 2. 

Fig. 3 

Steel ball 

( 17S ) 

Vise 
jaws 

This small lip 

will roll over 

to secure 

Vise 
jaws


Insert 

23A-1 

Tools or Supplies Required


1/4 Allan wrench 

4-45-3 Pressure cap 

Torque Wrench 

Vise 

H.E.R.O. hydraulic oil 

Rags  

17S Balls ( 2 ) Slightly 
used. May damage new.  

Fig. 1 

59 

18


53


17


130 

Содержание 300S Legend

Страница 1: ...719 Lake City Way 2719 Lake City Way Burnaby B C V5A 2Z6 Burnaby B C V5A 2Z6 Phone 604 420 Phone 604 420 6543 6543 To Toll Free ll Free800 800 494 494 4376 4376 Fax 604 420 Fax 604 420 8725C 8725C E E...

Страница 2: ...ers or their local authorized service depots The warranty is only applicable to the original purchaser and the equipment has been properly used operated and maintained in accordance with all instructi...

Страница 3: ...S ARE IMPORTANT Read and understand this manual completely especially with regard to all safety precautions Read and follow instructions on all warning labels on your equipment Keep the warning labels...

Страница 4: ...n trigger in LOCKED position with gun locked closed NEVER operate the sprayer without the tip guard complete and in place NEVER spray any material in the vicinity of open flame pilot lights electrical...

Страница 5: ...r at least 3000 psi working pressure in the spraying system ALWAYS use accessories and components supplied by H E R O Industries or specifically approved in writing by H E R O Industries on with the u...

Страница 6: ...an be dangerous Your H E R O airless sprayer has been fully factory tested prior to shipment BEFORE STARTING YOUR H E R O PUMP CHECK to ensure that the shipping seal has been removed from under the ca...

Страница 7: ...ssure control handle ref 43 counter clockwise to lowest pressure setting 11 Be sure motor switch is in OFF position Plug unit into 115V 15 amp grounded circuit NOTE If using an extension cord you MUST...

Страница 8: ...o flush the prime valve 6 Close prime valve 7 Trigger gun into paint container until thinner comes through See special notes from step 4 Re direct flow into waste container and continue spraying until...

Страница 9: ...least three times the maximum draw of the motor under full load A minimum 50 and a maximum of 300 of airless spray hose may be used NOTE 50 x 3 8 paint hose part 117 should be used for every 50 x 1 4...

Страница 10: ...lves or plugging the tip Always strain the paint before putting through the pump 2 Always spray at the lowest pressure setting which will provide a uniform spray fan fig 1 page 11 Adjust pressure cont...

Страница 11: ...H E R O INDUSTRIES 300S 300SL LEGEND Owner s Manual 11 AIRLESS SPRAY PAINTING SUGGESTIONS AND TECHNIQUE Poor Good Tailing Good Pattern Fog Over Spray FIG 1 FIG 2 FIG 2 FIG 3 FIG 4 FIG 5...

Страница 12: ...ay tip s fan width classification This size is measured in inches and is determined when spraying 12 inches from the spray surface Various methods of noting the fan widths are used by tip manufacturer...

Страница 13: ...er Finishes clear 009 011 Sanding Sealers 009 011 Shellac clear 009 011 Transparent Stain 011 013 Water Sealers clear 011 013 Solid Stains Medium Body 60 100 013 015 Exterior House Paint 013 017 Inter...

Страница 14: ...agm is to create a barrier between the hydraulic oil and the spray material and transfer the energy created To fully understand and trouble shoot a H E R O pump always keep in mind that for every acti...

Страница 15: ...pressure will cease HYDRAULIC OUTGO VALVE REF 73 PART 4 27C The hydraulic outgo valve better known as the pressure control valve is used to control the units operating pressure The valve is fully adju...

Страница 16: ...the pump and hose at the completion of a job When the prime valve is open the material is pumped through the paint intake and outgo and back to the source by way of the prime valve return hose When c...

Страница 17: ...nt hydraulic from paint and make identification of your solution easier to obtain This test is commonly referred to as the Diaphragm Test The solution to almost all problems can be found in the paint...

Страница 18: ...Inspect ball cage and cage spring for damage or wear Inspect for foreign material jamming ball Replace parts as needed 3 Intake seat loose bypassing remove intake endcap ref 11 and ball cage ref 14 Ch...

Страница 19: ...ulic system must be cleaned and flushed Make sure to remove and clean the hydraulic tank screen ref 66 during this process Refill only with genuine H E R O LVO hydraulic fluid NOTE If lacquer has cont...

Страница 20: ...e return hose ref 48 for material bypass Repair prime valve using ref 47 if material is bypassing LOW STATIC PRESSURE LOW SPRAY PRESSURE Check with pressure gauge see page 17 for details 1 Pressure co...

Страница 21: ...se clamps in intake assembly for tightness 2 Air leak in paint intake check for cracked or broken intake fittings Swivel connector ref 8 or hose barb ref 7 may be damaged due to over tightening Look f...

Страница 22: ...3 Plugged siphon screen siphon tube gun filter or a combination inspect and clean or replace as required 4 Plugged tip remove and clean tip 5 Pump malfunctioning or unsuitable for the material refer t...

Страница 23: ...rea when correctly installed Use a wooden or nylon dowel to gently tap into place if the seat did not fall into place fully Use caution as the tungsten carbide seat is very brittle yet strong and may...

Страница 24: ...the sides of the tunnel during installation If closed too much it will trap the ball and cause pulsation in spray pattern 11 Place ball into cage 12 Install seat beveled side down to ball Seat should...

Страница 25: ...tight If leakage occurs at this junction point during operation tighten 1 4 turn more or until leakage stops 9 To install new valve stem or valve stem seals ref 38 or 39 continue at step 9 10 Complete...

Страница 26: ...onto the screw being certain the beveled edge of the plate is next to the nylon pads During operation the diaphragm flexes over the beveled edge If reversed flat edge against diaphragm the diaphragm w...

Страница 27: ...otrude through the hydraulic head by approximately 1 8 To affix the insert the extra material of the insert must be flared to secure to the hydraulic head 8 Position a steel ball on the front and back...

Страница 28: ...ay under cylinder area 4 Grasp the pump assembly and pull away from the piston Stop when piston pulls free to allow the hydraulic oil to drain into pan Completely remove pump assembly from between sid...

Страница 29: ...begins to loosen from rod re tighten to rod Place vise grips on rod to assist in tightening piston rod into eccentric 15 Remove and discard old piston seals 16 Piston seal kits ref 90 contain a total...

Страница 30: ...hole should be flush or slightly beveled The greater the wear on the ball seat and retainer the poorer the static pressure will be Replace parts individually or use repair kit ref 88 6 Hold P C body v...

Страница 31: ...r Bags 5 Gallon 25 per Carton 4 649 Wonder Wash 1 5 ounce 48 per Carton 4 655 Wonder Wash 5 ounce 25 per Carton 4 660 Wonder Wash 5 lbs Bulk 4 662 Wonder Coat 1 Liter Bottle 4 664 Wonder Coat 12 x 4 6...

Страница 32: ...14 4 183S CAGE Spring Loaded Use with steel ball 17S 1 15 19A SPRING 1 16 5V O RING Viton 1 17 3 CAPSCREW SKT HD 5 16 x 1 3 4 8 18 21E HEAD Material Paint 1 19 4 6652 REPAIR KIT Ref 13 2 14 16 KIT 20...

Страница 33: ...lve Close Tightly After Prime 1 46 606 12 LABEL Bleed Valve Max WPR 4000 PSI 1 47 4 606RK REPAIR KIT Bleed Valve Ref 24 25 37 KIT 48 4 185B HOSE P V Return Line 1 49 196 CLAMP 1 50 188 TIES 2 HYDRAULI...

Страница 34: ...SSY 75 HW2010 SETSCREW SKT HD 5 16 NC x 5 16 1 76 27C 6 LOCK NUT Aluminum P C 1 77 4 27C 10 STEM ASSEMBLY Ref 78 80 ASSY 78 27C 10A STEM P C 1 79 27C 10B SCREW Stem P C 1 80 27C 12 O RING P C 2 81 4 2...

Страница 35: ...AVE Pump C W Set Screws 2 ref 105 1 106 HW2020 SET SCREW SKT HD 5 16 NC x 7 16 2 107 66 100 BELT 1 108 4 48 100 SHEAVE Motor C W Set Screws See Ref 105 1 109 4 61 74 MOTOR 1 0 H P Doerr Motor Includes...

Страница 36: ...D 2 130 4 1 75 3 FRAME HANDLE 1 131 67 16A WHEEL 8 1 4 2 132 67 17 COTTER PIN 2 300S ONLY CHASSIS PARTS 133 210 1 AXLE 1 134 67 12 HANDLE GRIP 1 135 211 HANDLE 1 136 212 SPRING CLIP 1 137 213 PIN 1 13...

Страница 37: ...300SL LEGEND Owner s Manual 37 PARTS SCHEMATIC 300S 300SL LEGEND 134 133 135 136 132 131 120 128 127 137 2 7 49 48 50 4 6 1 8 300SL 140 139 138 141 121 5 130 6 142 122 122 123 122 125 124 124 125 122...

Страница 38: ...00S 300SL LEGEND 123 108 106 104 109 119 117 104 125 107 102 101 124 95 95 97 116 115 106 105 114 110 113 58 59 63 61 62 64 103 111 112 61 113 114 65 68 67 71 69 70 97 96 33 73 66 30 72 34 22 21 56 89...

Страница 39: ...STRIES 2719 LAKE CITY WAY BURNABY B C CANADA Phone 604 420 6543 800 494 4376 Fax 604 420 8725 Purchased From __________________________ __________________________ __________________________ __________...

Отзывы: