HENN Wardrobe Cavic II 02 Sliding Doors D225-108 Скачать руководство пользователя страница 4

ITM/D225-

12

13

13

14

15

15

16

16

16

16

K

K

K

K

K

K

K

K

K

K

K

K

K

K

K

K

K

K

D

D

D

D

D

D

D

D

D

AB

AB

AB

AB

AB

AB

AB

AB

AB

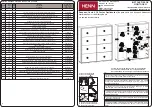
Recomenda-se montar estas 
peças separadamente, antes 

de 

fi

 xar no móvel.

It is recommended to mount 

these parts separately before 

attaching to the cabinet.

Se recomienda montar estas 

piezas por separado, antes 

de 

fi

 jar en el mueble.

4

23

23

24

27

27

27

27

24

Fixar as corrediças nessas furações

Fix slides in these drillings

Fijar las diapositivas de estos agujeros

Para a desmontagem da corrediça 
siga a instrução ao lado.

For the dismount of the sliding onem follows
the instruction aside.

Para el desmontaje seguimiento de diapositivas
la instrucción siguiente a.

ITM/D225-

14º

13

Содержание Wardrobe Cavic II 02 Sliding Doors D225-108

Страница 1: ...irror 1040x566x15 27 6 6 04 Espelho com furo Espejo con orificio Mirror with hole 1000x540x3 28 2 6 03 Frente de gaveta Frente de caj n Front of drawer 628x200x15 29 2 6 03 Vidro incolor com furo Vidr...

Страница 2: ...Suporte cabideiro oblongo Zamac ZB Parafuso minifix Adesivo tapa parafuso 17mm Cabideiro Alum 574mm Cabideiro Alum 1027mm Sach de cola Tambor minifix Adesivo tapa parafuso 10mm Etiqueta resinada Henn...

Страница 3: ...menda se montar estas pe as separadamente antes de fixar no m vel It is recommended to mount these parts separately before attaching to the cabinet Se recomienda montar estas piezas por separado antes...

Страница 4: ...attaching to the cabinet Se recomienda montar estas piezas por separado antes de fijar en el mueble 6 7 4 23 23 24 27 27 27 27 24 Fixar as corredi as nessas fura es Fix slides in these drillings Fijar...

Страница 5: ...7 27 27 Y Y F F F F F F U U U U T T U V Z AB AB AB AB AB AB H H H H H H U U U U U 25 26 L F F 13 12 ITM D225 K K K K K K K K K K K K K K K K K I I I I I I I J J J J J J J D D AB AB AA AA AA AA AA AA A...

Страница 6: ...I I I I I I I K I I I I K K K K K K K J J J D AA AA AA AA AA AA AA AA AA AA AA AA J J J J J J J J J J 9 6 U U U U U ITM D225 23 23 23 24 24 24 24 Y Y F F F F F F U U U V V H H H H H H AB AB AB AB AB A...

Страница 7: ...aci n del Kit Roldanas U y Kit Amortiguador T en las Puertas ITM D225 Interno da Porta Lado direito Interno de la Puerta Lado derecho Internal Door Right Side Interno da Porta Lado esquerdo Interno de...

Страница 8: ...attached to the product 11 8 ITM D225 T T T T T T T T U U U U 22 22 17 05 18 17 21 21 Detalhe para Insta o do Kit Amortecedor T no Trilho Superior Detalle para la instalaci n del Kit amortiguador T e...

Отзывы: