Hendi 281369 Скачать руководство пользователя страница 95

95

RO

Cum se scoate și se re-instalează filtrul de aer (Doar pentru articolul 281369)

Acest filtru este amplasat înaintea admisiei aerului și trebuie curățat regulat pentru a menține 
camera curată.

Содержание 281369

Страница 1: ...nehmen sollten Sie diese Gebrauchsanweisung aufmerksam lesen Alvorens de apparatuur in gebruik te nemen dient u deze gebruiksaanwijzing aandachtig te lezen Przed uruchomieniem urz dzenia nale y koniec...

Страница 2: ...stra i maualul de utilizare al turi de aparat For indoor use only Nur zur Verwendung im Innenbereich Alleen voor gebruik binnenshuis Do u ytku wewn trz pomieszcze Pour l usage l int rieur seulement D...

Страница 3: ...nnect the appliance from the electrical outlet and contact the retailer if it is damaged Warning Do not immerse the electrical parts of the appliance in water or other liquids Never hold the appliance...

Страница 4: ...as described in this manual This appliance should be operated by trained personnel in kitchen of the restau rant canteens or bar staff etc Caution Hot surface The temperature of the glass door and oth...

Страница 5: ...and the temperature checked before consumption in order to avoid burns Warning Microwave heating of beverages can result in delayed eruptive boiling therefore care must be taken when handling the con...

Страница 6: ...neces sary to use an extension cord use only a 3 wire extension cord Utensils There may be certain non metalic utensils that are not safe to use for microwaving If in doubt you can test the utensil i...

Страница 7: ...be shown on the display It will disappear in 1 minute of inac tivity Then the microwave will enter into the Idle Mode Idle Mode During idle mode the screen is blank and there will be no oven activity...

Страница 8: ...you ll find the 10 preset programs When operating the microwave shows the remaining time in the display when it s a multi stage program the total remaining time will be displayed Button 1 2 3 4 5 6 7...

Страница 9: ...To use this function first follow the steps under Man ual entry After setting the time and power of the first stage press again the display shows STAGE 2 for item no 281369 281413 or S 2 for 281444 on...

Страница 10: ...cycles trough these options To set the desired setting press start Now the change is saved During changing the options you can cancel this by pressing pause The change won t be saved and the microwave...

Страница 11: ...cooler parts of the microwave like for instance on the door Trouble Possible cause Solution Microwave doesn t start working Power cord not plugged in correctly Check if the power cord is plugged in c...

Страница 12: ...be cleaned regularly to keep the chamber clean Pull up the plastic nail cap Take off the filter Wash the filter with lukewarm water with a mild detergent until it s clean as possi ble Let the filter d...

Страница 13: ...splash shield 1 Use 2 thumbs to press the indicated locks of the splash shield 1 Align the 3 pins at the back of the splash shield with the 3 holes at the back of the microwave 2 The lock is released...

Страница 14: ...in one year after purchase will be repaired by free repair or replacement provided the appliance has been used and maintained in accordance with the instructions and has not been abused or misused in...

Страница 15: ...egenst nde einf hren Den Stecker nicht mit nassen oder feuchten H nden ber hren Gefahr eines Stromschlags Das Ger t darf nicht selbstst ndig repariert wer den S mtliche M ngel und Unzul nglichkeiten s...

Страница 16: ...eine Gefahr f r den Nutzer dar und kann zur Besch digung des Ger tes f hren Benutzen Sie ausschlie lich Ersatzteile und Zubeh r im Original Dieses Ger t eignet sich nicht f r den Gebrauch durch Person...

Страница 17: ...in keinem sauberen Zustand dann kann dies zu einer Verschlechterung des Zustands der Oberfl chen f hren was wiederum die Lebensdauer des Ger tes negativ beeinflusst und Gefahrensituationen auf treten...

Страница 18: ...ellen sind nicht geeignet f r die Bedienung mit Hilfe einer externen Schaltuhr oder eines gesonderten Fernsteuerungssystems Die T r oder Au enfl chen k nnen w hrend der Funktion des Ger tes hei wer de...

Страница 19: ...elle Wenn die Verwendung einer Verl ngerungsleitung notwendig ist dann d rfen nur 3 adrige einge setzt werden Gef e Die Verwendung einiger Nichtmetallgef e kann nicht sicher sein Wenn Zweifel bestehen...

Страница 20: ...btau en 2 Taste f r die Zeiteingabe 3 Doppelte Anzahl 4 Pause 5 Start 6 Zifferntastatur Die Taste 1 dient auch zum Programmieren und Einstellen des Modus f r mehrstufiges Kochen 0 X2 1 2 3 4 5 6 7 8 9...

Страница 21: ...Wahl der Leistung nicht eingestellt wird kommt es zur Einstellung des fabrikm igen Wertes von 100 Wenn alle Einstellungen eingef hrt wurden dr cken Sie die Tas te jetzt beginnt die Mikrowelle zu arbe...

Страница 22: ...peichert Nachfolgend finden Sie eine kurze Anweisung wie man ein Programm von 1 25 Minuten bei 70 Leistung programmiert 1 ffnen Sie die T r und dr cken Sie die Taste 1 f r 5 Sekunden im Display wird d...

Страница 23: ...n wird im Display die dem jeweiligen Pro gramm entsprechende Zeit angezeigt stan dardm ig 30 3 Dr cken Sie die Tasten 1 2 5 zur Ein f hrung der Kochzeit 4 Dr cken Sie die Taste zur Einstellung der Lei...

Страница 24: ...us zur ck Nachfolgend finden Sie ein Verzeichnis der Optionen die ge ndert werden k nnen die fett gedruckten Optionen sind die fabrikm ig eingestellten Optionen Option Einstellung Beschreibung 1 Signa...

Страница 25: ...r vorher im Wasser mit dem Zusatz eines milden Reini gungsmittels angefeuchtet wurde in einem sauberen Zustand zu halten Verwenden Sie keine tzenden oder abrei benden Reinigungsmittel Ebenso d rfen ke...

Страница 26: ...ist muss man sich mit dem Lieferanten oder einem autori sierten Service in Verbindung setzen Im Display wird die Information angezeigt OVEN IS HOT DO NOT OPEN THE DOOR DIE MIKROWELLE IST HEISS FFNEN S...

Страница 27: ...ln die den Filter befestigen abnehmen und zu sich ziehen Um den Filter einzusetzen muss man die Montageplatte des Filters an die Mikrowelle anlegen wobei auf die richtige Lage der Montagebohrungen zu...

Страница 28: ...rons 1 Mit den Daumen auf die angezeigten Haken dr cken welche die Abdeckung des Magnetrons befestigen 2 Dadurch werden die Haken entblockiert und man kann die Abdeckung herausnehmen 3 Die Abdeckung m...

Страница 29: ...bzw des Austausches unter der Voraussetzung beseitigt dass das Ger t in einer der Bedienungsanleitung ge m en Art und Weise betrieben und gewartet wird und weder vors tzlich vernichtet noch nicht best...

Страница 30: ...at Raak de stekker niet met natte of vochtige handen aan Gevaar van elektrische schokken Probeer het apparaat niet zelf te repareren In het geval van storingen laat reparaties alleen uitvoeren door ge...

Страница 31: ...apparaat en het netsnoer buiten bereik van kinderen Kinderen mogen niet met het apparaat spelen Koppel het apparaat altijd los van het lichtnet als het onbeheerd wordt achter gelaten en voordat het ap...

Страница 32: ...n kommen met gefreesde randen of kunststof pannen met het deksel slechts gedeeltelijk verwijderd Brandge vaar Houd de oven altijd in de gaten terwijl voedsel in papier of kunststof verpakkin gen wordt...

Страница 33: ...njuist aansluiten van de aardeleiding kan leiden tot elektrische schok Plug de stekker niet in een con tactdoos totdat de gehele installatie goed voorbereid en geaard is Aarde aansluiting Deze magnetr...

Страница 34: ...erpen bovenop de magnetron Plaats de magnetron zodanig dat de stekker in de contactdoos altijd binnen handbereik is Plaats de magnetron zo ver mogelijk weg van radio s televisies en WiFi toegangspunte...

Страница 35: ...t scherm leeg terwijl de ventilator en ovenlamp zijn ingeschakeld Als de deur van de magnetron tijdens gebruik wordt geopend zal het programma worden gepauzeerd terwijl de ventila tor blijft draaien e...

Страница 36: ...ukt zal het vermogen worden ingesteld op 100 en als er geen vermogen wordt geselecteerd zal het vermogen ook worden ingesteld op 100 Druk na het instellen van de tijd en het vermogen op de knop om het...

Страница 37: ...isplay toont de tekst PROGRAM item 281369 281413 of ProG item 281444 2 Druk op de numerieke knop 3 het display toont P 03 alleen voor item 281369 281413 Na 2 seconden zal het display de bijbeho rende...

Страница 38: ...nder vindt u een lijst met opties die kunnen worden aangepast De dikgedrukte items zijn de vooraf ingestelde opties Optie Instelling Omschrijving 1 Pieptoon OP 10 Pieptoon van 3 seconden OP 11 Continu...

Страница 39: ...juist aange sloten op stopcontact Controleer of de stekker van het netsnoer juist in het stopcontact is gestoken Zekering of aardlekscha kelaar gesprongen Vervang de zekering of reset de aardlekschake...

Страница 40: ...r verwijderen en opnieuw installeren Alleen voor item nr 281369 Dit filter wordt v r de luchtinlaat geplaatst en moet regelmatig worden schoongemaakt om de binnenruimte schoon te houden Trek de plasti...

Страница 41: ...uw installeren 1 Gebruik 2 duimen om de aangegeven vergrendelingen van het spatscherm in te drukken 1 Lijn de 3 pinnen op de achterkant van het spatscherm uit met de 3 gaten aan de achterkant van de m...

Страница 42: ...n jaar na aankoop van het apparaat voordoet wordt gratis hersteld door reparatie of vervan ging mits het apparaat conform de instructies is gebruikt en onderhouden en niet op eniger lei wijze verkeerd...

Страница 43: ...tnymi r kami Ryzyko pora enia pr dem Regularnie kontroluj stan wtyczki i kabla W przy padku wykrycia uszkodzenia wtyczki lub kabla zle napraw w wyspecjalizowa nym punkcie naprawczym Nigdynieu ywajuszk...

Страница 44: ...oniewa grozi to eksplozj pojemnika butelki itp Nie korzysta z kuchenki mikrofalowej bez umieszczenia w niej uprzednio pro dukt w spo ywczych Jest to bardzo niebezpieczne Kuchenka mikrofalowa s u y do...

Страница 45: ...ki Nie u ywaj misek z metalowym brzegiem ani pojemnik w plastikowych z cz ciowo zdj tym wieczkiem Niebezpiecze stwo powstania ognia Ze wzgl du na ryzyko zap onu obserwowa proces podgrzewania ywno ci z...

Страница 46: ...nia lub transportu urz dze nia ze wzgl du na jego ci ar Urz dzenie powinno by przenoszone przez 2 oso by lub przemieszczane za pomoc w zka Przeno urz dzenie powoli i ostro nie nie przechylaj c go bard...

Страница 47: ...a rancja Usun ewentualn foli ochronn znajduj c si na powierzchni kuchenki mikrofalowej Umy wn trze kuchenki mikrofalowej za pomoc mi kkiej szmatki zwil onej letni wod Patrz Czyszczenie i konserwacja U...

Страница 48: ...etlaczu pojawi si informacja READY a w przypadku modelu 281444 warto 0 00 Z trybu gotowo ci urz dzenie mo na prze czy w praktycznie wszystkie pozosta e tryby Tryb otwartych drzwiczek Tryb otwartych dr...

Страница 49: ...ie potwierdzone sygna em d wi kowym i wy wietleniem komunikatu PROGRAM dla modelu nr 281369 281413 lub ProG dla mo delu nr 281444 Wybierz czas trwania programu przy u yciu przycisku Na wy wietlaczu po...

Страница 50: ...wy wietlaczu pojawi si komunikat STAGE 3 dla modelu nr 281369 281413 lub S 3 dla modelu nr 281444 Wprowad czas i moc dla etapu trzeciego Nast pnie naci nij przycisk aby rozpocz prac kuchenki Wprowadz...

Страница 51: ...je dla danego ustawienia Aby wybra dan war to nale y nacisn przycisk Start Spowodu je to zapisanie wybranej opcji Procedur zmiany ustawienia mo na przerwa naciskaj c przycisk Pauza W wczas zmiana nie...

Страница 52: ...zenie za pomoc szmatki zmoczonej w wodzie z dodatkiem a godnego detergentu Nie stosowa r cych rodk w czyszcz cych lub ciernych Nie stosowa ostrych ani ostro zako czonych przedmiot w Nie stosowa benzyn...

Страница 53: ...odczeka 10 sekund i ponownie pod czy urz dzenie do pr du Je eli problem utrzymuje si skon taktowa si z dostawc lub autoryzowanym serwisem Na wy wietlaczu pojawia si komu nikat OVEN IS HOT DO NOT OPEN...

Страница 54: ...54 PL Wyjmowanie i zak adanie filtra powietrza Wy cznie dla modelu nr 281369 Filtr jest umieszczony za wlotem powietrza i wymaga regularnego czyszczenia w celu utrzymania czysto ci w komorze gotowania...

Страница 55: ...ie os ony magnetronu Wy cznie dla modelu nr 281369 Ostrze enie przed wyj ciem b d za o eniem os ony nale y upewni si czy kuchenka jest od czo na od gniazdka i sch odzona Wyjmowanie os ony magnetronu Z...

Страница 56: ...u ytkowane i konserwowane zgodnie z instrukcj obs ugi i nie by o wykorzystywane w niew a ciwy spos b lub niezgodnie z przeznaczeniem Postano wienie to w adnej mierze nie narusza innych praw u ytkowni...

Страница 57: ...ppareil Ne touchez pas la prise avec les mains mouill es ou humides Risque d lectrocution Ne tentez jamais de r parer l appareil Tous d fauts et dysfonctionnement doivent tre supprim s par le personne...

Страница 58: ...s enfants utiliser l appareil L appareil et le c ble d alimentation doivent tre stock s hors de la port e des enfants Ne permettez pas aux enfants d utiliser l appareil pour jouer D branchez toujours...

Страница 59: ...limination du couvercle prot geant contre l exposition au rayonnement micro ondes par une personne autre que le personnel du service autoris et form Pour cuire r chauffer les aliments dans le four mic...

Страница 60: ...e des r cipient dans la chambre de cuisson peut endom mager la plaque c ramique Ne placez aucuns objets sur l appareil Laissez un espace minimal de 15 cm au dessus de l appareil L ampoule est install...

Страница 61: ...our en versant 1 verre d eau froide 250 ml et mettez le dans la chambre du four Chauffez pendant 1 minute en utilisant la puis sance maximale Touchez d licatement un plat S il est chaud n utilisez pas...

Страница 62: ...la fiche dans la prise l cran affiche le message qui dispara tra apr s 1 minute d inactivit Ensuite le four se met en mode veille Mode veille En mode veille l cran n affiche rien et le four ne foncti...

Страница 63: ...le termin l cran affiche le message DONE pour le mod le n 281369 281413 ou END pour le mod le n 281444 Mode pause Ce mode permet l utilisateur d interrompre le cycle pour contr ler ou m langer les ali...

Страница 64: ...ez le bouton l appareil re tournera au mode de la porte ouverte et le programme ne sera pas enregistr Below a quick guide how to make a program of 1 25 minutes at 70 power 1 Ouvrez la porte et appuyez...

Страница 65: ...le symbole P 03 uniquement pour le mod le 281369 281413 Apr s 2 secondes l cran affiche la dur e correspondant ce programme normalement 30 3 Appuyez sur les boutons 1 2 5 pour r gler la dur e de cuiss...

Страница 66: ...Le signal informant sur la fin du cycle de cuisson OP 10 Signal long 3 secondes OP 11 Signal en continu OP 12 S quence de 5 signaux courts 2 Le volume du signal sonore OP 20 Signal activ OP 21 Signal...

Страница 67: ...le c ble d alimentation est correctement branch Un fusible br l ou un disjoncteur activ Remplacez le fusible et r enclenchez le disjoncteur En cas de doutes li s l ex cution de cette op ration contac...

Страница 68: ...R D montage et montage du filtre d air Uniquement pour le mod le n 281369 Le filtre se trouve derri re l entr e d air et n cessite un nettoyage r gulier pour maintenir la pro pret de la chambre de cui...

Страница 69: ...refroidi D montage de la protection du magn tron Montage de la protection du magn tron 1 Positionnez la protection de sorte que 3 prises derri re la protection soient ins r es dans les 3 trous localis...

Страница 70: ...l n a pas t ind ment exploit ou de ma ni re non conforme sa destination La pr sente stipulation ne porte pas de pr judice aux autres droits de l utilisateurs pr vus par les dispositions l gales Dans l...

Страница 71: ...ucro dell apparecchio Non toccare la presa con le mani bagnate o umide Pericoli di scosse elettriche Non tentare de riparare l apparecchio da solo Eventuali difetti e malfunzionamenti devono essere ri...

Страница 72: ...bambini di giocare con l apparecchio Scollegare l apparecchio dalla rete se esso deve essere lasciato incustodito e prima del montaggio dello smontaggio o della pulizia Non lasciare l apparecchio inc...

Страница 73: ...ipienti o la po sata fatti di metallo o contenenti metallo foglio di alluminio cristallo di piombo plastica non resistente a temperature elevate o contenenti fermagli o legami di filo Non utilizzare l...

Страница 74: ...esistente a temperature elevate o contenenti fermagli o legami di filo Non utilizzare le ciotole di metallo o le tazze di plastica col coperchio parzialmente rimosso Pericolo di incendio Mantenere la...

Страница 75: ...cola protettiva che si trova sulla superficie del forno Lavare l interno del forno a microonde con un panno morbido inumidito con acqua tiepida Vedere Pulizia e manutenzione Lavare tutti i componenti...

Страница 76: ...1413 nella modalit di prontezza il display visualizza l informazione READY e in caso di modello n 281444 il valore 0 00 L apparecchio pu essere commutato in pratica in tutte le altre modalit dalla mod...

Страница 77: ...ulsante numerico 1 Questo consente di accedere alla modalit di programmazione che sar confermato da un segnale acustico e dalla scritta visualizza ta PROGRAMMA per il modello n 281369 281413 o ProG pe...

Страница 78: ...zza STAGE 2 per il modello n 281369 281413 o S 2 per il modello n 281444 Poi impostare la durata e la potenza della seconda fase Se si vuole programmare la terza fase premere di nuovo il pulsante di d...

Страница 79: ...t di modificare alcune opzioni di impostazione del forno Per modifi care una delle impostazioni aprire lo sportel lo e tener premuto per 5 secondi il tasto 2 Sul display verr visualizzato segno OP Qui...

Страница 80: ...it di visualizzazione di due cifre 99 programmi Pulizia e manutenzione Prima di pulire l apparecchio rimuovere as solutamente la spina dalla presa di corrente Attenzione non immergere il forno in acqu...

Страница 81: ...forno si chiude correttamente Se la porta non si chiude correttamente contattare il rivenditore o il centro di assistenza autorizzato Sul display appaiono diciture E 01 oppu re E 02 Sensore di tempera...

Страница 82: ...IT Rimozione e rimontaggio del filtro aria Unicamente per il modello n 281369 Filtro situato dietro la presa d aria e deve essere sistematicamente pulito per garantire l igiene nella camera di cottur...

Страница 83: ...dato Rimozione copertura del magnetron Rimontaggio della copertura del magnetron 1 Posizionare la copertura in modo da far centrare i 3 pernetti presenti sul lato posteriore della copertura nei 3 fori...

Страница 84: ...titolo interamente gratuito o con la sostituzione del prodotto che stato utilizzato e sottoposto a manutenzione corretta seguendo le istruzioni senza alcuna violazione I diritti legali del cliente non...

Страница 85: ...atului Nu atinge i techerul cu m inile ude sau umede Pericol de electrocutare Nu ncerca i s repara i singur aparatul n cazul unei defec iuni repara iile vor fi efectuate ntotdeauna numai de personal c...

Страница 86: ...nesupravegheat precum i nainte de asamblare dezasamblare sau cur are Nu l sa i niciodat aparatul nesupravegheat pe parcursul utiliz rii Instruc iuni speciale de siguran Avertisment Lichidele i alte al...

Страница 87: ...cu margini striate sau vase din plastic cu capacul par ial ndep rtat Risc de incendiu Supraveghea i cuptorul atunci c nd nc lzi i alimente n recipiente din material plastic sau din h rtie ntruc t exi...

Страница 88: ...erne poate provoca r nirea grav sau decesul Nu dezasambla i cuptorul cu microunde AVERTISMENT Pericol de electrocutare Utilizarea neadecvat a mp m nt rii poate duce la electrocutare Nu conecta i cupto...

Страница 89: ...a cuptorului cu microunde Pozi iona i cuptorul n a a fel nc t tec rul s fie accesibil n permanen Amplasa i cuptorul c t mai departe posibil de radio i televizor Func ionarea cuptorului cu microunde po...

Страница 90: ...taturii numerice Dup aceasta selecta i nivelul de putere dorit ap s nd pe 0 20 Decongelare 50 70 Ecranul va afi a puterea selectat Dac ap sa i din nou butonul aceluia i nivel de putere aceasta va reve...

Страница 91: ...ul nu va fi salvat Mai jos ave i un ghid rapid de realizarea a unui program de 1 25 minute la putere 70 1 Deschide i u a i ap sa i butonul 1 pen tru 5 secunde ecranul va afi a PROGRAM pentru articolul...

Страница 92: ...0 pentru a in troduce timpul 7 Ap sa i butonul pentru nivelul de pu tere dorit pentru etapa 2 Ecranul va afi a 3 30 50 doar pentru articolul nr 281369 281413 exclusiv 8 Ap sa i butonul start Programul...

Страница 93: ...99 programe Cur are i ntre inere Scoate i ntotdeauna tec rul din priz na inte de cur area cuptorului cu microunde Aten ie Nu scufunda i niciodat cuptorul cu microunde n ap sau n vreun alt lichid Cur...

Страница 94: ...Ecranul afi eaz E 01 sau E 02 Senzorul de temperatur este defect Deconecta i cuptorul cu microunde de la sursa de alimentare i a tep ta i 10 secunde nainte de a conecta din nou cablul de alimentare Da...

Страница 95: ...95 RO Cum se scoate i se re instaleaz filtrul de aer Doar pentru articolul 281369 Acest filtru este amplasat naintea admisiei aerului i trebuie cur at regulat pentru a men ine camera curat...

Страница 96: ...ntru stropi Doar pentru articolul 281369 Avertisment nainte de demontarea sau instalarea scutului cuptorul cu microunde trebuie s fie deconectat de la priz i trebuie s fie rece Demontarea scutului pen...

Страница 97: ...de un an de la cump rarea acestuia va fi remediat prin re para ie sau nlocuire gratuit cu condi ia ca aparatul s fi fost folosit i ntre inut conform instruc iunilor nu s nu fi fost bruscat sau fo losi...

Страница 98: ...98 RU Hendi...

Страница 99: ...99 RU...

Страница 100: ...100 RU...

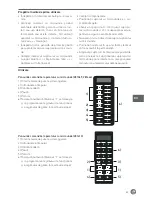
Страница 101: ...101 RU 15 2...

Страница 102: ...102 RU 45 I 3 1 250 1 1 10 30 c...

Страница 103: ...103 RU 281369 281444 1 2 3 4 5 6 1 X2 7 6 5 4 3 2 1 0 9 8 50 70 0 20 1 2 3 4 5 6 281413 1 2 3 4 5 6 1 0 X2 1 2 3 4 5 6 7 8 9 0 50 70 20 4 2 5 3 6 1 1 1 4...

Страница 104: ...3 READY 281444 0 00 00 00 0 20 Defrost 50 70 100 100 DONE 281369 281413 End 281444 1 1 2 3 4 5 6 7 8 9 0 281369 0 10 0 20 0 30 0 45 1 00 1 30 2 00 2 30 3 00 3 30 281444 0 10 0 20 0 30 0 45 1 00 1 30 2...

Страница 105: ...281369 281413 ProG 281444 00 00 0 20 defrost 50 70 100 100 PROGRAM 281369 281413 ProG 281444 1 25 70 1 1 5 PROGRAM 281369 281413 ProG 281444 2 3 P 03 281369 281413 2 30 3 1 2 5 4 1 25 70 281369 28141...

Страница 106: ...9 281413 S 3 281444 1 1 4 6 PROGRAM 281369 281413 ProG 281444 2 3 P 03 281369 281413 2 30 3 1 2 5 4 1 25 70 281369 281413 5 STAGE 2 281369 281413 S 2 281444 6 3 3 0 w 7 3 30 50 281369 281413 8 Start 3...

Страница 107: ...OP 21 OP 22 1 OP 10 3 OP 11 OP 12 5 2 OP 20 OP 21 OP 22 OP 23 3 OP 30 OP 31 4 OP 40 15 OP 41 30 OP 42 60 OP 43 120 5 on the fly OP 50 on the fly OP 51 on the fly 6 OP 60 OP 61 7 OP 70 60 OP 71 10 8 OP...

Страница 108: ...108 RU E 01 E 02 10 OVEN IS HOT DO NOT OPEN THE DOOR 281369 3 10...

Страница 109: ...109 RU 281369...

Страница 110: ...110 RU 281369...

Страница 111: ...111 RU 281369 281413 281444 230 50 3000 1500 1550 1800 1000 1000 34 34 25 I 2450MHz 574 x 528 x H 368mm 553 x 488 x H 343 mm 511 x 432 x H 311 mm 32 19 2 15 3...

Страница 112: ...112 GR Hendi...

Страница 113: ...113 GR...

Страница 114: ...114 GR...

Страница 115: ...115 GR 15 cm 2 45...

Страница 116: ...116 GR 250ml 1 1 10 cm 20 cm 281369 281444 1 2 3 4 5 6 1 X2 7 6 5 4 3 2 1 0 9 8 50 70 0 20 1 2 3 4 5 6...

Страница 117: ...117 GR 281413 1 2 3 4 5 6 1 0 X2 1 2 3 4 5 6 7 8 9 0 50 70 20 4 2 5 3 6 1 1 1 4 READY 281369 281413 0 00 281444 00 00 0 20 50 70 100 100 DONE 281369 281413 End 281444...

Страница 118: ...00 1 30 2 00 3 00 4 00 5 00 281444 0 10 0 20 0 30 0 45 1 00 1 30 2 00 3 00 4 00 5 00 99 9 10 99 1 4 6 PROGRAM 281369 281413 ProG 281444 00 00 0 20 50 70 100 100 PROGRAM 281369 281413 ProG 281444 1 25...

Страница 119: ...81444 STAGE 3 281369 281413 S 3 281444 1 4 6 1 PROGRAM 281369 281413 ProG 281444 2 3 P 03 281369 281413 2 30 3 1 2 5 4 1 1 25 70 281369 281413 5 STAGE 2 281369 281413 S 2 281444 6 3 3 0 3 30 50 281369...

Страница 120: ...1 00 CLEAR 2 5 OP 2 OP 22 2 OP 20 OP 21 OP 22 start pause 1 EOC OP 10 3 OP 11 OP 12 5 2 OP 20 OP 21 OP 22 OP 23 3 OP 30 OP 31 4 OP 40 15 OP 41 30 OP 42 60 OP 43 120 5 OP 50 OP 51 6 OP 60 OP 61 7 OP 70...

Страница 121: ...121 GR E 01 E 02 10 OVEN IS HOT DO NOT OPEN THE DOOR 281369 3 10...

Страница 122: ...122 GR 281369...

Страница 123: ...123 281369 1 2 3 1 3 3 2 3 GR...

Страница 124: ...13 281444 230V 50Hz 3000W 1500W 1550W 1800W 1000W 1000W 34 34 25 I 2450MHz 574 x 528 x H 368mm 553 x 488x H 343mm 511 x 432 x H 311 mm 32 19 2 15 3 Serviceworld 210 6203 838 10 info serviceworld gr ww...

Страница 125: ...125...

Страница 126: ...126...

Страница 127: ...127...

Страница 128: ...SA 5 Metsovou Str 18346 Moschato Athens Greece Tel 30 210 4839700 Email office greece hendi eu Hendi HK Ltd 1208 12 F Exchange Tower 33 Wang Chiu Road Kowloon Bay Hong Kong Tel 852 2154 2618 Email inf...

Отзывы: