


4
6
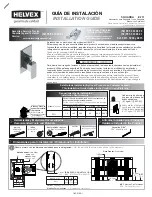
Instalación General
/ General Installation
3
2
5
*1,90 cm
74,8”
cámara
de aire
air chamber
*20-30 cm
7,8"-11,8"
max.
Medidas Recomendadas /
Recommended Dimensions
2
30 cm
max
.
11,8”
*70 cm
27,5” min.
tapón
plug
tubo Ø ½”
(no incluído)
Ø ½” tube
(not included)
VISTA FRONTAL
FRONT VIEW
Coloque teflón en las
conexiones roscadas.
/
Apply plumber’s tape around
the threaded connections.
cubierta de
plástico
plastic cover
tornillo
screw
NPT
FFL
120 m
(47,2")
1/2" - 14 NPT
(color negro)
salida a la regadera o a la regadera manual
(black color)
shower head or hand shower outlet
1/2" - 14 NPT
(color azul)
entrada de agua fría
(blue color)
cold water inlet
1/2" - 14 NPT
(color rojo)
entrada de agua
caliente
(red color)
hot water inlet
1/2" - 14 NPT
(color negro)
salida a la tina
(black color)
tub spout outlet
Inserte la caja armada dentro del ranurado de la pared,
nivele y fije la instalación.
/ Insert the assembly box within
the slotted wall, level and fix the installation.
Se considera que la caja está nivelada en el plano horizontal y
vertical, cuando la burbuja está en el centro. /
The box is considered to be level in the horizontal and vertical
plane, when the bubble is in the center.
Nota:
Asegúrese de que el acabado final se instalará dentro del Error de
Instalación (
EDI
).
/
Note:
Make sure that the finished wall will be installed
within the Installation Error (
IE
).
burbuja
bubble
nivel
level
tuerca
nut
chapetón
escutcheon
Desenrosque los tornillos para retirar la cubierta de plástico y desenrosque el
chapetón y la tuerca para retirar el cartucho, purgue la instalación. Vuelva a
ensamblar.
/ Unscrew the screws to remove the plastic cover and unscrew the
escutcheon and nut to remove the cartridge, purge the installation. Reassemble.
cartucho
cartridge
Mantenga hermética la instalación y genere
una prueba de fuga a la presión mínima de
operación
(1,0 kg/cm²)
. /
Keep the
installation airtight and generate a leak test at
the minimum operating pressure (14,22 PSI).
Nota:
Asegúrese de que no exista ninguna fuga en la
instalación.
/
Note:
Make sure that there is no leakage in
the installation.
tapón (no incluido)
cap (not included)
kg/cm²
PSI
7
Instale la pared con acabado final.
/ Install
the finished wall.
pared con
acabado final
finished wall
8
Desenrosque los tornillos y retire la
cubierta de plástico.
/ Unscrew the
screws and remove the plastic cover.
tornillo
screw
codo roscado
(no incluido)
threaded elbow
(not included)
Enrosque los conectores (no incluidos) con tubería (no incluida) a las conexiones de la caja. /
Screw the connectors (not included) with the tube (not included) to the box connections.
cubierta de
plástico
plastic cover


