background image

4-3

Chapter 4:  Printing

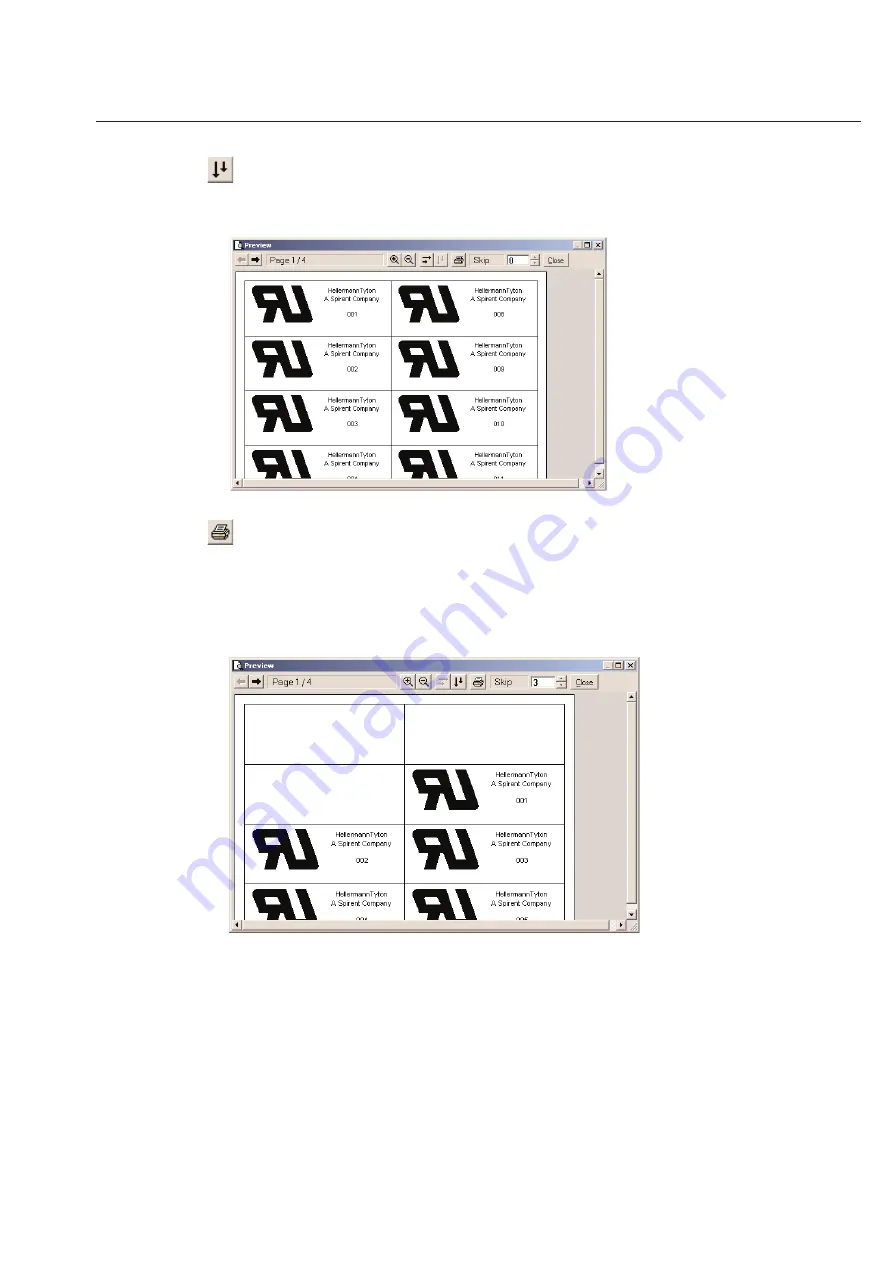
Sort Vertically

The 

Sort Vertical

tool will cause your printer to first print down the column and then move to the next row.  This fea-

ture is only available for labels designed to print a full page at a time such as laser labels and ink jet labels.

Print Labels

Using this 

Print

tool, you can print directly from the 

Print Preview 

screen should you desire.

Skip Labels

Use the 

Skip

labels option to skip a certain number of labels on a sheet.  This is useful for re-printing on sheets that

were only half-used.

Close

The 

Close

button will close the current preview and return to the previous screen in TagPrint Pro.  To close the 

window, simply click 

Close

.

Содержание TagPrintPRO

Страница 1: ...Version 2 0 User s Manual...

Страница 2: ...lows the user to incorporate variable sets of data graphics or bar codes into the label The powerful sequencing feature can also be used to skip the tedious data entry process that many other programs...

Страница 3: ...Properties 2 16 Image Sizing 2 17 Layering of Fields 2 18 Manipulation of Graphic Images 2 18 Mirror Image Option 2 18 Flip Image Option 2 19 Installing TagPrint Pro 1 2 Un installing TagPrint Pro 1...

Страница 4: ...fset 4 4 Printing to a Printer 4 5 Selecting a Printer 4 5 Column Types 3 9 Text Column 3 9 Copies Column 3 9 Image Column 3 10 Selecting an Image for the Table 3 10 Changing the Column Type 3 10 Repe...

Страница 5: ...Guide Thermal Transfer Settings 5 6 Media 5 6 Continuous 5 6 Gap 5 6 Black Mark 5 6 Gap Mark Width 5 7 Gap Mark Offset 5 7 Label Guide Groups and Margins 5 7 Column Groups 5 8 Row Groups 5 8 Margins 5...

Страница 6: ...one time transfer of TagPrint for Windows or TagPrint Pro to another end user The transfer has to include all component parts media printed materials this End User License Agreement and if applicable...

Страница 7: ...oped by HellermannTyton All rights belong to HellermannTyton The software may be used only under the following conditions The user agrees to the license agreement by opening the original packaging for...

Страница 8: ...Installation Instructions Load CD into CDROM drive Follow the installation instructions in the Installshield wizard...

Страница 9: ...capital letters when entering your TagPrint Pro serial number In the Installation Selection Screen everything will install by default If you select applications from the list you can de select them s...

Страница 10: ...Page 3 Follow the instructions for the Print Driver Wizard Select the HellermannTyton printer driver that you wish to select A message will appear that states that this printer driver has not passed t...

Страница 11: ...e default printer driver selections is recommended When the printer driver installation is complete you will be asked if you wish to register the program We recommend that you register in order to be...

Страница 12: ...rlos de modo que no se instalen 5 Seleccione el idioma de su preferencia 6 Siga las instrucciones de la gu a de impresi n 7 Seleccione el controlador de la impresora de HellermannTyton que usted desee...

Страница 13: ...ars Select Language on Next Restart Yes No Choose Yes and restart Installing TT310SM TT210SM TT1210 Printer Drivers When the Install Selection menu pops up expand the Printer Drivers menu and select t...

Страница 14: ...alling TT310SM TT210SM TT1210 Printer Drivers Page 7 Click Yes when the window asks Would you like to install the TT310SM Print Driver TagPrint 2 0 will install Choose Yes to register TagPrint Pro onl...

Страница 15: ...Installing TT310SM TT210SM TT1210 Printer Drivers Page 8 Click Next to begin printer installation Choose the option that best fits your existing setup Choose the port that your printer is connected to...

Страница 16: ...alling TT310SM TT210SM TT1210 Printer Drivers Page 9 Select the printer you are going to use then click Have Disk Install the drivers from your CD ROM drive Select the PrinterDrivers folder and click...

Страница 17: ...Installing TT310SM TT210SM TT1210 Printer Drivers Page 10 Select TT310SM TT210SM TT1210 Select NT40 Select OEMSETUP INF...

Страница 18: ...vers Page 11 When finished with Browse click OK Select the printer you will be using and press Next This screen will ONLY appear if updating the existing TT210SM TT310SM or TT1210 driver If updating s...

Страница 19: ...inter Drivers Page 12 Name your printer and choose if you would like to use it as the default printer then click Next Select if you would like to share your printer then click Next Select if you want...

Страница 20: ...Installing TT310SM TT210SM TT1210 Printer Drivers Page 13 Click Finish Select Continue Anyway...

Страница 21: ...ctive The label design will be saved containing the objects you placed on it the label dimensions and the label view preferences New Label Design The New option in the File Menu allows you to create a...

Страница 22: ...l Design Guide Step 1 Step one in the label design guide allows you to select your label type If the label that you want to use appears in the window you can just click Next If you want a different la...

Страница 23: ...Text Options Fixed Text Text field that does not change from label to label Variable Text Text field that changes depending on the label Used for serial numbers or for labels that have random or diffe...

Страница 24: ...r change from label to label Example Below You can mix and match by clicking once on the Fixed Text icon and then clicking once on the Variable Text icon This would create a label that has line one as...

Страница 25: ...ics above or below your text fields Layout 2 will align your graphics to the left of your text boxes Layout 1 Layout 2 When you are satisfied with the design of your label layout click on Next to cont...

Страница 26: ...te printer category and the re saving When opening old dsn files used in TagPrint Pro 1 0 they will keep the same settings for Printer Family When open ing a dsn file re select the label you are using...

Страница 27: ...uthorized Users The label designer is able to lock out any users so that they cannot change the contents of the label design and or table Only the authorized designer can make changes After opening a...

Страница 28: ...ase the mouse button to place the object To move or change an item in the label design see the section later in this chapter titled Changing Items in the Label Design Select Tool The Select tool is us...

Страница 29: ...ocated next to the icon that looks like a paint bucket A palette of colors will appear from which you may choose a fill color To leave your rectangle transparent where only the border will print over...

Страница 30: ...ol is used to create elliptical and circular objects Note To create circles hold down the Shift key while drawing the ellipse Text Tool The text tool is used to create boxes that contain text Every se...

Страница 31: ...iable text box You may format the variable text box to control the appearance of text from the table The variable text properties box helps you control the information that will be printed You can spe...

Страница 32: ...useful when printing labels ahead of time You may use negative values Increment Number With this text tool TagPrint Pro will automatically increment numbers for you Simply input the starting number an...

Страница 33: ...this vertical row appears like a small mountain Click once on this icon and you will see two familiar symbols Constant Image One represents a constant image in which the image will stay the same on e...

Страница 34: ...me once Double click on the image you wish to select NOTE The default folder is the the TagPrint Pro Clipart file TagPrint Pro supports the following image formats bmp Windows Bitmap jpg JPEG pcx PC P...

Страница 35: ...can view any image at any time by simply clicking on the image name once Double click on the image you wish to select The image now appears in the image box The General tab can be used to set specifi...

Страница 36: ...e drawn Note To specify a column in the table as an image column see the section on Column types in Chapter 3 Image Properties You can point your mouse cursor on the image and then right click the mou...

Страница 37: ...e Click and drag the point to reduce or enlarge the image You can also position the image anywhere on your label Text has now been added to the constant field by double clicking on the constant field...

Страница 38: ...follows Use the Send to back or Bring to front icons to allow access to each box type as needed Manipulation of Graphic Images TagPrint Pro offers the options of manipulating graphic images in these w...

Страница 39: ...l down menu The effect the Flip Image option has on the graphic image is flipping the image vertically For example Inverse Option Click on the graphic image on the label design and choose the Inverse...

Страница 40: ...t at the bottom of this vertical row appears like a small barcode Click once on this icon and you will see two familiar symbols Constant Barcode icon One represents a constant barcode is used when the...

Страница 41: ...he mouse to create a box that is as large as you require for the space allowed for the barcode When this action is completed your unnamed label design will show a screen that reads as Enter barcode te...

Страница 42: ...barcode will be displayed with an A in brackets The A signifies that your variable barcode is reading from column A in your table You will not see the actual data from your table on the label design...

Страница 43: ...th reduce the number of characters you use in the barcode Note Be especially careful with variable barcodes that read from the table Make sure the longest entry displays on the label design without sc...

Страница 44: ...barcode on the label design but it will not print when you print the label to the printer Print HR Human Readable Toggle on off the human readable characters below the barcode HR Above Bar Code Places...

Страница 45: ...mbology capable of encoding all 128 ASCII characters EAN UCC128 A variation on Code 128 primarily for product identification Interleaved 2 of 5 a variable length high density that encodes digit pairs...

Страница 46: ...or to where you would like to put the object down An outline of the objects will appear Release the mouse button and the software will place the item where you moved it You may also move a selected it...

Страница 47: ...eaves an exact copy in the clipboard You can use the paste command to add the copy to the label design Keyboard Shortcut Ctrl C Paste The paste function takes whatever is on the clipboard at the momen...

Страница 48: ...d illustration shows the recycle symbol behind the circle and square The recycle symbol is now in the bottom layer Bring to Front The Bring to front tool is just like the Send to back tool except for...

Страница 49: ...ether Next choose Group from the Objects menu The objects will now act like one item as illustrated on the right Ungroup Objects You can ungroup objects in much the same way as you grouped them First...

Страница 50: ...he right most and left most area that the objects reside is changed into Align Vertical This tool centers all the selected objects between the top most and bottom most points in which the objects resi...

Страница 51: ...l helps you place items on your label design evenly This tool will keep the left most and right most items exactly where they are It will then move the item s between the side items and evenly space t...

Страница 52: ...release the mouse button You can use any number of horizontal and vertical guide lines on your label design Changing Guide Lines You can change a guide line by placing your cursor over an existing gu...

Страница 53: ...ta table will print on the label design The second illustration shows the field codes off That example shows the actual informa tion off the table When the field codes option is off the label design w...

Страница 54: ...d Contours Field contours do not print but they show the outline of an object while you are designing your label design They are very useful for lining up re sizing moving and manipulating objects It...

Страница 55: ...allows you to zoom the label up to 2000 Additionally you can manually set the zoom to 10 000 Saving a Label Design To save a label design you must first make sure the window is currently active To ma...

Страница 56: ...e Save As function is a useful tool in saving modified files and saving files to a new location Any time you do not wish to save over an existing file you should use the Save As function You can find...

Страница 57: ...xt files Table Window A table window contains a table with row buttons column headings and cells The title of the window will show the name of the table or the text Unnamed table if the table is new a...

Страница 58: ...V1 0 TagPrint Pro tables Text files txt Comma Delimited Text dsv Excel Files xls Database Files dbf TagPrint Pro V5 0 and V6 0 tables tbl Assuming you have saved your data tables in the default direc...

Страница 59: ...ighted in yellow When the cell is Yellow it is selected You may select a number of connected cells in the TagPrint Pro data table Simply click and hold the mouse button on the cell in the corner of th...

Страница 60: ...of the cell you were editing Finally you may also just click on a different cell to finalize changes and move directly to a cell that is not connected Cut and Paste Like many popular spreadsheet prog...

Страница 61: ...t TagPrint Pro features rows for entering data It is easiest to think of every row as one printed label Every cell in a row will be associated together when you print your label design Remember to pri...

Страница 62: ...you highlight will be shifted down after the rows have been added Next go to the Table menu and choose the Row Insert option After you select the option blank rows will appear where you had rows highl...

Страница 63: ...ure columns to specify the number of times to print a label and for importing variable graphics Warning DO NOT attempt to copy and paste an entire column Instead select only the text you wish to have...

Страница 64: ...ew blank column will appear in your table Column Width You can adjust the table column widths by placing your cursor between column header A and column header B As seen in the screen capture below you...

Страница 65: ...le text for your label design Copies Column The copies column is used to set the number of times a particular variable label will print For example you want the information that is located in row 1 of...

Страница 66: ...Image column you must go to the Table menu and choose Select image The TagPrint Pro image browse dialog box will then appear allowing you to choose the image off your hard drive Changing the Column Ty...

Страница 67: ...his feature Consult your Windows manual and CDset for instructions on MSQuery Using ODBC you must start out in a table Click on the SQL Structured Query Language icon at the top of your screen and you...

Страница 68: ...order to connect using ODBC Otherwise you will get an error that says there are No Visible Data Tables This should not occur with MS Access or dBASE files Once you have selected a database the followi...

Страница 69: ...ending on your needs Click Next to confirm if you wish to go back to the TagPrint Pro Table or view the data in MSQuery If you select Return to Application and Finish the data is imported and you are...

Страница 70: ...3 14 Chapter 3 Table...

Страница 71: ...ition of the imported data When clicking on the TXT icon the following menu will appear Select the path and file name of the text file you wish to import The following Text import guide step 1 screen...

Страница 72: ...3 16 Chapter 3 Table This screen will show you how the text will be formatted in the data table You can change the delimiter as needed When ready click Finish to import the data into the data table...

Страница 73: ...plit screen Clicking once on the table side will activate a different set of icons To add printable text to your constant field double click on this field and a cursor will appear Begin to type your i...

Страница 74: ...change from serial number to serial number Start Beginning serial number Stop Last serial number Increment Number to increment If you select 2 the serial number would print as 1 3 5 7 etc No of each N...

Страница 75: ...nce from 1 to 1000 this option will make the software insert 0001 to 1000 Notice the extra zeros in front of the one Insert your information and then click Start The data will then import to the data...

Страница 76: ...w will also show you how this concept works TagPrint Pro knows to place this data on the actual labels no matter how many are across and down on the page Alphanumeric Sequences Select Alphanumeric fro...

Страница 77: ...to find in the Find what entry box Next select any options that you wish to use Match Whole Word Only This option will force the the software to exclude matches that are part of another word For inst...

Страница 78: ...any of the most popular TagPrint Pro tools are listed in this pop up menu To access the shortcut pop up menu you must click the right mouse button somewhere on the table itself The menu will appear on...

Страница 79: ...rowse and choose a new folder Save As The Save as command is to be used if you have a new table that needs to be saved or if you wish to rename a previous job Either way the following dialog box will...

Страница 80: ...3 24 Chapter 3 Table...

Страница 81: ...you will receive the follow ing reminder To fix this problem simply open a table that has your information in it or create a new table with the appropri ate data Make sure that your printer is connec...

Страница 82: ...ous Page This tool will take you to the previous page of labels Next Page This tool will take you to the next page of labels Current Page Status The current page status indicator shows you which label...

Страница 83: ...as laser labels and ink jet labels Print Labels Using this Print tool you can print directly from the Print Preview screen should you desire Skip Labels Use the Skip labels option to skip a certain nu...

Страница 84: ...ou change these values they will be stored as the default and automatically used the next time you print To make permanent changes to one particular label definition see Chapter 5 in this manual Top O...

Страница 85: ...ting to a HellermannTyton Thermal Transfer printer see Chapter 6 on Thermal Transfer Printing for more details You must have a valid Windows driver for the operating system you are using to be able to...

Страница 86: ...ommand directly correspond to the numbers next to the rows in the table Reverse Print Order Prints from a table in reverse order Label Saver Prints in a daisy chain method if selected If not selected...

Страница 87: ...rts printing the current batch of information This function is useful in allowing you to re use a partially printed page You may also adjust the Skip value in the Print Preview mode Cancel Printing Yo...

Страница 88: ...ct File and then Manage Print Jobs This brings up the Manage Print Jobs dialog box You can select as many jobs as desired and then send them off to their respective printers Jobs will stay in the prin...

Страница 89: ...abels database Selecting a Family A family is a group of labels that belong together For instance all the labels that can be printed on the HellermannTyton TT320SM printer are listed under the TT320SM...

Страница 90: ...elect a label by clicking on the name in the list and then click OK Creating a New Label Definition In the Select label dialog box there is a button called New Pressing this button will create a new l...

Страница 91: ...ily box You may also create a new Family of labels by simply entering a new name in the box Family names have a maximum of 32 characters and are always upper case Description The Description box allow...

Страница 92: ...abel page size for the printer This is where you enter the information per taining to the label itself Preview Just like the first screen of the Label guide the Preview window allows you to see what t...

Страница 93: ...ait makes the sheet taller than it is wide Horizontal Settings Columns Enter the number of label columns across the sheet horizontally Gap Enter the horizontal gap between the labels Repeat Automatic...

Страница 94: ...the setting that best describes your label Continuous Continuous labels do not have separations between the labels Usually labels of this type are cut by hand or with an external cutter Note See spec...

Страница 95: ...l number used for the Gap Mark width may vary from the physical size but this is a very good starting point Gap Mark Offset The Gap Mark offset is used on labels where the Gap or the Black mark is not...

Страница 96: ...Column Groups number A B C Above are examples of column groupings Example A shows column groups set to 1 Example B shows column groups set to 2 and example C shows column groups set to 3 Row Groups R...

Страница 97: ...When it is click Test to print one page Note If you are printing with a dot matrix laser or ink jet printer you may want to load plain paper for a test print first This will save you from wasting labe...

Страница 98: ...this simply click Finish in the last page of the Label guide Because you are changing an existing label you will be warned with the following dialog box If you are sure about the changes you want to...

Страница 99: ...r and are needed to print to our line of thermal transfer printers Note If you are upgrading from TagPrint Pro 6 0 you will still need to install these drivers The drivers included with TagPrint Pro 6...

Страница 100: ...with any other printer but you will need to have the printer directly connected to a PC In addition the PC must be on Refer to your Microsoft Windows users guide on how to connect a printer so that yo...

Страница 101: ...LPT1 Only choose a different port if you know your computer has been configured for a different port If LPT1 does not show up in this menu make sure no other devices are connected to your printer LPT...

Страница 102: ...not harm anything if you choose Yes but HellermannTyton label sizes vary greatly and the printer would not likely print a very clear test page with our specialized labels Click Finish to install the...

Страница 103: ...nsfer printer driver click on the Windows Start button and choose Settings Printers A new window displaying all your installed printer drivers will be shown To open the Properties of a particular driv...

Страница 104: ...ld remain set to none Printing Preferences Choose the Printing Preferences button and this screen will follow Layout Orientation All of the pre defined labels for the thermal transfer printers in TagP...

Страница 105: ...e the density setting for the best output Too low of a density setting will leave your print too light Too high of a density setting will cause the print to look bloated and less sharp Additionally a...

Страница 106: ...6 8 Chapter 6 Thermal Transfer Printers...

Страница 107: ...pping labels the gap sensor settings are probably not correct This can be caused by the printer gradually losing its settings or by changing the label material type in your printer Try doing a manual...

Страница 108: ...based on the amount of memory installed in your printer Make sure to capital ize the M Also do not include any spaces between the characters 6 Press the Enter key on your keyboard 3 more times 7 Type...

Страница 109: ...talled in the printer and that the ink is facing out Printing is faded or of poor quality 1 Clean the print head with the pen 2 Adjust print speed density in the printer driver see section on printer...

Страница 110: ...r is on and ready to print Make sure the printer is not in pause mode 7 Try to re start your computer Sometimes just clearing things out of memory will take care of system prob lems 8 Try re installin...

Страница 111: ...All forms of technical support are only available during normal business hours 8 AM to 5 PM Monday through Friday Central Time Contact Technical Support By phone Call 1 800 537 1512 and ask for techni...

Страница 112: ...6 14 Chapter 6 Thermal Transfer Printers...

Страница 113: ...e printer Many users find that opening the rear door of the printer is useful The reason is similar to why you should use the manual feed tray it straightens the paper path Some printers may allow you...

Страница 114: ...become corrupted 9 Try installing the software on a different computer and testing it with your printer In doing this you can eliminate the computer as being the problem If the printer works with a d...

Страница 115: ...s available in gif and jpg format Included Images 2 arrows gif arrow circle gif AUSTEL gif BABT gif ball of flames gif Bauart geprutt gif BEAB gif bell gif Big Q gif biohazard 1 gif Biohazard gif bolt...

Страница 116: ...iquid gif dosen recycling gif down arrow 1 gif down arrow 2 gif down arrow dashed 2 gif down arrow dashed gif DVE GS gif DVE gif e gif ETL Mark gif Ex 2 gif Ex gif extend the olive branch gif F gif FG...

Страница 117: ...gif mirrored T s gif NF gif NL gif NORWAY gif opposite arrows 2 gif oppositearrowshorizontal2 gif oppositearrowsvertical2 gif oppositearrowsvertical gif OVE gif P22 gif PHONE1 gif PHONE2 gif plant a t...

Страница 118: ...f threeway arrows gif tower waves gif TradeMark gif throw in trashcan gif Triangle Waves 2 gif Trangle Waves 3 gif TT gif TUV Rheinland 2 gif TUV Rheinland gif TUV gif two triangles in square gif UL C...

Страница 119: ...C US Hor gif UL Listed C US Vert gif UL Listed C Vert gif UL Listed Marine Hor gif UL Listed Marine Vert gif UL Listed Vert gif UL Logo Sm gif UL Logo gif UL Recognized C US gif UL Recognized C gif U...

Отзывы: