background image

OPERATION MANUAL V2.0

PAGE 17

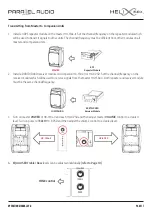
Transmitting from Master to Companion Units

1.  Install an RP5 repeater module on the master HX-158x-II. Set the channel/frequency on the repeater module which 

will be used to transmit signals to other units. The channel/frequency must be different from other modules on all 
master and companion units.

2.  Install a RX8TD/RX8D receiver module on companion HX-158x-II or HX-8 PSR. Set the channel/frequency on the 

receiver module which will be used to receive signals from the master HX-158x-II. Both repeater and receiver module 
must be the same channel/frequency.

3.  Turn on master 

POWER

 of HX-158x-II and each HX-8 PSR and then adjust master 

VOLUME

 control to a desired 

level. Turn on power of 

EACH

 HX-8 PSR and then adjust the volume control to a desired level.

4.  EQUALISER Treble / Bass

 levels can be adjusted individually 

(refer to Page 10)

.

MASTER

RP5 

Repeater Module

COMPANION

RX8TD/RX8D 

Receiver Module

HX-158x-II

HX-8 PSR

TONE control

Содержание I58X

Страница 1: ......

Страница 2: ...erate or minor personal injury and or property damage CAUTION Make sure to observe the following handling precautions so that a fire or personal injury does not result from leakage or explosion of the battery Do not short disassemble heat or put the battery into a fire Never charge batteries of the type which are not rechargeable Do not solder a battery directly Be sure to use the specified type o...

Страница 3: ...he battery compartment to replace battery Helix 158X amplifier 0 4 transmitters handheld beltpack Switching power supply plug varies from country to country Operation manual ACCESSORIES HX 8 ST Standard Tripod Stand HX 8 DC Weatherproof Dust Cover DM7SX Wired Microphone Note The above specifications are subject to change without prior notice In the Box MODULES TRANSMITTERS RX8TD True Diversity Rec...

Страница 4: ...arged LED Illuminated YELLOW Error No Battery Detected MIC LINE 1 Volume Control MIC LINE 2 Volume Control REVERB Control REVERB On Off Button VOICE PRIORITY On Off Button TREBLE BASS MASTER Volume Control MIC LINE 1 Level Switch MIC LINE 2 Level Switch MIC LINE INPUT 1 Combo MIC LINE INPUT 2 Combo LINE IN Socket 3 5mm LINE IN Volume Control LINE OUT 6 3mm MASTER Limiter Indicator BLUETOOTH Pairin...

Страница 5: ... MANUAL V2 0 PAGE 5 Module Compartment For Receiver MP3 Module For Receiver Repeater MP3 Module Sound control eg volume and equaliser of audio output from HX 158x II is controlled only by this external amplifier ...

Страница 6: ... 6 3mm or XLR connector to INPUT 1 or INPUT 2 2 Slide MIC LINE switch to MIC level 3 Turn on master POWER and then adjust INPUT 1 or INPUT 2 volume control to desired level 4 EQUALISER Treble Bass refer to Page 10 and REVERB refer to Page 11 levels can be adjusted individually TONE control REVERB effect ...

Страница 7: ...eyboard with a 6 3mm plug or XLR connector to INPUT 1 or INPUT 2 2 Slide MIC LINE switch to MIC level 3 Turn on master POWER and then adjust LINE volume control to desired level 4 EQUALISER Treble Bass refer to Page 10 and REVERB refer to Page 11 levels can be adjusted individually TONE control REVERB effect ...

Страница 8: ...MP3 Player 1 Connect your device to the LINE IN 3 5mm jack using a 3 5mm 3 pole stereo audio cable 2 Turn on master POWER and then adjust LINE IN volume control to desired level 3 EQUALISER Treble Bass levels can be adjusted individually refer to Page 10 TONE control ...

Страница 9: ...sh green and red 2 Activate BLUETOOTH on your device phone tablet PC etc and pair with external device named BT AUDIO After successful pairing you will hear PAIR COMPLETED DEVICE CONNECTED and the pairing indicator LED will illuminate green You can now play music through your HX 158x II PA 3 Adjust master volume control to a desired level 4 EQUALISER Treble Bass levels can be adjusted individually...

Страница 10: ... balanced by the high and low sounds after entering the amplifier so it is not necessary to adjust the EQUALISER during the output to the speaker It is recommended to maintain the position of BASS and TREBLE at 12 o clock KNOBS BASS TREBLE FUNCTION Reduce Increase the low frequency component of the sound Reduce Increase the high frequency component of the sound RANGE 12dB 12dB DEFAULT 12 o cock Ad...

Страница 11: ...is not required whilst music is being played to switch off or mute the microphone Reverb This function can add extra depth to the sound of WIRED or WIRELESS MICROPHONE to create a realistic acoustic ambience You can adjust the reverb depth by using the REVERB knob The depth range is from MIN through MAX The MIN level produces no effect while MAX level produces maximum reverb depth When REVERB is t...

Страница 12: ...tch the transmitter which means the receiver has been successfully synchronised 1 Press the SYNC button on the receiver Sync Channel from Transmitter Ú Receiver Sync Channel from Receiver Ú Transmitter 2 The transmitter s LED will illuminate to denote synchronisation signal recieved 3 The channel number on the transmitter LCD will match the receiver which means the transmitter has been successfull...

Страница 13: ... is not suitable Adjust the squelch back to its default level LE 01 and use the scan function to locate a clear interference free channel 1 Press down or up button until the frequency icon FREQ appears at the bottom of the LCD 2 Hold SET button until this icon FREQ flashes to denote readiness for setting 3 Press down or up button to find and locate a clear interference free channel 4 After a chann...

Страница 14: ...Volume and Other Settings 1 Turn on master POWER and then adjust volume control to the desired level 2 EQUALISER Treble Bass refer to Page 10 and REVERB refer to Page 11 levels can be adjusted individually TONE control REVERB effect ...

Страница 15: ...r module of master HX 158x II can transmit all audio signals including wired wireless microphone music instrument etc to other units installed with receiver module RP5 Module Parts and Functions Changing Channels Press LEFT button to increase the DOUBLE digit channel number Press RIGHT button to increase the SINGLE digit channel number Channel Selectors Channel Indicator Antenna Connector TNC type...

Страница 16: ...ini screw driver to adjust the volume of audio sources in the master unit Output Power Setting LOW position default for low output power and HI for high output power LOW output power will reduce the RF transmission distance and HI output power will extend the possible RF transmission distance If the module is installed on battery powered amplifiers remember HI output power places slightly more loa...

Страница 17: ...on HX 158x II or HX 8 PSR Set the channel frequency on the receiver module which will be used to receive signals from the master HX 158x II Both repeater and receiver module must be the same channel frequency 3 Turn on master POWER of HX 158x II and each HX 8 PSR and then adjust master VOLUME control to a desired level Turn on power of EACH HX 8 PSR and then adjust the volume control to a desired ...

Страница 18: ...best sound quality For this purpose please install a repeater module on the SUB MASTER unit and a receiver module on SUB COMPANION units same procedures as STEP 1 2 Both repeater and receiver module must be the same channel and same frequency which must be different from former repeater and receiver module SUB MASTER RP5 Repeater Module RX8TD RX8D Receiver Module RX8TD RX8D Receiver Module SUB COM...

Страница 19: ...ker 1 Plug the passive companion speaker s audio cable with a 6 3mm connector to the speaker input socket of HX 158x SP or another 4 8Ω load speaker Max cable length less than 20m 2 Turn on master POWER and then adjust its individual volume control to a desired level ...

Страница 20: ...1 Use a Phillips head screwdriver not included to remove the screws of the blank cover panel or current module s panel 2 To replace module use a mini flat head screw driver not included to pry up the current module s panel and remove the module 3 Gently insert the module into the slot by aligning its edges to the guide rails Then push the panel to make sure it s been firmly connected 4 Tighten up ...

Страница 21: ... wireless amplifiers can also be installed with MP3 recorder modules and equipped with remote control for more versatile functionality 3 Is it possible to record the sound of Microphone or external devices when using HX 158x II Yes Install an MP3 recorder player DPR5 on HX 158x II to obtain recording function 4 How to avoid or reduce feedback A Do not stand in front of the speaker when using the m...

Страница 22: ...ate or flash indicative of charging status The PA will charge regardless of whether power is on or off The PA s battery has no memory effect and can be charged any time It is suggested to charge the battery right after usage to extend battery life If the PA is not used for long periods please charge the battery at least every three months for lead acid batteries and six months for lithium batterie...

Страница 23: ...Do not charge at temperatures lower than 0 C or higher than 40 C 5 When charging place PA on a flat solid surface There should be no flammable or combustible materials around Pay attention to the charging process to prevent accidents 6 PA battery will automatically stop charging when fully charged After the battery is fully charged it is recommended to disconnect the amplifier from the power suppl...

Страница 24: ...PAGE 24 OPERATION MANUAL V2 0 Notes ...

Страница 25: ...OPERATION MANUAL V2 0 PAGE 25 Notes ...

Страница 26: ...PAGE 26 OPERATION MANUAL V2 0 Notes ...

Страница 27: ...as expired The Specific Warranty Table Information outlines the warranty period warranty type and any specific exclusions for your NAS product NAS considers the warranty period specified in the Specific Warranty Table to be a reasonable warranty period having regard to the price design manufacture and expected use of the product General Warranty Warranty NAS products come with guarantees that cann...

Страница 28: ...es accessories and consumable goods which have ceased working through normal wear and tear such as but not limited to batteries lamps and other parts classifiable as a consumable part The Warranty does not cover the loss of any data howsoever caused You shall be responsible for backing up and protecting data against loss damage or destruction Products presented for repair may be replaced by refurb...

Отзывы: