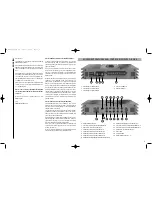
1 Connecting the ground cable
The ground cable should be connected to a central ground refe-
rence point (this is located where the negative terminal of the bat-
tery is grounded at the metal body of the vehicle), or to a bright
bare-metal location on the vehicle chassis, i.e. an area which has
been cleaned of all paint residues.
2 Connecting the remote lead
The remote lead is connected to the automatic antenna (aerial
positive) output of the head unit (radio). This is only activated if
the head unit is switched ON. Thus the amplifier is switched on
and off with the head unit.
3 Connecting the battery cable
Connect the +12 V power cable to the positive terminal of the
battery. Recommended cross section: min. 20 mm
2
.
4 Fuses
The input fuses are connected in parallel and provide protection
against an internal equipment fault, i.e. the system must be addi-
tionally protected by a further line fuse located in the vicinity of
the battery (max. distance from battery: 30 cm). The fuse rating
is 2 x 25 amperes.
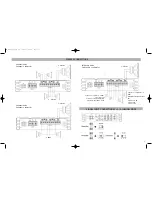
5 Speaker terminals
To connect the speaker cables. See figures on page 7.
Never connect the loudspeaker cables with the car chas-
sis gound. It damages your amplifier
.
Ensure that the loudspeaker systems are correctly connected
(phase), i.e. plus to plus and minus to minus. Exchanging plus
and minus causes a total loss of bass reproduction.The plus pole
is indicated on most speakers.
The impedance per channel should not be lower than
2 ohm
as overheating could cause a shut down of the amplifier.
6/20 Signal inputs
The HELIX DBamplifiers have RCA connectors for RCA cables that
can be connected with the pre-amplifier output of the line-outputs
of the headunit or with a pre-amplifier. This connectors are gold-
plated to ensure a better signal transmission.
7/15/16 Level controls for input sensitivity
These controls can be used to match the input sensitivity of the
individual channels to the output voltage of the connected head
unit. These controls are not volume controls and are solely inten-
ded for the purpose of sensitivity trimming. The control range
extends from 300 mV to 6 V.
8 Bassboost control
To raise the bass signal from 0 to 18 dB at 45 Hz.
9 Frequency control for channel 5
To control the frequency of subwoofer channel 5.
10/12 Frequency controls for channel 3 and 4
Control 10: To adjust the low pass filter between 50 Hz and
4 kHz.
Control 12: To adjust the high pass filter between 50 Hz and 4
kHz.
Caution! To avoid a loss of sound pressure make sure that
the crossover frequencies are seperated by 2 octaves
when adjusting the bandpass.
That means for example: When the lowpass signal is adjusted to
1 kHz, the highpass should be adjusted 2 octaves lower to 250 Hz.
(1 octave = double frequency or half frequency)
11 Frequency controls for channel 1 and 2
To adjust the highpass filter between 50 Hz and 4 kHz.
12 Frequency controls for channel 3 and 4
(see 10)
13 Switch full range / low pass, high pass
channel 3 and 4
14 Switch full range and high pass channel 1 and 2
7/15/16 Level controls for input sensitivity
These controls can be used to match the input sensitivity of the
individual channels to the output voltage of the connected head
unit. These controls are not volume controls and are solely inten-
ded for the purpose of sensitivity trimming. The control range
extends from 300 mV to 6 V.
17 Switch for 2-channel/4-channel/5-channel mode
4-channel mode: When head units without subwoofer output are
operated, channel 5 is supplied by the signals from all inputs (20),
this means, inputs 6 must not be connected.
5-channel mode: The subwoofer channel is supplied independently
from inputs 20, e.g. by a sub out of the head unit.
18 Power LED
Shows the operation mode of the amplifier.
19 Protection LED
The red LED indicates malfunctions of the amplifier.
The HELIX DB-amplifiers have several electronic protection cir-
cuits that shut off the amplifier at overheating, overloading,
short-circuit on loudspeaker, low-ohmic mode or defective power
supply.
Please check for connecting failures such as short-circuits, wrong
connections and over-temperature. If the amplifier does not turn
on it is defect and has to be send to your local authorized dealer
for repair service. A detailed description of the malfunction and
the purchase receipt has to be attached.
6
Due to the high quality standard Helix products achieved an excel-
lent international reputation. Therefore we grant a warranty peri-
od of 2 years.
The products checked and tested carefully during the entire pro-
duction process. In the case of service note the following:
1) The 2 years warranty period commences with the purchase of
the product and is applicable only to the original owner.
2) During the warranty period we will rectify any defects
due to faulty material or workmanship by replacing or repai
ring the defective part at our decision.
Further claims, and in particular those for price reduction,
cancellation of sale, compensation for damages or subse
quential damages, are excluded. The warranty period is not
altered by the fact that we have carried out warranty work.
3) Unauthorized tampering with the product will invalidate this
warranty.
4) Consult your authorized dealer first, if warranty service is nee-
ded. Should it be necessary to return the product to the fac
tory, please insure that
a) the product is packed in original factory packing in
good condition
b) the product is shipped prepaid, i.e. at your expense
and risk
c) the receipt/invoice as proof of purchase is enclosed
5) Excluded from the warranty are:
a) Shipping damages, either readily apparent or concea-
led (claims for such damages must be immediately
notified to the forwarding agent).
b) Scratches in metal parts, front panels or covers etc.
This must be notified to your dealer within 5 days of purchase.
c) Defects caused by incorrect installation or connec-
tion, by operation errors, by overloading or by external force.
d) Products which have been repaired incorrectly or
modified or where the product has been opened by
other persons than us.
e) Consoquential damages to other equipments.
f) Reimbursement when repairing damages by third
parties without our previous permission.
WARRANTY REGULATION
ba_db five.qxp 22.06.2007 14:32 Seite 6


