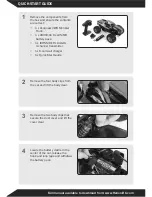
Helion conquest 10MT XLR Скачать руководство пользователя страница 5

QUICK-START GUIDE

Full manual available to download from: www.Helion-RC.com

Full manual available to download from: www.Helion-RC.com

1

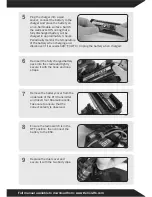
Remove the body and locate the 

ET3 Krypton receiver.

2

Place your Conquest and ET3 

transmitter in close proximity but 

not less than 12” (300mm) apart.

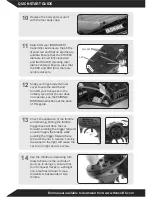
Having followed steps 1 to 12, in the unlikely event that your car does not operate please 

follow the 5 stage pairing process detailed here.

Pairing / Binding The Transmitter

3

Press and hold the PAIR / BIND 

button on the receiver then switch 

the receiver on. The receiver’s 

LED will flash to indicate that it is 

in PAIR / BIND mode.

5

When the LED on the receiver 

lights solid red your ET3 

transmitter and Conquest will 

be bound. You will now have full 

control of throttle and steering. 

Return to Step 13 of this guide to 

complete the set-up of your car.

4

Press and hold the PAIR / BIND 

button on the transmitter then 

switch the transmitter on. Release 

the PAIR / BIND button only when 

the transmitter’s LED begins 

flashing.

300mm

Содержание conquest 10MT XLR

Страница 1: ...years of age and younger To download the full Owner s Manual Technical Information Guide please visit www Helion RC com or scan the QR code with your smart phone Distributed in the UK by J Perkins Distribution Ltd Lenham Kent UK ME17 2DL www jperkins com Distributed in Australia by Model Engines Aust Pty Ltd P O BOX 828 NOBLE PARK 3174 Australia www modelengines com au Ph 03 8793 5555 warranties m...

Страница 2: ...he dust cover and lift the cover clear 1 Remove the components from the box and ensure the contents are correct 1 x Conquest 2WD Monster Truck 1 x 2000mAh 6 cell NiMH battery pack 1 x IKONNIK ET3 2 4GHz 3 channel transmitter 1 x 6 cell wall charger 1 x Quick Start Guide 4 Locate the battery cradle in the center of the car release the hook and loop tape and withdraw the battery pack ...

Страница 3: ...e of the battery when charging and disconnect if it exceeds 120 F 49 C Unplug the battery when charged 6 Re insert the fully charged battery pack into the cradle and tightly secure it with the hook and loop straps 7 Remove the battery cover from the underside of the ET3 transmitter and insert four AA alkaline cells Take care to ensure that the correct polarity is observed 8 Ensure the radio switch...

Страница 4: ...erate see the PAIRING BINDING instructions at the back of this guide 13 Check the operation of the throttle and steering Pulling the throttle trigger back will drive the car forward pushing the trigger forward once will apply the brakes while pushing the trigger forward twice will drive the car in reverse Turning the wheel to the right will cause the car to turn right and vice versa 14 Use the thr...

Страница 5: ...g The Transmitter 3 Press and hold the PAIR BIND button on the receiver then switch the receiver on The receiver s LED will flash to indicate that it is in PAIR BIND mode 5 When the LED on the receiver lights solid red your ET3 transmitter and Conquest will be bound You will now have full control of throttle and steering Return to Step 13 of this guide to complete the set up of your car 4 Press an...

Страница 6: ...M3 12 HLNA0987 Flat Head Hex Machine Screw 3 8 HLNA0988 Flat Head Hex Machine Screw 2 10 HLNA0990 Sus Arm E Clips 0 6mm HLNA0991 Flat Head Hex Mechnical Screw 3 10 HLNA0992 Cap Head Hex Mechnical Screw 3 10 HLNA0993 Cap Head Hex Mechnical Screw 3 12 HLNA0994 Cap Head Hex Mechnical Screw 3 5 HLNA0996 Front Bumper MT HLNA0997 Motor Guard MT HLNA0998 Wheelie Wheel MT HLNA0999 Motor Guard With Wheelie...

Страница 7: ... 34T 48P HLNA1024 Gear 81T 48P HLNA1026 Front Shock Absorber HLNA1027 Rear Arm Bulkhead HLNA1028 Front Arm Bulkhead HLNA1031 Steering Sway Arm Assembly HLNA1032 Gear 20T 48P HLNA1033 Slipper Shaft HLNA1034 Slipper Pad HLNA1035 Slipper Hub HLNA1036 Slipper Tensioner Spring HLNA1037 Motor Mount HLNA1039 Rear Wheel Axle HLNA1040 Dogbone HLNA1041 Front Rear Suspension Pin HLNA1042 Servo Saver Assembly...

Страница 8: ...y MT Blue HLNA1081R Replacement Body MT Red HLNA1081Y Replacement Body MT Yellow HLNA1081G Replacement Body MT Green HLNA1082 Clear Body MT HLNA1086 Conquest Battery 2000 mAh HLNA1088 Front Steering Turnbuckle 55mm HLNA1089 Front Arm Turnbuckle HLNA1090 Front Steering Turnbuckle 74mm HLNA1091 Machine Serrated Axle Nuts HLNA1092 Aluminum Axle Drive Hexes HLNA1093 Front Aluminum Pivot HLNA1094 Rear ...

Отзывы: