background image

www.heinner.com                                                                      750W, 220-240V~50/60Hz 


Toasting Sandwiches   


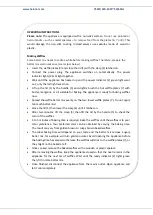
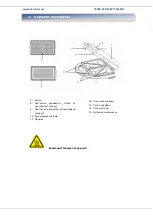
Insert the sandwich plates (6) and close the lid (1) with the clasp (4) latched on.   


Connect  the  power  plug.  The  appliance  switches  on  automatically.  The  power 
indicator lights (2 & 3) light together   


Wait until the appliance has heated up and the power indicator (2) green light went 
out, the red light remain on.     


Lift up the lid (1) by the handle (5) and slightly brush the hot sandwich plates (6) with 
butter,  margarine  or  oil  suitable  for  toasting.  The  appliance  is  ready  for  toasting 
sandwiches now.   


Place  the  prepared  sandwich  halves  on  the  lower  plates  (6).  Do  not  put  too  much 
filling in the sandwiches. 


Close the lid (1) then lower the clasp (4) until it latches on.   


After  two  minutes,  lift  up  the  lid  on  the  handle  (5)  to  check  the  color  of  the 
sandwiches.   


4 to 5 minutes of toasting time is required. Toast the sandwiches until the sandwiches 
are  to  your  color  preference.  Your  preferred  color  can  be  obtained  by  varying  the 
toasting  time.  The  result  can  vary  from  golden  brown  to  crispy  brown  toasted 
sandwiches.   


Once cooked, remove the toasted sandwiches with a wooden or plastic spatula.   


After removing the sandwiches, keep the appliance closed so that the heat remains in 
the  appliance  for  the  next  sandwich.  Wait  until  the  ready  indicator  (2)  lights  green 
then place in your next sandwich. 


Once finished,  disconnect the appliance  from the mains outlet. Open appliance  and 
let it cool completely.   


Grill Food   


Insert the grill plates (8) and close the lid (1) with the clasp (4) latched on.   


Connect  the  power  plug.  The  appliance  switches  on  automatically.  The  power 
indicator lights (2 & 3) light together.   


Wait until the appliance has heated up and the power indicator (2) green light went 
out, only the red light remain on.   


Lift  up  the  lid  (1)  by  the  handle  (5)  and  slightly  brush  the  hot  grill  plates  (6)  with 
butter,  margarine  or  oil  suitable  for  grilling.  The  appliance  is  ready  for  grilling  food 
now.   


Place the prepared food on the lower plates (6). Do not put too much food. 


Close the lid (1) then lower the clasp (4) until it latches on.   


After  two  minutes,  lift  up  the  lid  on  the  handle  (5)  to  check  if  the  food  is  done.  If 
necessary, turn the food around then cook to your liking.   


Once cooked, remove the food with a wooden or plastic spatula.   


Содержание SM-2K750WH

Страница 1: ...SANDWICH MAKER Model SM 2K750WH www heinner com Sandwich maker Putere 750W Culoare alb...

Страница 2: ...erioare Acest manual este conceput pentru a v oferi toate instruc iunile necesare referitoare la instalarea utilizarea i ntre inerea aparatului Pentru utilizarea corect i n siguran a aparatului v ruga...

Страница 3: ...pentru a evita deterior rile cauzate de utilizarea necorespunz toare ine i cont de toate etichetele de avertizare de pe aparat P stra i acest manual de instruc iuni pentru utiliz ri ulterioare n cazul...

Страница 4: ...onele fierbin i i de sursele de flac r deschis Nu pune i obiecte grele pe aparat Nu pune i aparatul aproape de sau sub materiale inflamabile cum ar fi de exemplu perdelele Pericol de arsuri Nu atinge...

Страница 5: ...fierbinte IV DESCRIEREA PRODUSULUI 1 Capac 2 Indicator luminos Preg tit pentru utilizare verde 3 Indicator luminos de alimentare ro u 4 Sistem de blocare 5 M ner 6 Plite pentru sandviciuri 7 Plite pen...

Страница 6: ...ea r m ne n continuare n aparat Dup cur are ndep rta i cu grij umezeala de pe aparat Conecta i tec rul la sursa de alimentare Aparatul porne te automat iar indicatoarele de alimentare 2 i 3 se aprind...

Страница 7: ...re ntinde i uniform aluatul pentru gofre pe cele dou plite inferioare pentru gofre 7 Nu pune i prea mult aluat nchide i capacul 1 apoi cobor i clema sistemului de blocare 4 p n la fixarea acesteia Dup...

Страница 8: ...ante Dup preparare scoate i sandviciurile cu o spatul din lemn sau plastic Dup ce scoate i sandviciurile ine i aparatul nchis astfel nc t c ldura s r m n n aparat pentru urm torul sandvici A tepta i c...

Страница 9: ...g tit pentru utilizare 3 Ro u Temperatura necesar a plitelor 6 7 sau 8 a fost atins Dup ce scoate i alimentele preparate ine i aparatul nchis astfel nc t c ldura s r m n n aparat pentru urm toarele al...

Страница 10: ...or i oar Amesteca i untul pasta de mar ipan ca ul laptele i sarea Ad uga i scor i oar ras dup gust Cantitatea necesar de aluat pentru o gofr aprox 2 linguri Durat de preparare 3 minute Gofre cu vi ine...

Страница 11: ...pun sau detergent de vase sau pune i le pe raftul superior al ma inii de sp lat vase L sa i plitele s se usuce bine nainte de a le reintroduce n aparat Pentru a cur a exteriorul aparatului utiliza i...

Страница 12: ...ent similar sistemul unul la unu sau la punctul de colectare organizat de Primaria Sectorului localitatii Dvs Simbolul marcajul aplicat produselor care indica faptul ca deseurile DEEE bateriile si acu...

Страница 13: ...c nici utilizat pentru ob inerea unor derivate precum traduceri transform ri sau adapt ri f r consim m ntul prealabil al companiei NETWORK ONE DISTRIBUTION Copyright 2013 Network One Distribution Toat...

Страница 14: ...www heinner com 750W 220 240V 50 60Hz SANDWICH MAKER Model SM 2K750WH www heinner com Sandwich maker Power 750W Color white...

Страница 15: ...kee it for later information This manual is conceived for ofering you all of the necessary info regarding instalation using and maintenance of the machine For a correctly and safely use of the machin...

Страница 16: ...o avoid damage through improper use Follow all warning notices on the appliance Keep this instruction manual for future use Should this appliance be passed on to a third party this instruction manual...

Страница 17: ...flames Do not place heavy articles on top of the appliance Do not place the appliance close to or underneath any inflammable materials such as curtains Danger of burns Do not touch the appliance duri...

Страница 18: ...ner com 750W 220 240V 50 60Hz Caution Hot Surface IV PRODUCT DESCRIPTION 1 Lid 2 Ready indicator green 3 Power indicator red 4 Lock 5 Handle 6 Sandwich plates 7 Waffle plates 8 Grill plates 9 Release...

Страница 19: ...ackaging debris which might still remain in the appliance Dry appliance thoroughly Connect the power plug The appliances switches on automatically and the power indicator lights 2 3 light together Ope...

Страница 20: ...e waf e batter mix evenly on the two lower waffle plates 7 Do not apply too much batter mix Close the lid 1 then lower the clasp 4 until it latches on After two minutes lift the clasp 4 then lift the...

Страница 21: ...brown toasted sandwiches Once cooked remove the toasted sandwiches with a wooden or plastic spatula After removing the sandwiches keep the appliance closed so that the heat remains in the appliance f...

Страница 22: ...outlet Ready indicator 3 Red Plates 6 7 or 8 temperature has reached After removing the cooked food keep the appliance closed so that the heat remains in the appliance for the next food Wait until the...

Страница 23: ...arzipan paste curd cheese milk and salt Add grated cinnamon to taste Required amount of batter mix per waffle approx 2 tablespoons Baking time 3 minutes Cherry Waffles Makes about 12 waffles Ingredien...

Страница 24: ...es 6 7 or 8 out and wash in warm soapy water or put in top rack in dish washer Dry thoroughly before placing any plates back in the appliance Use a soft cloth or a moist sponge with a little cleaning...

Страница 25: ...emarks of their respective holders No part of the specifications may be reproduced in any form or by any means or used to make any derivative such as translation transformation or adaptation without p...

Страница 26: ...www heinner com 750W 220 240V 50 60Hz SM 2K750WH www heinner com 750W...

Страница 27: ...www heinner com 750W 220 240V 50 60Hz I II...

Страница 28: ...www heinner com 750W 220 240V 50 60Hz III 8 8 8...

Страница 29: ...www heinner com 750W 220 240V 50 60Hz 10...

Страница 30: ...www heinner com 750W 220 240V 50 60Hz IV 7 8 9 10 11 10 11 12 13...

Страница 31: ...www heinner com 750W 220 240V 50 60Hz V 2 3 6 7 8 9 6 7 8 6 7 8 6 7 8...

Страница 32: ...www heinner com 750W 220 240V 50 60Hz 6 7 8 7 1 4 2 3 2 1 5 7 7 1 4 4 5 4 5 7 2...

Страница 33: ...www heinner com 750W 220 240V 50 60Hz 6 1 4 2 3 2 1 5 6 6 1 4 5 4 5 2 8 1 4 2 3 2 1 5 6 6 1 4 5...

Страница 34: ...www heinner com 750W 220 240V 50 60Hz 2 3 3 6 7 8 2...

Страница 35: ...www heinner com 750W 220 240V 50 60Hz VI 12 300 300 450 150 300 1 1 2 3 12 300 300 200 3 300 2 3 1 2...

Страница 36: ...www heinner com 750W 220 240V 50 60Hz 220 240 V 50 60Hz 750W VII 6 7 8 6 7 8 VIII...

Страница 37: ...NER Network One Distribution SRL NETWORK ONE DISTRIBUTION Copyright 2013 Network One Distribution www heinner com http www nod ro http www heinner com http www nod ro Network One Distribution 3 5 Tel...

Страница 38: ...www heinner com 750W 220 240V 50 60Hz SZENDVICSS T Modell SM 2K750WH www heinner com Szendvicss t Teljes tm ny 750W Sz n feh r...

Страница 39: ...m nyoz s c lj b l k rj k rizze meg a haszn lati k zik nyvet A le r s c lja hogy megadja az sszes sz ks ges utas t st a g p telep t s re haszn lat ra s karbantart s ra A k sz l k helyes s biztons gos h...

Страница 40: ...mk kre rizze meg a jelen haszn lati k s bbi tanulm nyoz s c lj b l Abban az esetben ha a jelen term ket tadja egy harmadik f l r sz re a term k mell a jelen haszn lati tmutat t is mell kelje A k sz l...

Страница 41: ...t a k sz l kre Ne helyezze a k sz l ket gy l kony anyagok k zel be vagy al mint p ld ul a f gg ny k g s vesz ly Ne rintse meg a k sz l ket a m k d s ideje alatt A term ket csak a foganty j n l fogva t...

Страница 42: ...Figyelem Forr fel let IV A TERM K LE R SA 1 Fed lap 2 Haszn latra k sz f nyjelz z ld 3 Bekapcsolt llapotot mutat f nyjelz s piros 4 Blokkol rendszer 5 Foganty 6 Szendvics s t lapok 7 Gofri s t lapok 8...

Страница 43: ...n a nedvess get a k sz l kr l Csatlakoztassa a dugaszt a h l zati ramforr shoz A k sz l k automatikusan bekapcsol a bekapcsolt llapotot mutat kijelz k 2 s 3 egyszerre kigy lnak A gy rt si folyamat k v...

Страница 44: ...jtsa ki egyenletesen a gofri t szt t a k t als gofri s t lapra 7 Ne helyezzen r t l sok t szta massz t Csukja le a fed lapot 1 majd engedje le a blokkol rendszer kapcs t mindaddig am g r gz l K t perc...

Страница 45: ...tula seg ts g vel szedje ki a szendvicseket A szendvicsek kiv tele ut n tartsa a k sz l ket becsukva hogy a h a k sz l kben maradjon a k vetkez adag szendvicshez is V rjon am g a Haszn latra k sz 2 ki...

Страница 46: ...sz kijelz 3 Piros A s t lapok 6 7 s 8 el rt k a sz ks ges h m rs kletet Az elk sz lt lelmiszer kiv tele ut n tartsa a k sz l ket becsukva hogy a h a k sz l kben maradjon a k vetkez lelmiszerekhez is V...

Страница 47: ...a vajat a marcip n p pet a sajtot a tejet s a s t Adjon hozz reszelt fah jat zl s szerint Egy gofrihoz sz ks ges mennyis g k r lbel l 2 kan l Az elk sz t s id tartama 3 perc Meggyes gofri K r lbel l...

Страница 48: ...panos vagy mosogat szeres meleg v zzel vagy helyezze azokat a mosogat g p fels polc ra A k sz l kbe val visszahelyez s el tt hagyja j l megsz radni a s t lapokat A k sz l k k ls r sz nek tiszt t s hoz...

Страница 49: ...eskedelmi vagy az illet birtokl k ltal bejegyzett m rkanevek A le rtak egyetlen r sze sem haszn lhat fel semmilyen form ban m g leford tott talak tott v ltozatban sem a NETWORK ONE DISTRIBUTION el zet...

Отзывы: