


• The serrated lift pad or lift arm notch must be in direct contact with the forklift .
WARNING!
NEVER use any other area on the jack as a contact point (see Figure 6).
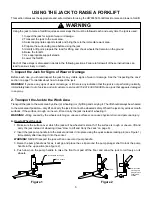
• The jack’s front footpad and rear wheels must ALWAYS remain in direct contact with the floor (see Figure 4).
WARNING!
NEVER increase the lifting height of the jack by putting wood, pads, cinder blocks, or any other objects
above the lift pad or underneath the front footpad and/or wheels (See Fig. 7A).
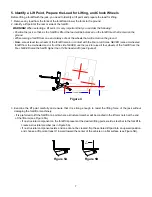
•
WARNING!
NEVER lift with the jack positioned under a sloped or rounded surface, such as the bottom surface of
a forklift’s counterweights (see Figure 7B).
Figure 6
Figure 7A Figure 7B
•
WARNING!
NEVER push the jack under the load past the “red line” marked on the decal located on top of the lift
arm.
•
WARNING!
NEVER lift the forklift by its counterweight.
•
WARNING!
NEVER lift the forklift in a manner that is counter to the manufacturer’s recommendations.
6. Raise the Forklift
1. Make sure the forklift is not running before raising the forklift.
2. If lifting the forklift from the front or rear, the wheels remaining on the ground must be chocked.
3. Select a lift point as outlined in Step 4.
4. Make sure appropriate support stands and chocks are available for use in the immediate work area.
5. If the jack pump handle is not in the socket, insert the pump handle and lock it into position with the quick-release
locking pin provided. Remove the J-clip from the pump plunger shaft (see Figure 2).
6. Carefully begin pumping the jack handle to raise the load.
WARNING!
NEVER raise the forklift higher than 1/4 its tread width when using the serrated lift pad (see Figure 8).
Figure 8
8
Tread Width
Height


