background image

2

1

3

4

Loading the Dishwasher

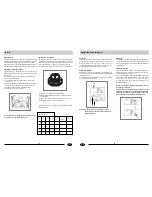
Lower Rack

Upper Rack

Load for 12 Standard Settings

Turning  on the Appliance

Starting a wash cycle

- Make sure that the plug for the appliance is inserted into the wall

  socket.

- Make sure that the water supply is turned on to full pressure.

- Load the dishwasher (see the section entitled, "Loading the

  Dishwasher").

- Pour in the detergent (see the section entitled, "Salt, Detergent

  and Rinse Aid").

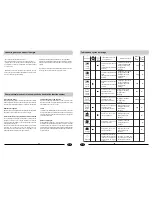
- Turn the knob located on the right of the control panel in

  clockwise direction until the number or symbol for the cycle set-

  ting is aligned with the reference mark (see the section entitled,

  "Wash Cycle Table").

- Press the ON-OFF button, and the ON-OFF light will turn on. At

  this point, the wash cycle will begin.

Cancelling or modifying a wash cycle setting

A cycle that is underway can only be modified if it has been run-

ning for a short time. Otherwise, the detergent may have already

been used, and the appliance may have already drained the wash

water. If this is the case, the detergent dispenser must be refilled

(see the paragraph entitled, "Loading the Detergent").

Press the ON-OFF button, and the ON light will turn off. Rotate

the knob in clockwise direction to the desired cycle setting (see

the section entitled: Starting a wash cycle

?F

. Then, turn the

dishwasher back on using the ON-OFF button.

Wash Cycle Adjustment Buttons

"ECO" Button

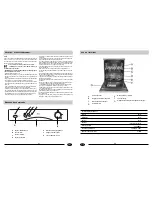
This button (see "Close-up View - Control Panel", letter "B" ) is

used for normal dirty dishes, pots and pans. It is a standard daily

cycle.

At the end of  the wash cycle

When the knob stops turning and is aligned with a STOP mark

(see figure), the cycle has finished. Turn off the appliance using

the ON-OFF button, turn off the water supply and open the door

of the dishwasher.

Before placing the dishes in the dishwasher, remove larger food

particles to prevent the filter from becoming clogged, which results

in reduced performance.

If the pots and pans have baked-on food that is extremely hard to

remove, we recommend that they are soaked before washed. This

will eliminate the need for extra wash cycles.

Pull out the rack to load the dishwasher.

How to use the lower rack

We recommend that you place the most difficult to clean items on

the bottom rack: pots, pans, lids, serving dishes and bowls, as

shown in the figure to the right.

It is preferable to place serving dishes and lids on the sides of the

racks in order to avoid blocking the rotation of the top spray arm.

- Pots, serving bowls, etc. must always be placed face down.

- Deep pots should be slanted to allow the water to flow out.

- The silverware basket can be doubled (see fig.A) so that only

  one section may be used when the silverware load is light. This

  also makes space for additional pots and pans and it can also be

  placed in the upper rack.

- Silverware should be placed in the silverware basket with the

  handles at the bottom; if the rack has side baskets, the spoons

  should be located individually into the appropriate slots. Espe-

  cially long utensils should be placed in the horizontal position at

  the front of the upper rack.

How to use the upper rack

The upper rack is designed to hold more delicate and lighter

dishware, such as glasses, cups and saucers, plates, small bowls

and shallow pans (as long as they are not too dirty).

- Position the dishes and cookware so that they do not get moved

  by the spray of water.

The upper rack can be adjusted for height by using the knobs lo-

cated on both sides of the rack itself (see fig.B).

Adjust the upper basket to the higher level and you have more

space to accommodate those taller pans and trays in the bottom

basket.

Shelf

Lean tall glasses and those with long stems against the shelf-not

against other items to be washed.

Place glasses, cups and small bowls on the additional cup rack.

The additional cup rack can be swivelled in or out as required(see

fig.C).

fig.B

fig.A

fig.C

.6.

.5.

GB

GB

Wait a few minutes before unloading the dishwasher to avoid

handling the dishes and utensils while they are still hot and more

susceptible to breakage. They will also dry better.

Pots and Pans Button

When intensive wash mode, normal wash mode or rinse mode is

set, press the button (see "Close-up View - Control Panel ", letter

"C") to increase the water temperature for heavily stained pots

and pans.

Содержание DW12-BFM1

Страница 1: ...0120504640A Installation Diagram GB DE FR IT ES PT NL DW12 BFM1 DW12 BFM1ME ...

Страница 2: ... To maintain the EFFICIENCY and SAFETY of this appliance we recommend call only the Service Centers authorized by the manufacturer always use original Spare Parts NOTICE Carefully read the instructions contained in this manual as they provide important information which is essential to safe and proper installation use and maintenance of the appliance This appliance complies with the following EEC ...

Страница 3: ...d Detergent Detergent specifically intended for use with dishwashers must be used The dispenser must be refilled before the start of each wash cycle following the instructions provided in the Wash Cycle Table The detergent dispenser is located on the inside panel the door Loading the detergent To open the A cover on the dispenser press the B button The detergent for the wash cycle should be poured...

Страница 4: ...ate the need for extra wash cycles Pull out the rack to load the dishwasher How to use the lower rack We recommend that you place the most difficult to clean items on the bottom rack pots pans lids serving dishes and bowls as shown in the figure to the right It is preferable to place serving dishes and lids on the sides of the racks in order to avoid blocking the rotation of the top spray arm Pots...

Страница 5: ...ical position If absolutely necessary it can be positioned on its back Seals One of the factors that cause odors to form in the dishwasher is food that remains trapped in the seals Periodic cleaning with a sponge will prevent this from occurring Wash Cycle Table 8 7 GB GB Cycle Button Button Cycle Selection Information Description of Cycle Deter gent Rinse Aid Very dirty dishes pots and pans not t...

Страница 6: ... get blocked and damage the appliance Drain Hose Connection Insert the drain hose into a drain pipe with a minimum diameter of 4cm or let it run into the sink making sure to avoid bending or crimping it Use the special plastic support that comes with the appliance see fig 2 The free end of the hose must be at a height between 40 and 100 cm and must not be immersed in water Attention The special pl...

Страница 7: ...inem Dach steht es ist außerdem gefährlich den Geschirrspüler Witterungseinflüssen einschließlich Regen auszusetzen Berühren Sie niemals die Heizelemente während oder nach einem Spüldurchgang Lehnen Sie oder setzen Sie sich niemals auf die offene Tür da der Geschirrspüler sonst umkippen könnte Bei Störungen am Gerät müssen Sie immer sofort die Wasserversorgung zum Gerät abstellen und den Stecker a...

Страница 8: ...Spülmittel Verwenden Sie stets nur speziell für Geschirrspüler entwickelte Spülmittel Füllen Sie den Behälter vor Beginn eines jeden Spülprogramms und folgen Sie dabei den in der Spülprogrammtabelle gegebenen Anweisungen Der Spülmittelbehälter befindet sich an der Türinnenseite Spülmittel eingeben Öffnen Sie den Deckel A des Behälters und drücken Sie auf die Taste B Geben Sie das Spülmittel füπr d...

Страница 9: ...mehren Raum für Unterbringung höherer Teller und Tablette in dem Unterkorb haben Regal Lehnen Sie bitte die lange Gläser und die Gegenstände mit langem Stiel an anderen Gegenständen zu waschen Das zusätzliche Tassegestell kann in oder aus drehen wenn es nötig ist siehe Abb C Abb B Abb A Unterkorb Oberkorb Beladung mit 12 Maßgedecken Ein Spülprogramm starten Stellen Sie sicher dass der Gerätestecke...

Страница 10: ...lassen Sie die Tür des Geschirrspülers leicht geöffnet Die Dichtungen halten so länger außerdem wird eine Geruchbildung im Geschirrspüler vermieden 18 17 DE DE Programm Knopf Knopf Informationen zur Programmwahl Programmbeschreibung Geschirr spülmittel Klars püler Starkspül programm Starkspül programm Normal spülen Spülen Einweichen Stark verschmutztes Geschirr Töpfe und Pfannen nicht zusammen mit...

Страница 11: ... Mod und Seriennummer S N die auf dem Schild an der Seite des Innenteils der Tür zu finden sind Lassen Sie niemals Arbeiten von nicht autorisierten Arbeitskräften durchführen und stellen Sie sicher dass nur Originalersatzteile verwendet werden Aufstellen des Geschirrspülers Stellen Sie den Geschirrspüler an der gewünschten Stelle auf Die Rückseite sollte an einer Wand stehen die Seiten an danebens...

Страница 12: ...pide Si ne pouvez résoudre le problème par vous même adressez vous à un Service Après vente Les réparations doivent être réalisées exclusivement par du per sonnel spécialisé Pour la mise au rebut rendez les appareils inutilisables en sectionnant le câble d alimentation et en démontant le verrou de la porte Si le cordon d alimentation est endommagé il doit être remplacé par un cable spécial ou de m...

Страница 13: ...au s échappe du distributeur de sel Revissez soigneusement le bouchon Afin d éviter la formation de rouille remplissez le distributeur de sel juste avant de lancer un cycle de lavage Détergent et liquide de rinçage Détergent Utilisez exclusivement un détergent spécial pour lave vaisselle Remplissez le distributeur de détergent avant de lancer un nouveau cycle de lavage en respectant les instructio...

Страница 14: ...eau plus haut et vous aurez plus d espace pour charger des casseroles et plats plus grands dans le panier L étagère Appuyez les verres hauts et les verres à pied contre le bord de l étagère pas contre la vaisselle Les verres les tasses et les grands bols se rangent sur l étagère du haut Vous pouvez faire basculer l étagère dans les deux sens voir fig C fig B fig A fig C Panier inférieur Panier sup...

Страница 15: ...ces des joints du lave vaisselle favorise la formation d odeurs à l intérieur de celui ci Nettoyez régulièrement les joints avec une éponge pour éviter cet inconvénient Absence prolongée En cas d absence prolongée il est conseillé de lancer un cycle de lavage à vide de débrancher l appareil de fermer le robinet d arrivée d eau et de laisser la porte de l appareil légèrement entrouverte Cette préca...

Страница 16: ...e dos de l appareil doit reposer contre le mur et les parois latérales doivent être parallèles aux parois du meuble adjacent ou du mur Le lave vaisselle est équipé de tuyaux d alimentation et de vidange de l eau Ces tuyaux peuvent être installés à droite ou à gauche pour faciliter l installation correcte de l appareil Comment mettre l appareil de niveau Dès que l appareil est mis en place réglez l...

Страница 17: ... che si avvicinino alla lavastoviglie quando lo sportello è aperto Questo apparecchio non può essere installato all aperto nemmeno in aree coperte da un tetto inoltre è molto pericoloso lasciarlo esposto agli agenti atmosferici Non toccare la resistenza durante o dopo un ciclo di lavaggio Non appoggiarsi o sedersi sullo sportello aperto perché ciò potrebbe causare il ribaltamento della lavastovigl...

Страница 18: ...esclusivamente detersivi per lavastoviglie Il contenitore deve essere riempito prima dell inizio di ciascun ciclo di lavaggio seguendo le istruzioni contenute nella Tabella dei cicli di lavaggio Il contenitore del detersivo si trova nel pannello interno dello sportello Inserimento del detersivo Per aprire il coperchio A del contenitore premere il pulsante B Il detersivo per il ciclo di lavaggio de...

Страница 19: ...i da eliminare consigliamo di lasciarli in ammollo prima di procedere al lavaggio Ciò evita di dovere effettuare ulteriori cicli di lavaggio Estrarre il cestello per semplificare il caricamento della lavastoviglie Come riempire il cestello inferiore Si consiglia di disporre sul cestello inferiore le stoviglie maggiormente sporche pentole padelle coperchi piatti e contenitori di portata come illust...

Страница 20: ... guarnizioni dureranno piu a lungo ed all interno non si formeranno odori sgradevoli 38 37 IT IT programma Pulsante Pulsante Indicazioni per la scelta dei programmi Descrizione del ciclo Detersivo lavaggio brillan tante Lavaggio Energico Lavaggio Energico Lavaggio Normale Risciacqui Ammollo Stoviglie e pentole Molto sporche da non usare per pezzi delicati Stoviglie e pentole Molto sporche da non u...

Страница 21: ...sportello Non ricorrere mai a tecnici non autorizzati e non permettere l installazione di ricambi non originali Installazione Posizionamento della lavastoviglie Sistemare la lavastoviglie nella posizione desiderata La parte posteriore dovrebbe essere appoggiata ad una parete e i fianchi ai mobili o alle pareti adiacenti La lavastoviglie è dotata di tubi di alimentazione e scarico che possono esser...

Отзывы: