background image

X-Series Hexapod Assembly Instructions

21

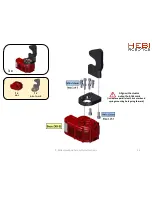
3 x

3 x

3 x

1 x

A

-2088-60-15

(Gas Spring 

15lbs.)

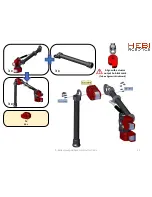
1 x

A

-2083-01

Align with actuator

output hub tick mark

(Tube aligns with tick mark)

Содержание X-Series Hexapod

Страница 1: ...X Series Hexapod Assembly Instructions ...

Страница 2: ...ator Comply with the operating temperature 10 to 50 Turn off power source before connecting or disconnecting actuator power Do not expose the actuator to permanent and strong magnetic fields The actuator must not be exposed to dusty or wet environments If actuator is under load abruptly removing the power connection can cause permanent damage Do not force screws into the bottom of the actuator X5 ...

Страница 3: ...01R fasteners included not shown 6 x A 2127 60 15 Gas Spring 15lbs 6 x A 2083 01 6 x PP 2200 01 150mm Tube 12 x PP 2200 02 300mm Tube 6 x PP 2057 01 1 x A 2050 01 Slip Ring Assembly if necessary 3 x A 2070 01R 3 x A 2070 01L 12 x A 2039 02 12 x A 2091 01 12 x A 2090 01 12 x A 2038 02 Default Configuration 12 x X8 9 6 x X8 16 ...

Страница 4: ...2046 18 Power Cable 18 Length 6 x A 2046 24 Power Cable 24 Length 12 x PP 2059 01 Ethernet Cable 12 Length 6 x PP 2060 01 Ethernet Cable 24 Length 6 x PP 2061 01 Ethernet Cable 36 Length 14 x A 2128 01 Power Distribution Board 1 x A 2048 02 Power Jumper 6 x PP 2058 01 Ethernet Coupler 6 x PE 2042 01 Power Capacitor ...

Страница 5: ...Table of Contents Assembly Image Pages Chassis 6 8 Left Legs 9 16 Right Legs 17 24 Final includes wiring 25 30 X Series Hexapod Assembly Instructions 5 ...

Страница 6: ...X Series Hexapod Assembly Instructions 6 Chassis ...

Страница 7: ...6 x X Series Hexapod Assembly Instructions 7 1 x A 2039 02 1 x PP 2200 01 150mm Tube ...

Страница 8: ...1 x 1 x A 2095 01 6 x 1 x A 2096 01 X Series Hexapod Assembly Instructions 8 ...

Страница 9: ...Left Legs X Series Hexapod Assembly Instructions 9 ...

Страница 10: ...1 x X8 9 3 x X Series Hexapod Assembly Instructions 10 1 x A 2070 01L Align with actuator output hub tick mark inside face parallel with tick mark and spring mounting hole going forward ...

Страница 11: ...1 x X8 16 X Series Hexapod Assembly Instructions 11 3 x ...

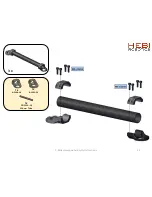
Страница 12: ...X Series Hexapod Assembly Instructions 12 3 x 1 x A 2039 02 1 x A 2038 02 1 x PP 2200 02 300mm Tube ...

Страница 13: ...1 x A 2088 60 15 Gas Spring 15lbs X Series Hexapod Assembly Instructions 13 3 x 3 x 3 x 1 x A 2083 01 Align with actuator output hub tick mark Tube aligns with tick mark ...

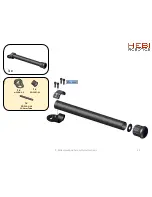
Страница 14: ...X Series Hexapod Assembly Instructions 14 3 x 1 x PP 2057 01 1 x A 2038 02 1 x PP 2200 02 300mm Tube ...

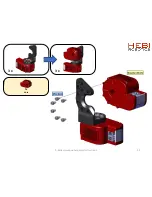
Страница 15: ...X Series Hexapod Assembly Instructions 15 3 x 3 x 3 x 1 x X8 9 Align with actuator output hub tick mark Tube aligns with tick mark ...

Страница 16: ...X Series Hexapod Assembly Instructions 16 3 x 1 x A 2091 01 2 x A 2090 01 1 x A 2094 01L ...

Страница 17: ...Right Legs X Series Hexapod Assembly Instructions 17 ...

Страница 18: ...3 x X Series Hexapod Assembly Instructions 18 1 x A 2070 01R Align with actuator output hub tick mark inside face parallel with tick mark and spring mounting hole going forward 1 x X8 9 ...

Страница 19: ...X Series Hexapod Assembly Instructions 19 3 x 3 x 1 x X8 16 ...

Страница 20: ...X Series Hexapod Assembly Instructions 20 3 x 1 x A 2039 02 1 x A 2038 02 1 x PP 2200 02 300mm Tube ...

Страница 21: ...X Series Hexapod Assembly Instructions 21 3 x 3 x 3 x 1 x A 2088 60 15 Gas Spring 15lbs 1 x A 2083 01 Align with actuator output hub tick mark Tube aligns with tick mark ...

Страница 22: ...X Series Hexapod Assembly Instructions 22 3 x 1 x PP 2057 01 1 x A 2038 02 1 x PP 2200 02 300mm Tube ...

Страница 23: ...X Series Hexapod Assembly Instructions 23 3 x 3 x 3 x Align with actuator output hub tick mark Tube aligns with tick mark 1 x X8 9 ...

Страница 24: ...X Series Hexapod Assembly Instructions 24 3 x 1 x A 2094 01R 1 x A 2091 01 2 x A 2090 01 ...

Страница 25: ...X Series Hexapod Assembly Instructions 25 Final Assembly ...

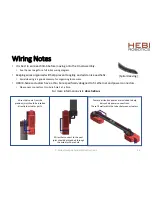
Страница 26: ...e specifically designed to fit ethernet and power connectors Please pass connectors thru bore hole 1 at a time For more information visit docs hebi us X Series Hexapod Assembly Instructions 26 Spiral sleeving Wires that come from the previous joint should be inserted directly to actuator ports Wires that connect to the next joint should be threaded through the actuator s bore hole Power distributi...

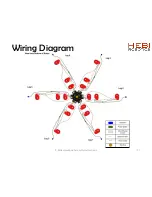
Страница 27: ...X Series Hexapod Assembly Instructions 27 Wiring Diagram ...

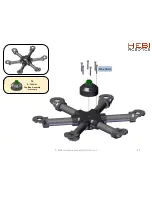
Страница 28: ...X Series Hexapod Assembly Instructions 28 1 x A 2050 01 Slip Ring Assembly if necessary ...

Страница 29: ...X Series Hexapod Assembly Instructions 29 3 x 3 x ...

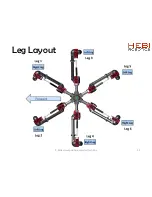
Страница 30: ...X Series Hexapod Assembly Instructions 30 Leg Layout ...

Страница 31: ...X Series Hexapod Assembly Instructions 31 HEBI Robotics 2018 ...

Отзывы: