Ensuring you don’t waste energy on heating the outside
world, the heater is equipped with optional open /
closed window detection. The heater recognises sudden
drops in temperature when a window or a door is
opened and turns the heating off to save energy. When
the window is closed, the heater will automatically
detect a temperature rise, and switch itself back on.
Once enabled in the setup menu, the open window
detection is fully automatic and does not require any
human intervention to be activated.
Setting-up Open Window Detection
The system has been factory set to default time and
temperature values. If necessary, all values can be
adjusted. When the heating is on, open window
detection sensor will automatically switch the heater off
when it detects a fall in temperature of 2
°
C in less than
10 minutes (this temperature can be changed in menu 7
and time in menu 6). If a temperature rise of 2
°
C in less
than 30 seconds is detected, the heater will switch itself
back on (this temperature can be changed in menu 9
and time in menu 8).
13. Open Window Detection
5
58000390 Iss 01
1.
Press and hold TEMP and MODE together for 5
seconds.
2.
The display will enter the setup menu.
3.
Use TEMP and MODE to change a value.
4.
Use TIME to scroll between the settings.
01 - temperature calibration
The temperature reading has been factory calibrated
but if for any reason it needs adjusting (better accuracy
required, to suit different position in the room etc.), the
reading can be recalibrated in 0.5 degrees steps.
02 - change between degrees Celsius or Fahrenheit
03 - set minimum temperature
(3.5 deg = frost protection)
When this is set, the heater will operate in any mode
should the room temperature fall below the set
temperature.
04 - set maximum temperature
When this is set, the maximum temperature in any mode
cannot exceed the limit.
05 - open window detection 0 = off, 1 = on
06 - 600 - open window detection time 600 seconds
07 - 2 - temperature drop of 2
°
C in the detection time
08 - 30 - closed window detection time of 30 seconds
09 - 2 -
temperature rise of 2
°
C in the detection time
14. Setup menu
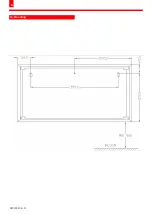
15. Mounting
1.
Mark screw fixing positions on the wall in
accordance with dimensions shown on the
diagram.
2.
Drill 3 holes for 8mm wall plugs.
3.
Insert plugs in to the holes.
4.
The two end screws can be now screwed in until
the heads are approximately 10mm from the wall.
5.
Remove the top grille.
6.
Hung the unit on the two end screws.
7.
Secure the unit with the center screws.
8.
Tighten all 3 screws ensuring that the unit is truly
horizontal.
9.
Reattach the top grille.
OPTIMUM MOUNTING HEIGHT IS 400mm FROM THE FLOOR.
NOTE:
- MINIMUM CLEARANCE FROM THE FLOOR IS 200mm.
- IF THE HEATER IS MOUNTED AT HIGH LEVEL, THE MINIMUM
DISTANCE FROM THE CEILING IS 1000mm.
- THE HEATER MUST NOT BE LOCATED IMMEDIATELY BELOW
A FIXED SOCKET OUTLET.
Содержание HSCF3000E
Страница 6: ...6 15 Mounting 58000390 Iss 01 ...


