Heatmiser Touch-HWN Скачать руководство пользователя страница 25

Section Header

Model: 

Touch-HWN

24

01

02

03

04

05

06

07

08

09

10

11

12

01

05

07

03

FEATURE

Temperature Format 

Switching Differential

Frost Protect

Frost Protection 

Temperature Output Delay 

Communications ID No. Up/

Down Temperature Limit 

Sensor Selection

Floor Temperature Limit 

Optimum Start

Rate of Change

Program Mode

Temperature Format 

Temperature Output Delay 

Down Temperature Limit 

Frost Protect

DESCRIPTION

00 = °C, 01 = °F (°C = Default)

0.5° - 3.0°C  (1°C = Default)

00 = Disabled, 01 = Enabled (01 = Default)

07° - 17°C (12°C = Default)

Enter Value: 00 - 15 Minutes (00 = Default) 

Enter number 01-32

00° - 10°C (00 = Default)

Fixed on Internal Sensor

Not available on this model

00 = Disabled (Default)

01 = 01hr,   02 = 02hr,   03 = 03hr

For Information Only

00 = Weekday/Weekend (Default)
01 = 7 Day Programming

00 = °C, 01 = °F (°C = Default)

Enter Value: 00 - 15 Minutes (00 = Default) 

00° - 10°C (00 = Default)

00 = Disabled, 01 = Enabled (01 = Default)

SETTING

09

11

Floor Temperature Limit 

Rate of Change

Not available on this model

For Information Only

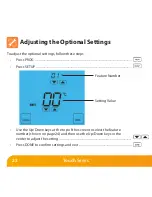
Optional Settings - Feature Table

Содержание Touch-HWN

Страница 1: ...Model Touch HWN ...

Страница 2: ...1 Touch Series Model Touch HWN 1 Touch Series Model Touch HWN ...

Страница 3: ...rmostat LCD Display Hot Water Timings Explained Temperature Display Product Image 16 16 17 18 19 20 21 22 23 24 25 26 27 28 16 19 24 17 21 22 Temperature Control Hot Water Control Temperature Hold Holiday Programming Frost Protection Heating ON OFF Optional Features Explained Adjusting the Optional Settings Optional Settings Features Table Re calibrating the Thermostat Factory Reset Wiring Diagram...

Страница 4: ...It will allow you to select different temperatures in your home at different times of the day and days of the week to meet your particular needs and preferences Setting a room thermostat to a higher temperature will not make the room heat up any faster How quickly the room heats up depends on the design size of the heating system Similarly reducing the temperature setting does not affect how quick...

Страница 5: ...radiator valves TRVs on individual radiators If you don t have TRVs you should choose a temperature that is reasonable for the whole house If you do have TRVs you can choose a slightly higher setting to make sure that even the coldest room is comfortable then prevent any overheating in other rooms by adjusting the TRVs You are able to temporarily adjust the heating program by overriding or using t...

Страница 6: ... bottom face of the thermostat Step 2 Place the thermostat front somewhere safe Terminate the thermostat as shown in the diagrams on pages 27 28 of this booklet Step 3 Screw the thermostat back plate securely into the back box Step 4 Clip the front of the thermostat back onto the thermostat back plate Do Mount the thermostat at eye level Read the instructions fully so you get the best from our pro...

Страница 7: ...Section Header Model Touch HWN 6 1 2 3 4 ...

Страница 8: ...7 Touch Series Section Header 1 4 3 2 5 9 8 18 17 14 6 11 12 13 16 19 7 15 10 ...

Страница 9: ...st protection or press and hold to turn off display 9 Frost Icon Displayed when the thermostat is in frost protection mode 10 Hot Water ON OFF Indicates the hot water status 11 Room Temp Indicates the current temperature sensor mode 12 Set Indicates when changes are being made to programs or temperature set points 13 Clean Screen Freezes screen temporarily to enable cleaning 14 Up Down Keys Increa...

Страница 10: ... follow these steps Press PROG Press CLOCK Use the Down key to set the hours Use the Up key to set the minutes Use the Day key to set the day of the week Press DONE to confirm and exit Setting the Clock Hours Change Hours Minutes Day Change Minutes ...

Страница 11: ...erature Temperature Display The temperature display information is driven by two different inputs the sensor measurement and the target temperature you have set This is the current room temperature This is the temperature you are trying to achieve in your home ...

Страница 12: ...ing options 5 2 Day Programming 4 levels for the weekdays and 4 different levels for the weekend 7 Day Programming 4 levels for each day See page 23 for details on how to switch between these modes Tip If you don t want to use all of the comfort levels just set the time to Default comfort levels are pre programmed but you can change them easily Weekday Level Time Temp Wake 08 00 21 C Leave 09 30 1...

Страница 13: ...the temperature Repeat these steps for the LEAVE RETURN SLEEP periods Press DAY to select the next day to program and repeat When complete press DONE to confirm settings and exit In 5 2 Day mode the thermostat will display Sat Sun prompting you to program the temperature levels for the weekend In 7 Day mode the thermostat will display Tue ...

Страница 14: ...7 Day Programming 4 levels for each day See page 23 for details on how to switch between these modes Tip If you don t want to use all of the comfort levels just set the time to Default switching times are pre programmed but you can change them easily Weekday Level On Time Off Time Wake 07 00 09 00 Leave 16 00 20 00 Return Sleep Weekend Level On Time Off Time Wake 07 00 09 00 Leave 16 00 20 00 Retu...

Страница 15: ...Down keys to set the OFF time for period 1 Repeat these steps for periods 2 3 and 4 Press DAY to select the next day to program and repeat When complete press DONE to confirm settings and exit In 5 2 Day mode the thermostat will display Sat Sun prompting you to program the temperature levels for the weekend In 7 Day mode the thermostat will display Tue ...

Страница 16: ...ttom right corner of the display and hold for 10 secs When activated you will see the Keypad Lock symbol To cancel press the bottom right corner of the display again for 10 secs Clean Screen Pressing will disable all keys providing you 15 seconds to wipe the screen clean before the keys are re activated Keypad Lock Indicator ...

Страница 17: ... programmed setting The hot water will remain in the override state until the next programmed time To cancel repeat the steps above The keys under the temperature display allow you to adjust the set temperature When you press either of these keys you will see the temperature and the word SET appear on screen Select the desired temperature and press to confirm and exit Note This new temperature is ...

Страница 18: ...ifferent temperature for a desired period Press HOLD Use the top set of Up Down keys to set the hold period Use the center set of Up Down keys to set the hold temperature Press DONE to confirm and exit To cancel a Temperature Hold follow the same steps but reduce the time to 00 00 Temperature Hold Hold Icon Hold Time Hold Temperature ...

Страница 19: ...automatically return to the program mode on your return Press HOLIDAY Enter the desired duration in days Press DONE to confirm and exit To cancel a Holiday setting reduce the Holiday time to 00 days Holiday Holiday Icon Holiday Days Note A holiday period does not start until 00 00 the next day For example if you set a holiday period on Friday for 2 days Saturday will be counted as the first day an...

Страница 20: ...ostat will display the frost icon and will only turn the heating on should the room temperature drop below the set frost temperature see page 21 Should the heating be turned on whilst in frost mode the flame symbol will be displayed To cancel the frost protect mode press the key once Frost Mode Frost Protection Mode Enabled ...

Страница 21: ...ent for heating to achieve the set temperature but the thermostat remains active To turn the thermostat OFF completely press and hold the OFF key The display and heating output will be turned off completely To turn the thermostat back ON press the ON key once Heating On Off Thermostat completely OFF Thermostat powered ON See Feature 3 on page 21 ...

Страница 22: ...perature is achieved Feature 03 Frost Protect You can set whether the thermostat will maintain the frost temperature when the thermostat display is turned off As a default this is enabled Feature 04 Frost Protect Temperature This is the temperature maintained when the thermostat is in frost mode The range is 07 17 C The default is 12 C and is suitable for most applications Feature 05 Output Delay ...

Страница 23: ...me The thermostat uses the rate of change information to calculate how long the heating needs to raise the building temperature 1 C with a rate of change of 20 the thermostat has calculated the heating needs 20 minutes to raise the building temperature 1 C and starts the heating accordingly Feature 11 Rate Of Change This is the number of minutes the thermostat has calculated it takes to raise your...

Страница 24: ... Press PROG Press SETUP Use the Up Down keys at the top of the screen to select the feature number shown on page 24 and then use the Up Down keys in the center to adjust the setting Press DONE to confirm settings and exit Adjusting the Optional Settings Feature Number Setting Value ...

Страница 25: ...ect DESCRIPTION 00 C 01 F C Default 0 5 3 0 C 1 C Default 00 Disabled 01 Enabled 01 Default 07 17 C 12 C Default Enter Value 00 15 Minutes 00 Default Enter number 01 32 00 10 C 00 Default Fixed on Internal Sensor Not available on this model 00 Disabled Default 01 01hr 02 02hr 03 03hr For Information Only 00 Weekday Weekend Default 01 7 Day Programming 00 C 01 F C Default Enter Value 00 15 Minutes ...

Страница 26: ...llow these steps Press and hold the OFF key to turn the thermostat OFF Press and hold the ON key until the temperature appears on the screen Use the Up Down keys to configure the new temperature Press DONE to confirm the new temperature Press the ON key once to turn the thermostat back ON Re calibrating the Thermostat ...

Страница 27: ... settings to their factory defaults To perform a factory reset follow these steps Press hold the OFF key to turn the thermostat display OFF Press and hold the bottom left corner of the LCD for 10 seconds All of the screen icons will appear for 2 seconds and then disappear Press the ON key once to turn the thermostat display back ON Factory Reset ...

Страница 28: ...27 Touch Series Section Header Wiring Diagram Touch HWN to UH1 UH1 ZONE 1 ZONE X A2 A1 B2 B1 B _ A2 A1 B Y _ Y B A1 B2 Y Network Touch HWN A2 B1 12VDC ...

Страница 29: ... 12VDC H W C H A2 B2 NO NC C NO NC C N E L 230V SUPPLY IN Volt Free Output A2 Volt Free Output B2 COMMS CABLE For 230V switched live output link mains L to C Recommendations Max Cable Size 1 5MM Back Box Depth 35MM Max Load 3 Amps POWERED RELAY CARD Network Touch HWN A2 B1 12V ...

Страница 30: ... Model Manual REF 29 Notes 29 TouchScreen Series ...

Страница 31: ... Model Touch HWN 30 Notes ...

Страница 32: ...t More Information PDF FAQ Call our support team on 44 0 1254 669090 Or view technical specifications directly on our website www heatmiser com Twitter heatmiseruk Facebook facebook com thermostats Rev 2 0 ...

Отзывы: