background image

3

598-1116-00

DRAFT COPY

Channel Settings

Note: Most installations will not require you to change any of the dip
switches on your plug-in module or remote control.

The remote control communicates
by using channels that can be
changed by sliding dip switches into
the ON or OFF [on some switches
the numbers 1 (ON) and/or 0 (OFF)
are used] position on the remote
control. The channel is factory set;
however, there are 3 switches (8
selectable channels) that allow you
to expand your system and prevent
outside interference. Other wireless
products may cause interference
and the system may not function properly. Follow the instructions below for
setting a new channel.
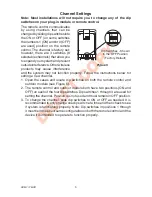
1. Open the cases and locate dip switches on both the remote control and

outdoor module (see Figure 5).

2. The remote control and outdoor module both have two positions (ON and

OFF) on each of the four dip switches. Dip switches 1 through 3 are used for
setting the channel. Position 4 is not used and must remain in OFF position.

3. To change the channel, slide dip switches to ON or OFF as needed. It is

recommended to only change one dip switch at a time and then check to see
if system is functioning properly. Note: Dip switches in positions 1 through
3 must be in the exact same configuration on both the remote control and the
device it is intended to operate to function properly.

Dip Switches - Shown

in the OFF Position

(Factory Default)

ON

1 2 3 4

ON

1 2 3 4

Figure 5

Содержание SL-6005

Страница 1: ...ansmitter by pressing on it with your thumb and sliding it off as shown in Figure 1 Using outline of battery chamber as a guide align battery with chamber and insert battery into remote Slide cover back onto transmitter 2 Remote Control Functions Channel 1 2 ON Turns ON any devices set to the same channel as this remote control Channel 1 2 OFF Turns OFF any devices set to the same channel as this ...

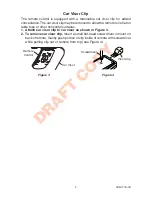
Страница 2: ...to lie flat on table tops or other horizontal surfaces 1 Attach car visor clip to car visor as shown in Figure 3 2 To remove car visor clip Insert a small flat head screw driver into slot on back of remote Gently push portion of clip inside of remote with screwdriver while pulling clip out of remote from top see Figure 4 Figure 3 Figure 4 Car Visor Remote Control Visor Clip Screwdriver ...

Страница 3: ...the instructions below for setting a new channel 1 Open the cases and locate dip switches on both the remote control and outdoor module see Figure 5 2 The remote control and outdoor module both have two positions ON and OFF on each of the four dip switches Dip switches 1 through 3 are used for setting the channel Position 4 is not used and must remain in OFF position 3 To change the channel slide ...

Страница 4: ...www desatech com Iftheproblempersists callforassistanceat1 800 858 8501 7 30 AM to 4 30 PM Central Time weekdays You may also write to DESA International Inc P O Box 90004 Bowling Green KY 42102 9004 Do not send products Regulatory Information This device complies with Part 15 of the FCC Rules and RSS 210 of Industry Canada Operation is subject to the following two conditions 1 this device may not...

Страница 5: ...overs only Heath Zenith assembled products and is not extended to other equipment and components that a customer uses in conjunction with our products THIS WARRANTY IS EXPRESSLY IN LIEU OF ALL OTHER WARRAN TIES EXPRESS OR IMPLIED INCLUDING ANY WARRANTY REPRE SENTATION OR CONDITION OF MERCHANT ABILITY OR THAT THE PRODUCTS ARE FIT FOR ANY PARTICULAR PURPOSE OR USE AND SPECIFICALLY IN LIEU OF ALL SPE...

Отзывы: