HearthStone Tudor 8120 Скачать руководство пользователя страница 15

Hearthstone Quality Home Heating Products, Inc.


Tudor Model #8120 


15

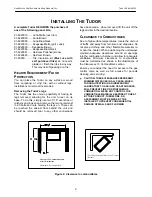
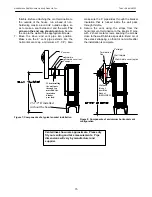
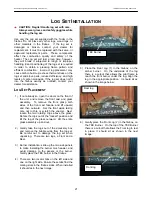
thimble. Before attaching the vent termination to 
the outside of the house, run a bead of non-
hardening mastic around its’ outside edges, so 
as to make a seal between it and the wall. 

The 

arrow on the end cap should point up

. Secure 

the cap to the wall with the appropriate screws. 

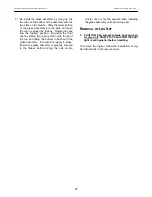
7.  Move the stove and vent pipe into position. 

Make sure the 6” vent pipe extends into the 
horizontal vent cap a minimum of 1-1/4”). Also 

make sure the 6” pipe slides through the blanket 
insulation that is tucked inside the wall pass 
through thimble.  

8.  Secure the vent using the straps from the 

horizontal vent termination to the interior 6” pipe 
with 2 sheet metal screws, keeping the screws 
close to the wall thimble as possible. Bend or cut 
the excess strapping, so that it is not visible after 
the installation is complete.  
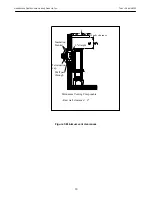
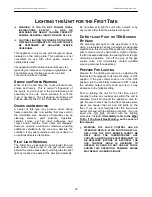
 

wall thimble
wall thimble cover (opt

When installing 
the wall pass 
through you 
must add the 
insulation 
blanket 
provided. 

6"straight

14" snorkel

23-1/2" If installed 
without the base

Figure 7: Components of a typical snorkel installation  
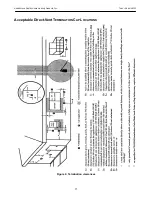
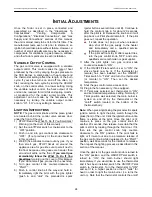
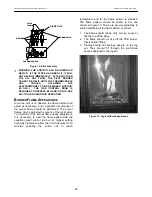


Termination
Cap

Wall thimble

Wall thimble cover (option

6"straight

Wallpass 
through 

insulation 
blanket 
(REQUIRED)


Figure 8: Components of a minimum horizontal vent 
configuration 


Centerlines shown are approximate.  Please dry 
fit your venting and take measurements.  Pipe 
dimensions will vary by manufacturer and 
supplier. 

Содержание Tudor 8120

Страница 1: ...ervice agency or gas supplier must perform installation and service In the Commonwealth of Massachusetts all installation of gas lines and gas fitting must be done by a licensed gas fitter or licensed...

Страница 2: ...Hearthstone Quality Home Heating Products Inc Tudor Model 8120 2...

Страница 3: ...p your original receipt in a safe place as proof of purchase Serial Number Fuel type check one Natural Gas Liquid Propane Sold by Phone Date of Purchase Installed by Phone Date of Installation Gas Sup...

Страница 4: ...S 16 REMOTE CONTROL 16 THERMOSTAT WIRING 16 WIRING SCHEMATIC 17 GAS SUPPLY CONNECTIONS 19 GAS CONNECTIONS 19 GAS SUPPLY 19 GAS PRESSURE ADJUSTMENT 19 REFRACTORY PANEL INSTALLATION 20 PANEL PLACEMENT 2...

Страница 5: ...OR SLAMMING SHUT REPLACEMENT OF THE GLASS PANEL SHOULD BE DONE BY A LICENSED OR QUALIFIED SERVICE PERSON Replace any shield door or safety screen component removed for servicing prior to operating th...

Страница 6: ...3 M02 CAN CGA2 17 M91 Certified for Canada CSA P 4 1 Approved for Mobile Home Installation Figure 1 Tudor Dimensions FUEL TYPE NG LP INPUT RATING Btu hr 0 2000 ft 11 500 11 200 ORIFICE SIZE DMS 0 2000...

Страница 7: ...he homeowner can select the optimum flame size for their setting and application During the summer non heating season switch the wall thermostat to OFF and turn off the pilot This will improve the ove...

Страница 8: ...nts are supplied separately Failure to use the venting components specified by Hearthstone QHHP Inc will void your warranty and could risk a fire UNPACKING AND INSPECTION Unpack and Inspect for Damage...

Страница 9: ...ved prior to any other connections have been made Once removed lift the unit off the legs and set in the desired location CLEARANCE TO COMBUSTIBLES Due to high surface temperatures locate the unit out...

Страница 10: ...ality Home Heating Products Inc Tudor Model 8120 6 straight Minumum Venting Components Rear wall clearance 0 Termination cap Wall pass through Insulation blanket Mantle clearance Figure 3 Minimum vent...

Страница 11: ...Hearthstone Quality Home Heating Products Inc Tudor Model 8120 Acceptable Direct Vent TERMINATION CAP LOCATIONS Figure 4 Termination clearances 11...

Страница 12: ...lable Controlling the draft also changes the aesthetics of the flame The restriction plate consists of a rotating shutter behind the starter section of pipe and an adjustment plate with an index hole...

Страница 13: ...Hearthstone Quality Home Heating Products Inc Tudor Model 8120 Figure 6 Venting configurations 13...

Страница 14: ...tallations 90 0 Elbow 45 0 Elbow 6 Straight 9 Straight Simpson only 12 Straight 24 Straight 36 Straight 48 Straight 11 14 5 8 Adjustable Pipe Length Horizontal Vent Cap Vertical Vent Cap 14 Snorkel Vi...

Страница 15: ...t using the straps from the horizontal vent termination to the interior 6 pipe with 2 sheet metal screws keeping the screws close to the wall thimble as possible Bend or cut the excess strapping so th...

Страница 16: ...5m off the floor and away from any influences that may cause the temperature in the vicinity of the thermostat to be unrepresentative of the room temperature in general Such influences might include s...

Страница 17: ...RATION AFTER SERVICING ATTENTION AU MOMENT DE L ENTRETIEN DES COMMANDES TIQUETEZ TOUS LES FILS AVANT LE D BRANCHEMENT DES ERREURS DE C BLAGE PEUVENT ENTRA UN FONCTIONNEMENT INADEQUATE ET DANGEREUX THE...

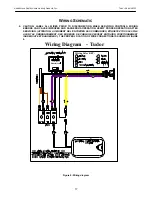
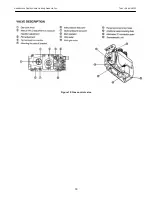
Страница 18: ...Hearthstone Quality Home Heating Products Inc Tudor Model 8120 18 Figure 10 Gas control valve...

Страница 19: ...gas supply to meet the maximum demand of the unit without undue loss of pressure We recommend a flexible line to avoid undue mechanical load on the valve and to ease thread alignment but refer to loc...

Страница 20: ...and inspect for damage or missing parts Contact your dealer if necessary 5 The panels are very fragile do not force them into position 6 Insert the rear panel into the firebox right edge first rotate...

Страница 21: ...the front grasp both sides of the front cast facade and lift upward and then outward Set the front aside taking care not to chip or scratch the enamel Next locate the two rotating clips above the glas...

Страница 22: ...cast by sliding the upper portion onto the lip of the top and tilting the bottom in flush with the glass assembly It should fit snuggly in place Ensure the glass assembly is properly secured to the f...

Страница 23: ...xt to the gas control valve behind the valve access door which ignites the pilot light by means of a spark at the pilot light assembly Do not attempt to light the unit with a match or by any means oth...

Страница 24: ...old in Immediately light the pilot with the gas lighter push in and click the piezoelectric spark igniter button several times until lit Continue to hold the control knob in for about 20 seconds after...

Страница 25: ...must perform supply line manifold gas line pressure adjustments and restrictor plate adjustments Do not attempt to complete any part of the installation or adjustment of this unit unless technically...

Страница 26: ...burner flame should be performed The burner flames can be adjusted by means of the air shutter To determine if the burner flame needs adjustment it is necessary to view the flame pattern with the var...

Страница 27: ...ccording to the lighting instructions described on page 22 Check to insure a proper flame is burning from each burner port The pilot flame should be large enough to engulf the thermopile and thermocou...

Страница 28: ...will weaken the integrity of the glass Do not clean the glass when hot Allow the glass to cool and apply a mild window cleaning fluid Special gas appliance window cleaner is available from your local...

Страница 29: ...3120 140 interior top 3120 141 interior left 3120 142 interior right 3120 143 interior rear 3120 125 heatshield top 7211 536 Ember bed 7211 537 rear log 7211 538 front log ELECTRICAL 7000 014 Thermost...

Страница 30: ...insulation If properly connected and no spark replace igniter E Clean or replace the pilot assembly 2 Pilot will not stay lit after carefully following lighting instructions A Low or too high gas pres...

Страница 31: ...rner orifice clean or replace Note do not use any metal cleaning device as this may damage the orifice 4 Pilot and burner come on but go out after some warm up A Inconsistent or insufficient flame on...

Страница 32: ...2 Clear obstructions B3 Clear obstructions C If gas pressures are correct and the flames stay the same adjust the air shutter for a proper burn 9 Burner flashback Air gas mixture ignites inside the bu...

Страница 33: ...tible for use with other gases unless a certified kit is used If the vent air intake system is disassembled for any reason reinstall per the instructions provided with the initial instructions This ve...

Страница 34: ...or burn through TEK logs and embers against breakage cracking or burn through This warranty expires on the fifth 5th anniversary of the Purchase Date LIMITED THREE YEAR WARRANTY HearthStone warrants t...

Страница 35: ...MENT EXTEND ONLY TO THE ORIGINAL PURCHASER OF THE STOVE WARRANTED HEREUNDER THEY DO NOT EXTEND TO ANY SUBSEQUENT OWNERS UNDER NO CIRCUMSTANCES SHALL HEARTHSTONE BE LIABLE TO THE ORIGINAL PURCHASER OR...

Страница 36: ...Stove to HearthStone or a Dealer for repair HearthStone will pay fifty percent 50 and the Original Purchaser will pay fifty percent 50 of the shipping costs related to shipping the Stove to and from H...

Отзывы: