HearthStone
Quality Home Heating Products Inc
®
Starlet Model 8550
12
the chimney needs repair, complete them before installing
and using your stove. Do not install your stove until the
chimney is safe for use.
Make sure the chimney’s cleanout is complete and
working properly. To avoid a loss of draft, the cleanout
must close off completely. If allowed to cool, your stove
will perform poorly and creosote will build up in the
chimney.
Make sure the size of the chimn ey’s flue is appropriate for
this stove and that it is not too large. Use a masonry
chimney with an 8" x 8" (203 mm x 203 mm) tile size for
best results. An oversized flue will contribute to the
accumulation of creosote.
Use the following checklist to ensure that your masonry
chimney meets these minimum requirements:
Chimney wall construction:
q
Brick or modular block at least 4" (102 mm) thick.
q
A rubble or stone wall.
Flue liner:
q
Minimum thickness of 5/8" (16 mm).
q
Installed with refractory mortar.
q
At least 1" (25 mm) air space.
q
An equivalent flue liner must be a listed chimney
liner system meeting type HT requirements or other
approved material. Interior chimney requirements:
q
At least 2" (51 mm) clearance to
combustible structure
q
Fire stops must be installed at the spaces where the
chimney passes through floors and/or ceiling.
q
Insulation must be 2" (51 mm) from the chimney.
Exterior chimney requirements:
q
At least 1" (25 mm) clearance to combustible
structure.
Chimney height requirements: (See Illustration)
q
At least 3 feet (0.9 m) higher than the highest part of
the roof opening through which it passes.
q
At least 2 feet (0.6 m) higher than any part of the roof
within 10 feet (3 m) measured horizontally from the
top of the chimney.
This stove requires a minimum chimney height of 13 feet
(4 m). The maximum allowable chimney height is 30 feet
(9m).
I
NSTALLING
I
N
A M
OBILE
H
OME
Follow these special requirements for installing your
stove in a mobile home.
¦
WARNING:
DO NOT INSTALL IN A SLEEPING ROOM
•
Install the stove in accordance with 24 CFR, Part
3280 (HUD)
•
Permanently attach the stove to your mobile home’s
floor. Use 1/4" holes in each leg base to bolt down
the stove.
•
Chimney must be removed when transporting Mobile
Home.
•
Install one of the following Dura-Vent Mobile Home
Chimney & Connector Kits:
6DP-MH 6” Diameter S/N 9096N
7DP-MH 7” Diameter S/N 9196N
8DP-MH 8” Diameter S/N 9296N
Each kit includes:
Stainless spark arrester cap, storm collar,
Adjustable vented flashing – 0/12 – 6/12, Two
24” Dura/Plus* chimney pipes, 24”support box
with built-in starter section and trim.
* (UL or ULC approved equipment is acceptable)
¦
CAUTION:
MAINTAIN THE STRUCTURAL INTEGRITY OF
THE MOBILE HOME WALLS, FLOOR,
CEILING, AND ROOF WHILE YOUR STOVE IS
INSTALLED AND IN USE.
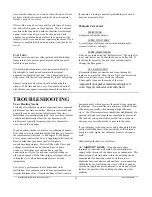
Typical Mobile Home installation.
Support Box
with built-in
starter section
Chimney supported by ceiling.
Chimney Cap
Storm Collar
Flashing
Adjustable Roof
Stovepipe
Chimney
Chimney Section


