background image

15/ 15

7.3 RX Boot Logo

RX Boot Logo picture can be changed and downloaded through Web Update page.

You can choose any one of pictures as RX boot and no signal standby logo picture.

Notes: Picture must be .jpg format file with 1920*1080 resolutions.

7.4 How to be controlled by Third-party controller

Please contact supplier to provide API documents.

Содержание HDTV10016x16

Страница 1: ...VER 1 1 ...

Страница 2: ...vice recommended This product contains sensitive electrical components that may be damaged by electrical spikes surges electric shock lightning strikes etc Use of surge protection systems is highly recommended in order to protect and extend the life of your equipment Table of Contents 1 Introduction 2 2 Features 2 3 Package Contents 2 4 Specifications 3 5 Operation Controls and Functions 4 6 Conne...

Страница 3: ...ing you can easily and flexibly to manage all your HDMI sources and display devices using Web GUI mobile application or third party control system 2 Features HDMI 1 4b HDCP 1 4 compliant Video resolution up to 1080P60Hz 4 4 4 Standard H 264 Encoding Decoding H 264 IP Camera supported HDMI audio and RS 232 over IP Unicast Multicast Matrix Video Wall and Multi viewer up to 5 windows Supports 1G stan...

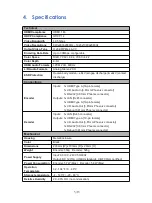
Страница 4: ...tor 1x RS 232 3 81mm Phoenix connector Outputs 1x LAN RJ45 connector 1x HDMI Type A 19 pin female 1x L R Audio Out 3 81mm Phoenix connector 1x Debug 3 81mm Phoenix connector Decoder Inputs 1x LAN RJ45 connector Outputs 1x HDMI Type A 19 pin female 1x L R Audio Out 3 81mm Phoenix connector 1x RS 232 3 81mm Phoenix connector 1x Debug 3 81mm Phoenix connector Mechanical Housing Metal Enclosure Color ...

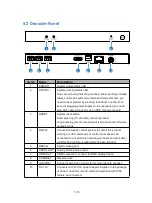
Страница 5: ...are upgrade mode 4 RS 232 Connect third party control system to control this product utilizing our API commands or control other devices be connected to our products including encoders and decoders via RS 232 port this is called RS 232 pass through 5 DEBUG System debug port 6 AUDIO OUT Analog stereo audio output 7 AUDIO IN Analog stereo audio input 8 HDMI IN HDMI input port connect to HDMI source ...

Страница 6: ...essing over 5 seconds will let product enter firmware upgrade mode 4 RS 232 Connect third party control system to control this product utilizing our API commands or control other devices be connected to our products including encoders and decoders via RS 232 port this is called RS 232 pass through 5 DEBUG System debug port 6 AUDIO OUT Analog stereo audio output 7 HDMI OUT HDMI output port connect ...

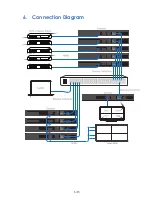
Страница 7: ...6 15 6 Connection Diagram ...

Страница 8: ...r first use See below for full information on completing each step 1 Choose an encoder box as Controller you can connect it to your laptop through CAT5e 6 cable directly or through a network switcher likes below Figure 1 Laptop connects to Controller directly Figure 2 Laptop and Controller both connect to switcher Note If your connection likes above Figure 2 through a switcher please only connect ...

Страница 9: ...rts Google Chrome browser Default don t need password to login You can see below Web page please click searching devices icon the right of Device List to search all encoders and decoders in the network You can get all devices list as below Please go to System page to set Controller IP address to 192 168 1 30 firstly for instance ...

Страница 10: ...y own IP address and firmware version information on the corresponding display So you would easily identify which decoder you re changing But for encoder you have to identify each box according to its MAC address label on the housing or you can add one encoder into system every time so that you can know which encoder you re changing After completing all boxes IP addresses changing you can go to Ma...

Страница 11: ...each box name like below the Controller name be changed to CON_DVD1 4 Now you can put other encoders into system and click searching devices icon Please change every one s IP address and name like above steps ...

Страница 12: ...11 15 5 Please set video wall parameters according to your system setup For instance set to 3x3 ...

Страница 13: ...r cursor on the RX s IP address position to each window position firstly Then you also can drag each encoder to the RX window you want Notes You can set the Row and Column values of video wall to another values or keep them to the same values then click Apply will clear video wall configuration settings ...

Страница 14: ...decoder box 6 After you complete all system configurations current settings would be saved into current Controller box it will be run automatically at next system power up Of course you can also save current configurations to a scene and take a name you want by clicking Add Scene icon You can recall different scenes to reload different system configurations according to your applications ...

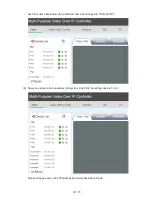
Страница 15: ...or decoders at the same time or only update one box you want Notes Please click Search Devices firstly then choose firmware file Click Burning after file transmission completed Please click Update page of below Controller s Web to update TX and RX firmware ...

Страница 16: ...ed through Web Update page You can choose any one of pictures as RX boot and no signal standby logo picture Notes Picture must be jpg format file with 1920 1080 resolutions 7 4 How to be controlled by Third party controller Please contact supplier to provide API documents ...

Отзывы: