Congratulations on purchasing the HDI Advance 3D Scanner. Here are the steps to set up the capturing
unit for 3D data acquisition. In this tutorial the HDI Advance R3x 3D Scanner was used. There are slight
variations to the instructions depending on which model you have purchased. Please see the following
instructions to assemble your 3D scanner, most of which will be pre-assembled.
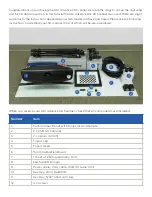
When you receive your HDI Advance 3D Scanner, check that all components are included:
Number
Item
1
Carbon Fiber Mount with Projector and Remote
2
2 x USB 3.0 Cameras
3
2 x Lenses (12mm)
4
Tripod Leg
5
Tripod Head
6
15mm Calibration Board
7
1 sheet of Photogrammetry Dots
8
FlexScan3D Dongle
9
Power cable, VGA cable, USB 3.0 cable (3m)
10
Hex Key, 2mm, 16x83mm
11
Hex Key, 5/32" Short Arm Key
12
4 x Screws
2
8
10
7
3
9
5
6
4
1
11
12

