HCT O5XHP-425V Скачать руководство пользователя страница 7

OWNER'S MANUAL

6

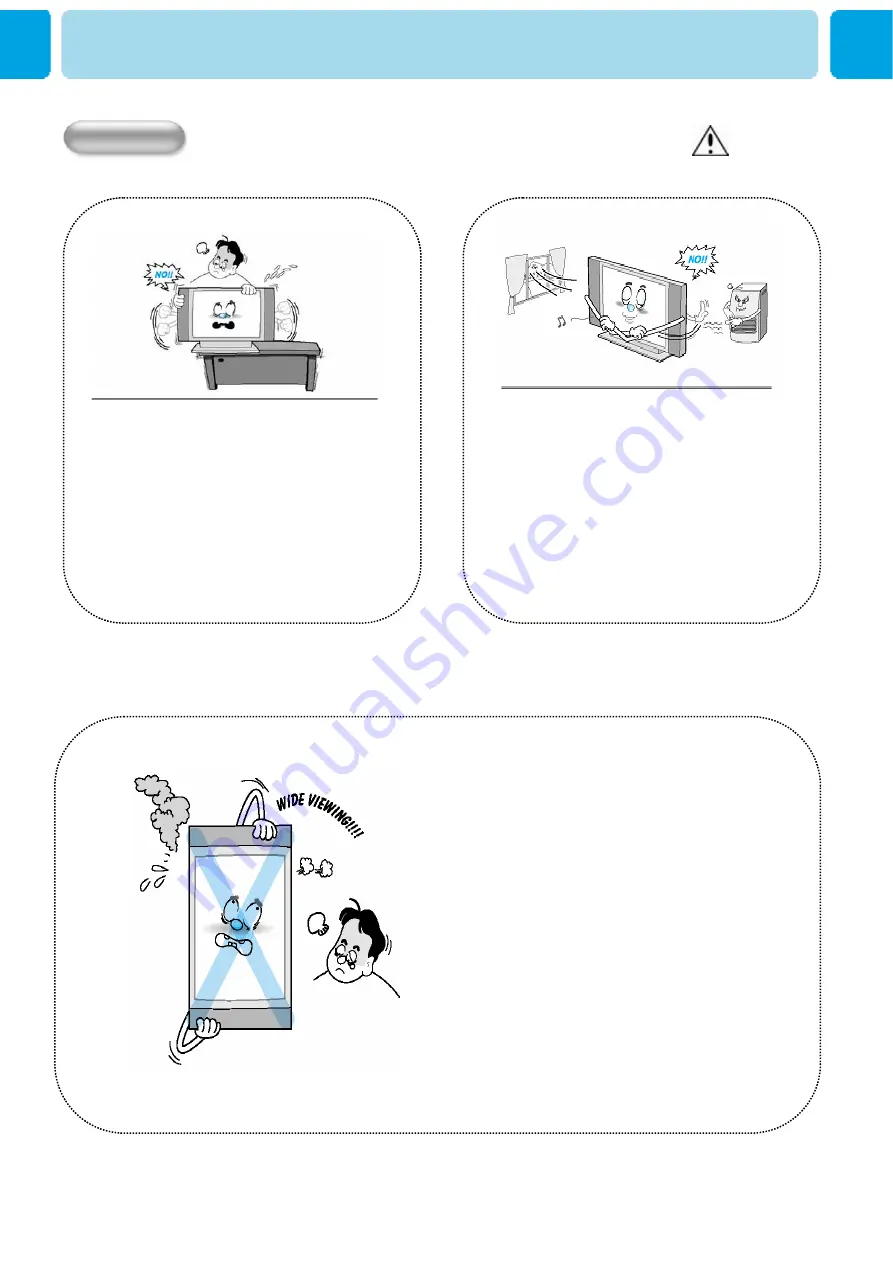
This plasma display is designed to be
mounted horizontally (wide viewing).
Any inquiry regarding its vertical position 
should be forwarded to the manufacture 
directly

Precaution

WARNING

Setting

When installing the Monitor on a table, 
be careful not to place the edge of its 
stand.

- This may cause the Monitor to fall, 
causing   serious injury to a child or 
adult, and serious damage to the 
Monitor.

Provide ventilation for the Monitor. The unit 
is designed with slots in the cabinet for 
ventilation to protect it from overheating. 
Do not block these openings with any 
object, and do not place the Monitor on a 
bed, sofa, rug or other similar surface. Do 
not place it near a radiator or heat register. 
If you place the Monitor on a rack or 
bookcase, ensure that there is adequate 
ventilation and that you've followed the 
manufacturer's instructions for mounting.

Содержание O5XHP-425V

Страница 1: ...YUNDAI CALIBRATION CERTIFICATION TECHNOLOGIES CO LTD SAN 136 1 AMI RI BUBAL EUP ICHEON SI KYOUNGKI DO 467 701 KOREA TEL 82 31 639 8517 FAX 82 31 639 8525 www hct co kr Report No HCT FO5 0914 1 1 ATTACHMENT E USER S MANUAL ...

Страница 2: ...24 Displayable Monitor Specification 25 Basic Operation 26 OSD Menu Structure 27 Choosing the Channel Type 28 Storing Channels Automatically 28 Channel Add Del and Fine Tune 29 Editing the Channels 30 Digest Function 31 Changing the Picture Mode 32 Adjusting the User Mode 33 Changing the Color Temperature 35 Color Enhancer 35 Video NR Noise Reduction 36 Changing the Screen Form 36 Selecting the Bl...

Страница 3: ...ip 47 Tv Block in V Chip 48 Movie Block in V Chip 48 Change Password in V Chip 49 V Chip Blocking in V Chip 49 Other Advanced Function Set ID in Advanced 50 Setting the Blue Screen Mode 51 Changing the OSD Language 51 Front Key Lock in Advance 51 Burn Protect in Advance 52 HDTV Setup HDTV mode Only Time Zone in HDTV Setup HDTV mode 53 Daylight in HDTV Setup HDTV mode 54 HDCCD Setup HDTV mode only ...

Страница 4: ...ications However there is no guarantee that interference will not occur in a particular installation If this equipment does cause harmful interference to radio or television reception which can be determined by turning the equipment off and on the user is encouraged to try to correct the interference by one or more of the following measures Reorient or relocate the receiving antenna Increase the s...

Страница 5: ...it into your outlet consult an electrician for replacement of the obsolete outlet 10 Protect the power cord from being walked on or pinched particularly at plugs convenience receptacles and the point where they exit from the apparatus 11 Only use the attachments accessories specified by the manufacturer 12 Use only with a cart stand tripod bracket or table specified by the manufacturer or sold wit...

Страница 6: ...c charges Section 810 of the National Electrical Code ANSI NFPA No 70 1984 provides information about proper grounding of the mast and supporting structure grounding of the lead in wire to an antenna discharge unit size of grounding conductors location of antenna discharge unit connection to grounding electrodes and requirements for the grounding electrode Do not place an outside antenna in the vi...

Страница 7: ...causing serious injury to a child or adult and serious damage to the Monitor Provide ventilation for the Monitor The unit is designed with slots in the cabinet for ventilation to protect it from overheating Do not block these openings with any object and do not place the Monitor on a bed sofa rug or other similar surface Do not place it near a radiator or heat register If you place the Monitor on ...

Страница 8: ...wer line surges Protect the power cord Power supply cords should be routed so that they won t be walked on or pinched by objects placed on or against them Pay particular attention to cords at plugs convenience receptacles and the point where they exit from the unit Use only a grounded or polarized outlet For your safety this Monitor is equipped with a polarized alternating current line plug having...

Страница 9: ...r dealer or service center This may cause a fire or could give an electric shock Do not insert anything through the openings in the unit where they can touch dangerous voltage points or damage parts Never spill liquid of any kind on the Monitor When replacement parts are required be sure the service technician uses replacement parts specified by the manufacturer or those that have the same charact...

Страница 10: ...therwise it can cause personal injury Keep the batteries out of reach of children when exchanged Seek urgent medical advice if child swallows a battery Avoid having a fixed image remain on the screen for a long period of time Typically a frozen still picture from a VCR 4 3 picture format or if a CH label is present the fixed image may remain visible on the screen When moving the Monitor assembled ...

Страница 11: ...NENT1 COMPONENT2 PC DVI and HDMI VOL CH To change the CHANNEL press button first and change the channel with buttons To change the VOLUME press button first and change the volume with buttons Stand By ON OFF Turn the TV on and off Accessories Remote Control Handset Power Cord RF Cable Alkaline Batteries Owner s Manual Viewing the Control Panel Menu Call the OSD Menu ...

Страница 12: ... 5 D Sub PC 6 Component1 2 7 Component Sound1 2 8 VIDEO 1 9 VIDEO OUTPUT2 10 VIDEO 2 11 SPDIF optical 12 Phone Jack 13 AV 14 S VIDEO 15 S VIDEO AV Sound 16 D TV Antenna 17 A TV Antenna 18 Speak Cable 19 AC Power Back Panels and Jacks Viewing the Connecting Panel ...

Страница 13: ...Connectors CTS 8 8 CTS RTS 7 7 RTS DSR 6 6 DSR DTR 4 4 DTR GND 5 5 GND RXD 2 3 TXD TXD 3 2 RXD TV PC 3 Wire Non standard RS 232C Configurations AC Power Cable Connect 15 port RF Cable Connect 16 and 17 port S Video Cable Connect 14 port Component Cable Connect 6 port D Sub PC Cable Connect 5 port DVI D Sub PC Sound Cable Connect 1 port DVI Cable Connect 2 port SPDIF Cable optical Connect 11 AV Cab...

Страница 14: ...NPUT Display the input source list 8 Menu Set Display the main OSD menu Activate your choice in the OSD menu 9 Exit EPG Return to the previous OSD menu 10 Sub CH Change channels of sub window by pressing the Sub CH button after pressing this button in PIP 11 CH Move to the upper and lower Channel 12 VOL Increase and decrease the volume level Buton Description Viewing the Remote Control 1 2 3 6 8 5...

Страница 15: ...c turn off OFF Not work 10min 20 30 60 90 120 150 180 7 TIME Display the current time on the screen 8 DIGEST DTV INFO Display the 16 TV programmes at the same time 9 CH ADD Add the current channel to memory 10 CH ERASE Erase the current channel to memory 11 CC CLOSED CAPTION Set the close caption Off Caption CC1 Caption CC2 Caption Text1 Caption Text2 12 V CHIP Get into V Chip menu PIP Picture In ...

Страница 16: ...nd PIP Window MODE KEY Change the PIP window mode OFF SMALL LARGE TWIN Viewing the Picture in Picture O O O X O O O O X O HDTV O O O X O O O O O HDTV X X X O O O O O O DVI X X O O O O O O DVI X X O O O O O O HDMI X X O O O O O O PC O O X O O O O O Component2 O O O X O O O O Component1 O O O O X O O O S Video AV O O O O O X O O VIDEO 2 O O O O O O X O VIDEO 1 O O O O O O O O TV HDMI PC Component2 C...

Страница 17: ...and slide in the direction of the arrow Loading The Batteries Load two AAA batteries taking care that the and ends face the correct direction Close the cover until it clicks Reception range of remote control Controls Of The Remote Control ...

Страница 18: ...OWNER S MANUAL 17 Stand Installation Monitor Installation ...

Страница 19: ... the input and the negative wire to the input Connect left monitor input to left speaker and right monitor input to right speaker Any extra speaker wire length remaining can be bunched into the wire holders provided Caution Once installed the speaker wire holders lock into position and can t be removed Always lift the monitor itself not the speakers when handling or moving the monitor after speake...

Страница 20: ...trol and select TV or HD TV on OSD Use CH CH button or numeric key to change TV channel for your channel selection Press Pre CH key on the remote control to tune the previous channel Also you can tune to cable service provided channel using the cable box For further information regarding cable TV service contact cable TV service provider s ...

Страница 21: ...deo tape into the VCR and press the PLAY key on the VCR To avoid picture noise interference leave an adequate distance over 3m between the VCR and monitor When connecting the TV with external equipments match the colour of connecting ports e g Video yellow Audio L white Audio R red If you have a mono VCR connect the audio cable from the VCR to the AUDIO L MONO input of the TV If you connect an S V...

Страница 22: ...which should be through normal YPbPr of Component signal Watching DVD 1080i 60Hz 1080i 50Hz 720p 60Hz 720p 55Hz 576p 50Hz 576i 50Hz 480p 60Hz 480i 60Hz O O O O O O O O O O O O O O O O O O O O O O O O O X X X O O O O O O O X X X O O HDMI DVI PC Component2 Component1 Supported Signals Connect the three separate component video cables to the DVD player s Y Pb and Pr jacks and to the Component jacks o...

Страница 23: ...ed device You should use the DVI to HDMI cable or DVI HDMI Adapter for the connection HDMI the HDMI logo and High Definition Multimedia Interface are trademarks or registered trademarks of HDMI Licensing LLC Connecting HDMI DVI Supports connections between HDMI connection enabled AV devices set top boxes DVD players AV receivers and digital TVs No sound connection is needed for an HDMI to HDMI con...

Страница 24: ... AV COMPONENT HDMI PC or DVI jacks on the TV Audio inputs to Audio sockets beside the L White and R Red audio jacks which you connect video inputs With AV Connect a AV cable to the AV jacks of the STB and the TV With Component Connect a three separate component cables to the component jacks of the STB and the TV Connect L White and R Red sound cables composite to the sound jacks of the STB and the...

Страница 25: ...PC requirements 3 Adjust the PC screen in Geometry menu See 38 page Red R Green G Blue B Grounding Grounding DDC Red R Grounding Green G Grounding Blue B Grounding Reserved Sync Grounding Grounding Data DDC Horizontal sync Vertical sync Clock DDC Description Clock DDC 15 Vertical sync 14 Horizontal sync 13 Data DDC 12 Grounding 11 Sync Grounding 10 Resered 9 Blue B Grounding 8 Green G Grounding 7 ...

Страница 26: ... Windows Check your PC instruction book for information about connecting your PC to a the monitor The Monitor may operate abnormally if a non standard video signal Out of Range message box will appear when an over spec video signal is input Change th video settings of PC when the message is displayed Displayable Monitor Specification 60 00 64 00 1280 X 1024 75 00 67 50 1152 X 864 84 997 68 677 75 ...

Страница 27: ...her information regarding cable TV service contact your TV service provider s Volume Control Use VOL VOL key on the remote control to adjust the volume level Press MUTE key on the remote control when you need to cut the sound temporarily Select Source Source list menu Basic Operation Press the Power key on the remote control The TV will turn on and you will be ready to use its features You can als...

Страница 28: ... menu First select Main menu item you need with key To select a main menu items just press or Menu Set button on the Remote Control 2 Sub Menu Each menu item has its own sub menu items to set 3 Sub Menu items A If there is no part the item has an sub menu You can enter the under menu and adjust an item you need Select sub menu item with keys on the remote control and press or Menu Set button to en...

Страница 29: ...edes Digital Scan on Auto Scan mode Press Menu Set button to display the main OSD menu Select The TV main menu Press Menu Set button to enter the sub menu Select Auto Scan With Button and press Menu Set Button on the remote control Then the tuning bar will appear and scanning will start 1 Press Menu set button to display the main OSD menu 2 Select the TV Main menu 3 Press Menu Set to enter the sub...

Страница 30: ... Select the TV main menu 3 Press Menu Set to enter the Fine tune sub menu 4 Select Fine tune with button and press Menu Set button Then you can see the adjust bar 5 Adjust the fine tune with or button 1 Press Menu set button on the remote control to display the main OSD menu 2 Select the TV main menu with key on the remote control 3 Press Menu Set button to enter the sub menu 4 Select Add Del menu...

Страница 31: ... current channel from the scanned channel list 1 Press Menu Set button to display the main OSD Menu 2 Select the TV main menu 3 Press Menu Set button to enter the TV Sub menu 4 Select Edit and press the Menu Set button 5 Select the channel to Skip or Set as the Favorite Channels 6 Select CH and set the values with button You can store of your favorite channels for each available input source Then ...

Страница 32: ... mode only 1 Press the DIGEST button on the remote control 2 You can make off the Digest Function by pressing Digest button again 16 side windows are renewed clockwise Next memorized programme appear in the renewed windows To choose the programme press the channel number with the numeric buttons on the remote control CHANNEL TV 1 3 4 2 ...

Страница 33: ...automatically recalls your personalized picture settings 1 Press Menu set button to display the main OSD menu 2 Select the picture main menu 3 Press Menu Set to enter the sub menu 4 Select Mode and press Menu Set to enter the sub menu Then the picture sub mode appear 5 Select the picture mode and press Menu Set button 6 You will see the picture setting bars Just Press EXIT button on the remote con...

Страница 34: ... mode The function for Tint Adjustment is activated when NTSC signal is input Select USER mode Previous page PICTURE 1 Select the item to adjust with button 2 Press Menu Set button 3 Adjust the item with button 4 To cancel all adjust select Recall and press Menu Set button For a more detailed description of these settings see the next page ...

Страница 35: ...inct Vague Contrast Adjust brightness difference between bright part of the screen and dark part Decrease Increase Color Adjust deep and light color of the screen Less sharp Sharp Sharpness Adjust vividness of the screen PICTURE Tint Adjusts the balance between green and yellow ...

Страница 36: ...in menu 3 Press button the picture menu 4 Select Temperature and press Menu Set to enter the under menu Then the Picture Temperature under menu appear 5 Select the Temperature mode with button 6 Press EXIT button to return Temperature Your TV has 5 screen temperatures color settings Cool 1 2 Screen seems warm Strong Blue NORMAL Normal Factory default Warm 1 2 Screen seems cool Strong Red PICTURE C...

Страница 37: ...u Set button to display the main OSD menu 2 Select the picture main menu item 3 Press Menu Set to enter the sub menu 4 Select Video NR menu Then the cursor moves into the parts 5 Turn on or off Video NR function with button and press EXIT button 1 Press Menu Set button to display the main OSD menu 2 Select the picture main menu 3 Press enter the picture menu 4 Select Screen Form and press button t...

Страница 38: ...n center Zoom 1 Expands 16 9 mode screen vertically Zoom 2 Expands zoom 1 mode screen vertically 4 3 16 9 video The image is suppressed 4 3 video No expansion There are gray areas besides the image Black Enhancer This will enhance the black level the contrast of the picture The dark regions of the picture are made Darker while bright areas remain unchanged The advantage of this black level expansi...

Страница 39: ...on refer to the next page PICTURE PC 1 Press Menu set button to display the main OSD menu 2 Select the picture main menu with button 3 Press Menu Set to enter the sub menu 4 Select Geometry and press Menu Set to enter the under menu Then the picture Geometry under menu will appear 1 Select the item to adjust with button 2 Press Menu Set button 3 Then the cursor moves on the bar and you can adjust ...

Страница 40: ...OWNER S MANUAL 39 Mismatch Match H POSITION V POSITION PHASE PICTURE PC ...

Страница 41: ...nalized sound settings 1 Press Menu set button to display the main OSD menu 2 Select the SOUND main menu 3 Press Menu Set to enter the sub menu 4 Select Mode and press Menu Set to enter the sub menu Then the Mode sub menu appear 5 Select the equalizer setting and press Menu Set button 6 You will see the equalizer bars Just press EXIT button on the remote control You can adjust each values of equal...

Страница 42: ...bar with button on the remote control and adjust it with button 3 Press EXIT button on the remote control to exit equalizer The result will be saved automatically 1 Press Menu set button to display the main OSD menu 2 Select the SOUND main menu 3 Press Menu Set to enter the sub menu 4 Select AVC menu Then the cursor moves into the parts 5 Turn on or off AVC function with button and press EXIT butt...

Страница 43: ...t button to display the main OSD menu 2 Select the SOUND main menu with button on the remote control 3 Press Menu Set to enter the sub menu 4 Select MTS and press Menu Set to enter the sub menu Then the MTS sub menu appear 5 Select the MTS format with and press Menu Set button MTS Multi Sounds supports English French and Spanish The available languages vary according to TV programs from broadcasti...

Страница 44: ...lect the Sound main menu with button on the remote control Press Menu Set to enter the sub menu Select Digital Output and press Menu Set to enter the sub menu Then the Digital Output sub menu appear Select PCM or Dolby Digital and press Exit Button Digital Output HDTV Mode Only Use this menu to select Sound Type PCM or Dolby Digital on SPDIF Output Mode Select PCM for general speakers L R and sele...

Страница 45: ...he OSD menu and set PIP and others Translucent Adjust the transparency of the OSD menu There are 8 step from OFF to 7 PIP Picture In Picture You can watch two programmes or sources at the same time And set up PIP size and position PIP Window SET UP 1 Press Menu set button to display the main OSD menu 2 Select the SETUP main menu with keys on the remote control 3 Press Menu Set to enter the sub men...

Страница 46: ...be displayed Select the source and press Menu Set button SET UP O O O X O O O O X O HDTV O O O X O O O O O HDTV X X X O O O O O O DVI X X O O O O O O DVI X X O O O O O O HDMI X X O O O O O O PC O O X O O O O O Component2 O O O X O O O O Component1 O O O O X O O O S Video AV O O O O O X O O VIDEO 2 O O O O O O X O VIDEO 1 O O O O O O O O TV HDMI PC Component2 Component1 S Video AV VIDEO 2 VIDEO 1 T...

Страница 47: ... menu appear 2 In Sub Menu there are four positions Select the position with button on the remote control and press EXIT button Picture Swap in PIP Picture In Picture Swap the sources of the main screen and the PIP window Select Picture Swap and press Menu Set button Position in PIP Change the position of the PIP window SET UP ...

Страница 48: ...V guidelines or the MPAA rating SET UP Press Menu Set button to display the main OSD menu Select the Setup main menu with button on the remote control Press Menu Set button to enter the sub menu After enter the password the V Chip sub menu appear The factory default number is 0000 and the master button number is 9673 ...

Страница 49: ...tions for these two groups work independently If a household includes very young children as well as young adults the TV guidelines must be Setup separately for each age group Movie Block in V Chip The Movie Block uses the motion picture association of America MPAA system and its main application is for movies When the rating controls is on the TV will automatically block any programs that are cod...

Страница 50: ...enu Then the Password change sub menu appear Enter the new password with numeric buttons on the remote control V Chip Blocking in V Chip Select V Chip Blocking with button on the remote control Enter to the part by pressing button Then the cursor moves into the parts On or off the V Chip Blocking with buttons Exit with Exit button on the remote control ...

Страница 51: ...ugh the serial port 1 Press Menu set button to display the main OSD menu 2 Select the SETUP main menu with button on the remote control 3 Press Menu Set to enter the sub menu 4 Select Advanced and press Menu Set to enter the Advanced menu Then the Advanced sub menu appear SET UP 1 Select Set ID menu Then the cursor moves into the part 2 Adjust with button and press Exit button ...

Страница 52: ...ct the TV monitor from children s power on off or other operation by miss 1 Select language menu and press button to enter the parts Then the cursor moves into the parts 2 Choose the Language with button and press EXIT button 1 Select Front key Lock Then the cursor moves into the parts 2 Turn the function on or off with button and press EXIT button SET UP 1 Select Blue Back menu Then the cursor mo...

Страница 53: ...ves image regularly to relieve image sticking You can set the moving range of burn protection function How much the image will move Burn Protection function moves image 1 pixel per 2 minutes and the set range image starts to go back to the original position SET UP Select Burn Protect menu Then the cursor moves into the parts Turn the function on or off with button and press Exit button ...

Страница 54: ...Press Menu set button to display the main OSD menu 2 Select the SETUP main menu with button on the remote control 3 Press Menu Set to enter the sub menu 4 Select HDTV Setup and press Menu Set to enter the HDTV Setup menu Then the HDTV Setup sub menu appear 1 Select Time Zone menu and press button to enter the parts Then the cursor moves into the parts 2 Choose the Time Zone with button and press E...

Страница 55: ...aylight in HDTV Setup HDTV mode Use this menu to adopt Daylight Saving Time 1 Select Daylight menu and press button to enter the parts Then the cursor moves into the parts 2 Choose the Daylight with button and press EXIT button ...

Страница 56: ...or Select a back color Black White Green Blue Yellow Magenta Edge Type Select an edge type None Raised Depressed Uniform Drop Shadow Edge Color Select an edge color Black White Green Blue Yellow Magenta Display Type Select a display type Origin Normal display of subtitles from broadcasting stations User User s display set on HDCCP setup menu 1 Press Menu set button to display the main OSD menu 2 S...

Страница 57: ...e current time and auto power on off Time Set Set the current time On Time This TV can be set to turn on automatically at specific time that you choose Before using the timer you must set the TV s Time as described previously O n T i m e AM 05 11 ON Auto power on time Activated Item Name Press Menu set button to display the main OSD menu Select the TIME main menu Press Menu Set to enter the sub me...

Страница 58: ...ress Menu set button to display the main OSD menu 2 Select the TIME main menu with button on the remote control 3 Press Menu Set to enter the sub menu 4 Select On Volume 5 Then the cursor moves into the parts 6 Adjust the sound volume level with button On Volume On Channel Set the channel when TV power turn on automatically Available only when the Time is set and On Time is ON Set the sound volume...

Страница 59: ... 1 Press Menu set button to display the main OSD menu 2 Select the TIME main menu with button on the remote control 3 Press Menu Set to enter the sub menu 4 Select Sleep with button on the remote control 5 Then the cursor moves into the parts 6 Set the time period with button 7 Press EXIT button to return Off T i m e AM 05 11 ON Auto power off time Activated Item Name TIME 1 Press Menu set button ...

Страница 60: ...FF SCREEN FORM 16 9 PANORAMA ZOOM1 ZOOM2 4 3 100Hz 500Hz 1 5KHz 5KHz 10KHz SOUND BALANCE SOUND MODE USER NEWS MUSIC MOVIE STANDARD EQUALIZER PRESS SET MTS MONO STEREO SAP SPATIAL EFFECT AVC AVC ON OFF SPATIAL EFFECT ON OFF BLACK ENHANCER BLACK ENHANCER ON OFF Contrast Brightness Color Sharpness Tint Only For NTSC Recall Digital Output Only HDTV MODE USER PCM ...

Страница 61: ...NSLUCENT SET UP PIP SOURCE SIZE OFF SMALL LARGE TWIN PICTURE SWAP CAPTION FRONT KEY LOCK LANGUAGE BLUE BACK SET ID NATIONAL SELECTIONS BLUE BACK ON OFF BRUN CLEAR BRUN PROTECT BRUN CLEAR ON OFF 0 99 ADVANCED FRONT KEY LOCK ON OFF V CHIP TV BLOCK MOVIE BLOCK CHANGE PASSWORD V CHIP BLOCKING V CHIP BLOCKING ON OFF ...

Страница 62: ...CAN FINE TUNE ADD DEL TIME TIME SET 1 100 ON TIME ON OFF SELECTION OFF 10 20 30 60 90 120 150 180 Min OFF TIME ON OFF ON TIME ON CHANNEL ON VOLUME SLEEP TIME OFF TIME CHANNEL TYPE CHANNEL TYPE ATV CHANNEL TYPE DTV AIR CABLE AIR CABLE ...

Страница 63: ...FF SCREEN FORM 16 9 PANORAMA ZOOM1 ZOOM2 4 3 100Hz 500Hz 1 5KHz 5KHz 10KHz SOUND BALANCE SOUND MODE USER NEWS MUSIC MOVIE STANDARD EQUALIZER PRESS SET MTS Only MTS Button SPATIAL EFFECT AVC AVC ON OFF SPATIAL EFFECT ON OFF BLACK ENHANCER BLACK ENHANCER ON OFF Contrast Brightness Color Sharpness Tint Only For NTSC Recall Digital Output Only HDTV MODE USER PCM ...

Страница 64: ...AR ON OFF 0 99 ADVANCED FRONT KEY LOCK ON OFF CC1 4 TEXT 1 4 SERVICE1 6 CAPTION POSITION RIGHT DOWN RIGHT UP LEFT UP LEFT DOWN SOURCE SIZE OFF SMALL LARGE TWIN PICTURE SWAP PIP TV BLOCK MOVIE BLOCK CHANGE PASSWORD V CHIP BLOCKING V CHIP BLOCKING ON OFF V CHIP HDTV SETUP HDCCD SETUP TIME ZONE DAYLIGHT Atlantic Eastern Central Mountain Pacific Alaska Hawaii On Off Auto ...

Страница 65: ...ness Color Tint Sharpness Recall PICTURE MODE Standard Vivid Mild User TEMPERATURE WARM2 WARM1 NORMAL COOL1 COOL2 GEOMETRY 16 9 4 3 SCREEN FORM NATIVE MOFE ON OFF NATIVE MODE DIVIDE V POSITION H POSITION PHASE AUTO ADJUST NATIVE H SIZE ...

Страница 66: ...KHz 10KHz SPATIAL EFFECT AVC AVC ON OFF SPATIAL EFFECT ON OFF SET UP TRANSLUCENT PIP SOURCE SIZE POSITION OFF SMALL LARGE TWIN RIGHT DOWN RIGHT UP LEFT UP LEFT DOWN ADVANCED FIRONT KEY LOCK ON OFF FRONT KEY LOCK LANGUAGE BLUE BACK SET ID PICTURE SWAP NATIONAL SELECTIONS BLUE BACK ON OFF 0 99 BURN PROTECT BURN CLEAR ...

Страница 67: ...OWNER S MANUAL 66 TIME TIME SET 1 100 ON TIME ON OFF SELECTION OFF 10 20 30 60 90 120 150 180 Min OFF TIME ON OFF ON TIME ON CHANNEL ON VOLUME SLEEP TIME OFF TIME CHANNEL TYPE ...

Страница 68: ...ture Check to see that both the monitor and the source are plugged in and turned on No or Poor color or Poor picture Check to see if there is any object between the Plasma Display and the remote control causing obstruction Check to see if the batteries are installed with the correct polarities The remote control doesn t work Press the VOLUME X key Check the audio input signal Picture OK No sound C...

Страница 69: ...D 38 9 kg With Stand 1046 W X 635 H X 87 3 D 38 kg Main Only Dimension Weight Front OSD Key Control Remote control RS232C Control External Control Built in amplifier and two speaker 7Watt Typ systems optional Selectable fixed variable audio output optional Audio Miscellaneous Specification 42 PDP HP 4200V 42 Plasma TV 350 Watt Power consumption AC 100 240V 50 60Hz Input Power Power Consumption SPD...

Страница 70: ... D 38 9 kg With Stand 1046 W X 635 H X 87 3 D 38 kg Main Only Dimension Weight Front OSD Key Control Remote control RS232C Control External Control Built in amplifier and two speaker 7Watt Typ systems optional Selectable fixed variable audio output optional Audio Miscellaneous Specification 42 PDP HP 4250V 42 Plasma TV 400 Watt Power consumption AC 100 240V 50 60Hz Input Power Power Consumption SP...

Страница 71: ...D 55 kg With Stand 1216 W X 732 H X 87 3 D 50 kg Main Only Dimension Weight Front OSD Key Control Remote control RS232C Control External Control Built in amplifier and two speaker 7Watt Typ systems optional Selectable fixed variable audio output optional Audio Miscellaneous Specification 50 PDP HP 5000V 50 Plasma TV 450 Watt Power consumption AC 100 240V 50 60Hz Input Power Power Consumption SPDIF...

Страница 72: ... 305 D 67 kg With Stand 1366 8 W X 801 4 H X 93 3 D 60 kg Main Only Dimension Weight Front OSD Key Control Remote control RS232C Control External Control Built in amplifier and two speaker 7Watt Typ systems optional Selectable fixed variable audio output optional Audio Miscellaneous Specification 55 PDP HP 5500V 55 Plasma TV 500 Watt Power consumption AC 100 240V 50 60Hz Input Power Power Consumpt...

Страница 73: ...400 D 98 kg With Stand 1503 W X 893 H X 92 6 D 79 kg Main Only Dimension Weight Front OSD Key Control Remote control RS232C Control External Control Built in amplifier and two speaker 7Watt Typ systems optional Selectable fixed variable audio output optional Audio Miscellaneous Specification 63 PDP HP 6300V 63 Plasma TV 580 Watt Power consumption AC 100 240V 50 60Hz Input Power Power Consumption S...

Страница 74: ...buse product modification or neglect damage occurring during shipment damage from failure to follow instructions contained in the instruction manual damage resulting from the performance of repairs by someone not authorized by us damage by natural disaster such as lightening flood etc damage caused by installation of parts that do not conform to thespecification units used for other than home and ...

Отзывы: