background image


 28                                    


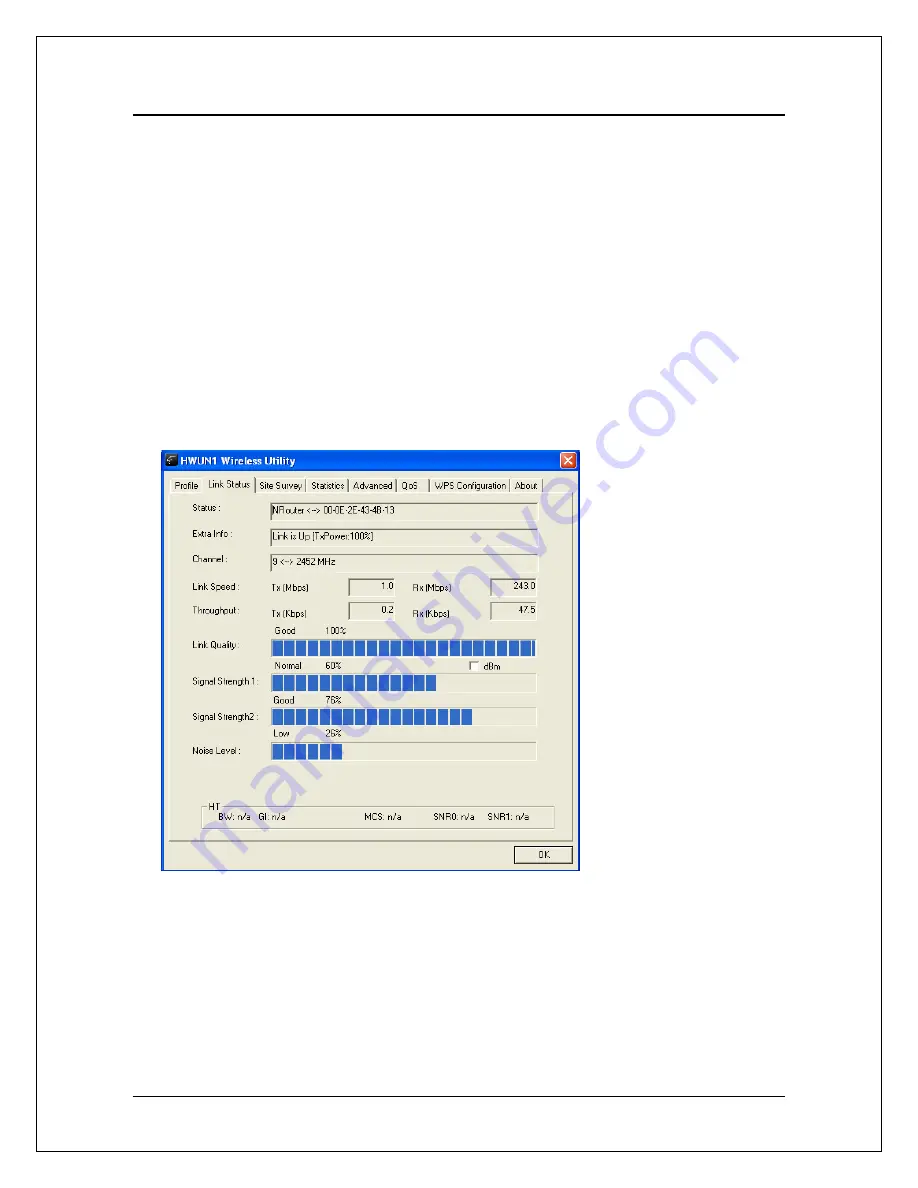
11.   Link Status 


This tab displays the information of the Wireless connection status. 

• 

Status

: Displays the linked AP name and MAC address. When [Disconnect] 

appears in this box, the connection is failed. 

• 

Extra Info

: link status and strength. 

• 

Channe

l: Current channel in use. 

• 

Link Speed

: Shows current transmit rate and receive rate. 

• 

Throughput:

 Displays transmit and receive throughput value. 

• 

Link Quality

: Displays connection quality based on signal strength and TX/RX 

packet error rate. 


• 

Signal Strength 1 & 2

: Receive signal strength, user can choose to display 

as percentage or dBm format 

• 

Noise Level

: Display noise signal strength. 


Содержание HWUN1

Страница 1: ...1 ...

Страница 2: ...ands and product names are trademarks of their respective companies No part of this publication may be reproduced in any form or by any means or used to make any derivative such as translation transformation or adaptation without the express written consent of the manufacturer as stipulated by the United States Copyright Act of 1976 Warning Statement Federal Communication Commission Interference S...

Страница 3: ...LATION WINDOW 2000 XP 14 6 2 NETWORK CONFIGURATION WIN 2000 XP 15 7 SETUP WLAN WIN 2000 XP 16 USING HAWKING CONFIGURATION UTILITY 16 7 1 NETWORK SECURITY WEP WPA 18 7 1 1 WEP SETUP 18 7 1 2 WPASETUP 19 7 2 ADDING PROFILES 22 7 3 WPS CONFIGURATION 24 8 QOS 25 9 ADVANCED SETTINGS 26 10 STATISTICS 27 11 LINK STATUS 28 12 ABOUT 29 13 UNINSTALLING HAWKING UTILITY DRIVER 30 APPENDIX A SPECIFICATIONS 33 ...

Страница 4: ... encryption decryption engine including 64 bit 128 bit WEP TKIP and AES Also it supports Wi Fi alliance WPA and WPA2 encryption Cisco CCX V1 0 V2 0 and V3 0 2 FEATURES Features Advantages High Speed Data Rate Up to 300Mbps Capable of handling heavy data payloads such as MPEG video streaming IEEE 802 11b g Compliant Fully Interoperable with IEEE 802 11b IEEE802 11g compliant devices with legacy pro...

Страница 5: ... N USB network Adapter One USB cable 1 0m One CD ROM with User s Manual Drivers Quick Installation Guide 2 Dipole Antenna SMA connector One Laptop Clip LED Description LINK Blinks when active connection is available else remains switched OFF PWR Blinks rapidly when data communication in progress else remains switched OFF Dipole Antennas USB port LED indicator ...

Страница 6: ...ements Operating System Microsoft Windows 2000 XP Vista An Available USB Port on your Laptop or Desktop 256MB system memory or larger 750MHz CPU or higher configuration 5 Driver Installation for Windows Vista a Insert the included CD an auto load page will appear instantly on you screen b Select Driver Utility Setup ...

Страница 7: ...t Install to begin the Installation d Please wait a while as the installation process take place e After installation is complete exit the wizard by clicking on the Finish button f Now plug in your HWUN1 adapter ...

Страница 8: ...the Windows Configuration for the Wireless N Adapter a To open up the Windows Configuration go to Start ÆConnect To b Select the Network you wish to connect to If you are connecting to an unsecure network go to step c If you are connecting to a secured network go to step d ...

Страница 9: ...ork Select Connect Anyway and skip step d d If your selected network is a secured encryption network then a window will prompt you to enter security key or passphrase If you are connecting to a network that is security enabled but do not have the security key or passphrase please obtain the passphrase from your Network Administrator ...

Страница 10: ...10 e Please wait while your HWUN1 is connecting f The HWUN1 Wireless N USB Network Adapter is now connected you may save this network as your preferred network ...

Страница 11: ...e HWUN1 into the USB port on your computer The HWUN1 Driver Utility is located on the CD Insert the support CD into your CD Drive In the CD drive folder you will see the following file Open the file and you can briefly see the following Choose HWUN1 Configuration Utility click next and then click install ...

Страница 12: ...12 Await instructions as you see the setup progress as shown below ...

Страница 13: ... follows It may give you the option to restart Click Finish to restart the PC notebook Restart your computer if the wizard prompted you to do so Otherwise please plug the Hawking HWUN1 Wireless N Network Adapter into an available USB port on your desktop or notebook ...

Страница 14: ...pen Control Panel ÆDouble click on System 2 Select Hardware tabÆClick on Device Manager Select and double click on 802 11N USB wireless LAN card Verify the device status of the 802 11N USB Wireless LAN Card This device is working properlyÆClick OK ...

Страница 15: ...twork Configuration WIN 2000 XP Go to Start Menu ÆControl Panel Æ Network Right click on Wireless Network Select ÆLocal Area Connection icon Æ select Properties Select Internet Protocol TCP IP ÆClick Properties ...

Страница 16: ...eless AP if there is no security key required If the connection is successful a message will appear on taskbar 1 The following steps guide you on how to initially setup a wireless network connection The Hawking Configuration Utility should appear on the bottom right taskbar Select the General tab a If your Wireless Router supports DHCP function please select both Obtain an IP address automatically...

Страница 17: ...d to an NRouter 3 Right click on the HAWK icon and it will open up a menu as shown below 4 Click on Launch Config Utilities To see a list of available wireless networks click on Site Survey tabÆ Press Rescan All detected service set identifiers SSID will be listed under SSID column Note the SSID indicates an individual Access Point AP Figure 6 4 ...

Страница 18: ... the HWUN1 fails to connect the status bar bottom left of the HWUN1 Wireless Utility will show Disconnected 7 1 NETWORK SECURITY WEP WPA If your AP Router has a networking security key you must enter the same security key and setting If you do not have the Network Encryption key please request it from the Network Administrator or the person who set up your wireless network After you obtained the n...

Страница 19: ...and grant It is essentially no authentication Shared WEP shared key is based on request challenge challenge response grant deny b Encryption field Select WEP c Enter in AP encryption keys 64 128bits in the box Key1 Key4 Please accept the auto selected setting of Hex ASCII d Select the current AP encryption keys from Key1 Key4 e Press OK to finish setting 7 1 2 WPA Setup WPA encryption type can be ...

Страница 20: ...tion and Security Page a Authentication Type Select WPA PSK or WPA2 PSK note your AP must support this function b Encryption Select TKIP or AES in the drop down menu Must Correspond to the Value on your AP c Enter the WAP Preshared Key and click OK ...

Страница 21: ...Wireless Access Point 2 Setting the Authentication and Security Page a Authentication Type select WPA or WPA2 PSK AP must support the function b Encryption select TKIP or AES Same as AP c If the AP router has 802 1x Setting function click it for advanced settings Please consult your network administrator for details or check the user manual of the Wireless Access Point See the Screen shot on the n...

Страница 22: ...ing 7 2 Adding Profiles 1 Select an AP in the SSID column example NRouter Æ Click Add to Profile and the page shown below will appear 2 Setting items in the configuration tab Profile Name Enter the connected AP profile eg PROF1 ...

Страница 23: ...nt of power used by a radio transceiver to send the signal out User can choose power value by sliding the bar RTS Threshold and Fragment Threshold We recommend you to use the default value 2312 User can adjust threshold numbers by sliding the bars or key in the values directly 3 Click OK and the set AP will appear in the Profile tab Add Click Add to add a new profile Delete to delete a profile sel...

Страница 24: ...ted Setup gives you a variety of setup options It uses familiar methodologies such as typing in a Personal Identification Number numeric code PIN method and pushing a button Push Button Configuration or PBC to enable users to automatically configure network names and strong WPA2 Wi Fi Protected Access 2TM data encryption and authentication ...

Страница 25: ...sions for 802 11 networks and started a certification program for WMM to satisfy the most urgent needs of the industry for a QoS solution for Wi Fi networks WMM provides prioritized media access and is based on the Enhanced Distributed Channel Access EDCA method Click WMM Enable to turn on the WMM capability Click WMM Power Save Enable and this can improve the power savings by atleast 15 as far as...

Страница 26: ... sure the Wireless AP supports it Turn on CCKM Open CCKM function Cisco Key Management Enable Radio Measurements Open the function of CCK Monitor AP Channel Non Serving Channel Measurements Select and start to monitor the channels on which the AP is not transmitting Turn off RF Disable wireless radio Turn on RF Enables wireless radio Apply Click this when finished with the settings Wireless mode S...

Страница 27: ...ed information about Wireless LAN TX RX Transmit Statistics Statistic of transmitted frames Receive Statistics Statistic of received frames Reset Counters Click Reset Counter to start over at zero the statistic numbers of transmitting and receiving data ...

Страница 28: ...fo link status and strength Channel Current channel in use Link Speed Shows current transmit rate and receive rate Throughput Displays transmit and receive throughput value Link Quality Displays connection quality based on signal strength and TX RX packet error rate Signal Strength 1 2 Receive signal strength user can choose to display as percentage or dBm format Noise Level Display noise signal s...

Страница 29: ...29 12 About The About tab displays version information of 1 Driver 2 Utility 3 EEPROM binary 4 Firmware 5 IP Address current 6 MAC address of the PHY 7 Subnet MASK Address 8 Default Gateway ...

Страница 30: ...wking Utility Driver Select Uninstall option from the start menu You can see the wizard preparing for uninstallation Select Remove All When asked if you are sure you want to remove application and all its features click Yes ...

Страница 31: ...31 Removing the utility is in progress At any time you may press cancel to abort uninstallation ...

Страница 32: ...32 You will need to restart your computer to ensure a clean removal of the Hawking Utility ...

Страница 33: ...SK CCK Operating Channels 11 for North America 14 for Japan 13 for Europe Receive Sensitivity Typical 2 412 2 472G IEEE802 11b 91dBm 1Mbps 90dBm 11Mbps 2 412 2 472G IEEE802 11g 90dBm 6Mbps 74dBm 54Mbps 2 412 2 472G IEEE802 11N 90 dBm MCS 8 65 dBm MCS 15 Available transmit power 2 412 2 472G IEEE802 11b 18dBm 1 11Mbps 2 412 2 472G IEEE802 11g 15 dBm 6Mbps 14 dBm 54Mbps 2 412 2 472G IEEE802 11N 15dB...

Страница 34: ...oduct b Frequently Asked Questions FAQs with answers to common asked questions about your product EMAIL SUPPORT techsupport hawkingtech com DOCUMENT SUPPORT Product User s Manual Normally located on the product CD You ll find detail install instruction on your product and default user name and password RMA RETURN MERCHANDISE AUTHORIZATION http www hawkingtech com support customerservice php CUSTOM...

Отзывы: