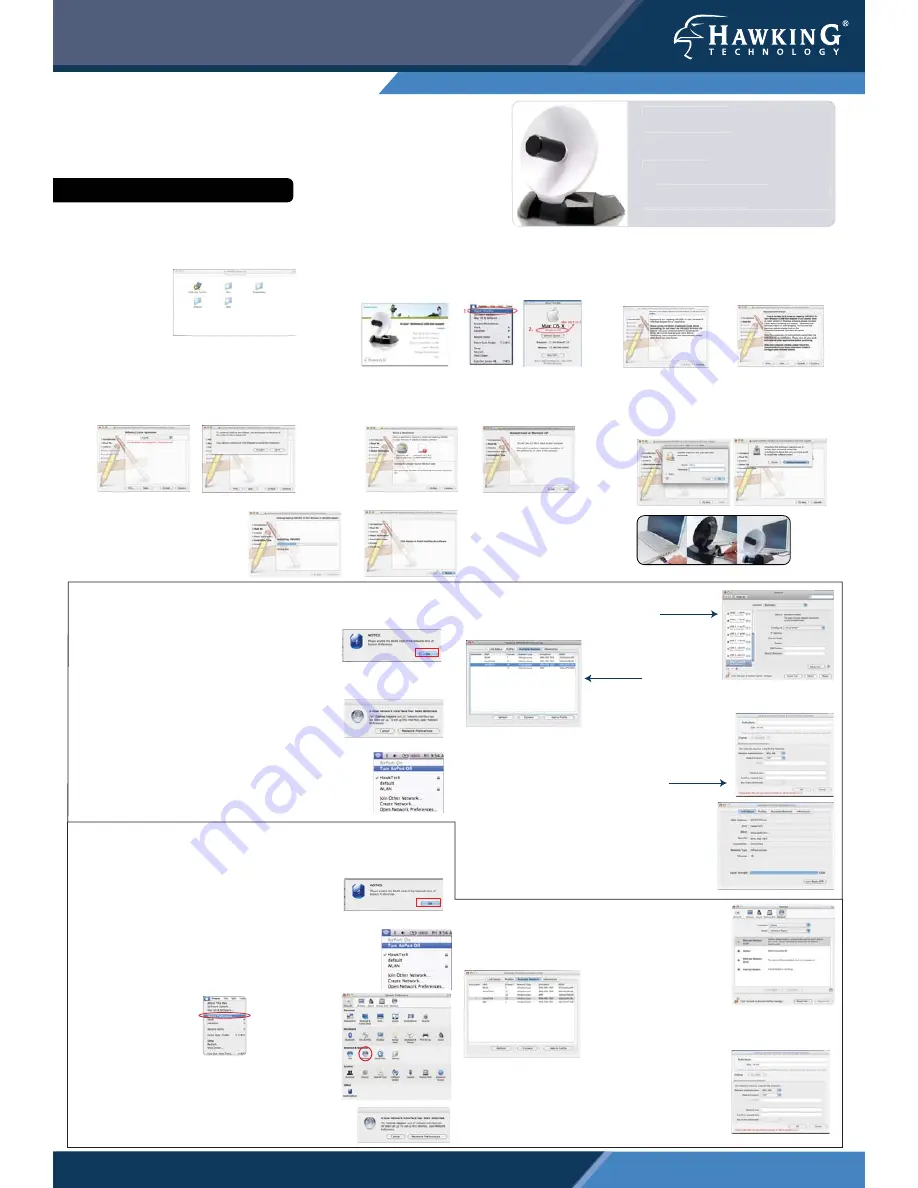
Installation for Mac OSX
Hi-Gain
TM
Wireless-G USB Network Dish Adapter
Part No. HWU9DD
Support Information
Tel: 1.888.202.3344 Email: [email protected] RMA: [email protected]
www.hawkingtech.com
Important: Do not connect the USB adapter until you install the driver from the CD and
are instructed to do so. Otherwise, the USB adapter may not operate correctly. Be sure to
save all your work before continuing. Your computer will automatically restart after the
driver installation.
Mac OS 10.4 or later
The Installation Screens may vary depending on your Mac OS.
Package Contents
• 1 x Wireless-G USB Dish Adapter
• USB Extension Cable
• CD: User Manual & Driver (Mac & PC)
Requirements
• PC or Mac Laptop or Desktop
• Windows XP/Vista or Max OS X 10.4 or later
• One Available USB port
• An available Wireless 802.11b/g/n Network
Package Contents
• 1 x Wireless-G USB Dish Adapter
• USB Extension Cable
• CD: User Manual & Driver (Mac & PC)
Requirements
• PC or Mac Laptop or Desktop
• Windows XP/Vista or Max OS X 10.4 or later
• One Available USB port
• An available Wireless 802.11b/g/n Network
1.
Insert the Setup CD and a menu page will
automatically appear on your screen. Select “Click
Here To Start”.
2.
Select the Mac OS X consistent with your computer.
If you are uncertain about which Mac OS you are
using, click on the APPLE icon on the upper-left
corner of the Finder Menu bar and select “About
this Mac” to view your current Mac OS X version.
3.
Welcome to the Hawking HWU9DD Hi-Gain Adapter
Driver Installer. Select “Continue”. Read the
Important information in the following screen and
click “Continue”.
4.
Software License Agreement: select
“Continue” and “Agree” in the following
screen.
5.
Select a destination and click “Continue”.
Select “Install ” on the following screen.
6.
If your computer is password protected,
please enter your password to continue.
Then, select “Continue Installation” in the
following screen.
7.
Please wait while the wizard
installs the HWU9DD Driver.
Select “Restart” when
prompted.
8.
Plug in the Hawking
Wireless-G Adapter after
your computer restarts.
Connect To A Wireless Network (Mac 10.5 or later)
A.
After plugging in the Adapter, the Hawking HWU9DD Wireless Utility will
automatically pop up. You will be asked to enable
your WLAN card. When the NOTICE appears,
select “OK”. Then, select “Network Preferences.”
Please note the “Ethernet Adapter (en15)”network interface. You will need
to enable this in the Network preference. The screen
above shows “Ethernet Adapter (en15)” network
interface, however the en number will vary from
one computer to another.
B.
Enabling the USB Adapter in your Network Preferences.
Note:
In order for the Wireless-N Adapter to work
properly, you must turn off any previously installed airport
cards. To do this, go to the top right hand corner of your
finder and select “
Turn Airport Off
”.
C.
Select “Ethernet Adapter (....).” Then click “Apply.”
D.
In the “Available Network”tab, select a wireless
network and click on “Connect.”
Encryption/ Password Protected:
If your
selected network is password protected, please enter
the network key and confirm it.
F.
Congratulations! You are now connected. To view
your link status go to “Link Status” tab. For more
information, please refer to the manual located in
the CD.
Connect To A Wireless Network (Mac 10.4~10.4.9)
A.
After plugging in the Adapter, the Hawking HWU9DD Wireless Utility will
automatically pop up. You will be asked to enable
your WLAN card. When a NOTICE comes up,
select “OK”.
B.
Enabling the USB Adapter in your Network Preferences.
Note:
In order for the Wireless-G Adapter to work properly,
you must turn off any previously installed airport cards. To do
this, go to the top right hand corner of your finder and select
“
Turn Airport Off
”.
a) Click on the APPLE
icon in the top
left-hand corner and
then select SYSTEM
PREFERENCES.
C.
A New Network Port has been detected.
a
b
D.
Select the Newly Installed Port and click “Apply.”
F.
Now go to the Hawking HWU9DD Wireless
Utility and select a wireless network and click on
“Connect.”
Encryption/ Password Protected:
If your selected
network is password protected, please enter the
network key and confirm it.
b) Select
the NETWORK
icon


