LED Description
Power
- LED is on, when the power adapter is connected and
plugged into an outlet
Back Panel Description
Wired
- LED is on, when a ethernet cable is plugged into the ethernet port
Top # corresponds to 10/100M connections, bottom is for 1000M connections
Wireless
- LED is on, (blinking) when wireless data activity is
detected. 2.4G is 2.4GHz wireless, 5G is 5GHz wireless
Removable Antennas
Removable 3dBi Omni-Directional Antennas
Reset Switch / WPS
Resets your extender to its default settings / WPS Setup
Wireless Radio On / Off Switch
Turns on / off the wireless functions
Power (12V / 1.25A)
Power Adapter Plug
B
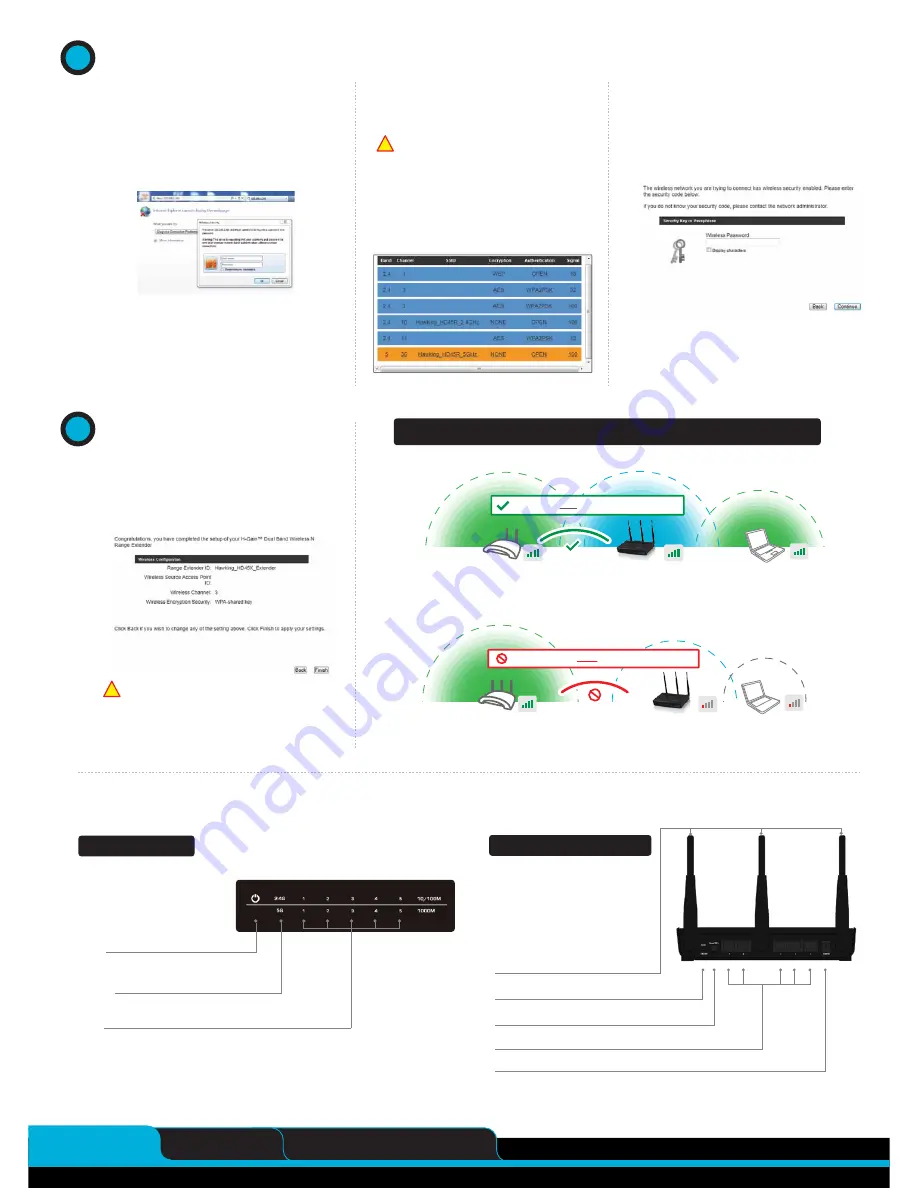
. Click ‘Scan’ to find your wireless Internet
connection. Select a network you would like to
extend, 2.4GHz or 5GHz , and click ‘Connect’.
The 2.4GHz networks will appear in blue and 5GHz
networks will appear in orange. While you can select a
2.4GHz network, if available we recommend connecting to a
5GHz network to optimize your speed and throughput.
If the signal strength is low or your network does
not appear, you may need to adjust the location of
your HD45X. Click ‘Scan’ to try again.
A
. Using the same computer, open a web browser and
type in the following web address in the web
address bar:
http://192.168.1.240
Once the page loads, enter the following login
information:
Login:
admin
Password:
1234
Click
Login
to continue.
If this page does not load or you need to get back
into the unit, you can reset the device by holding
the reset button for 15 seconds, power off/on. If
running Windows, you may also run the setup
software to find the device.
The setup of your HD45X is now complete. A
summary page will appear with all your settings. If
anything is incorrect, click back to re-enter your
settings. Click Finish to complete your setup. The
HD45X will automatically reboot and start repeating
and extending your wireless network.
After the reboot, the HD45X will join the original network
and will no longer be listed as “Hawking_HD45X_Extender”. It
will automatically be renamed to your original network, unless it
was specified during the set up process.
If you wish to modify
this name, please refer to the user’s manual.
C
. The Quick Setup will now prompt you to enter a
security key only if the network you are
connecting to is encrypted. Enter the key and
click ‘Continue’.
Note: If there is no security on the original
network, this step will automatically be skipped.
If you do not know the security key of the
network you are connecting to, please consult
your network administrator.
LAN Ports
Connects your wired network devices and computers to your network
3
Connecting to your Dual-Band Range Extender
4
Finishing Up
Placing your Dual Band Range Extender in an Optimal Location
Home Router or AP
Home Router or AP
Home Router or AP
Hi-Gain™ Dual Band Wireless N
Range Extender
HD45X
Router / HotSpot
(wireless source)
Wireless Device
(laptop)
Place the HD45X
within
the range of your wireless source.
Home Router or AP
Hi-Gain™ Dual Band Wireless N
Range Extender
HD45X
Wireless Device
(laptop)
Router / HotSpot
(wireless source)
DO NOT place the HD45X
outside
the range of your wireless source.
Technical Support
Tel: 1.888.202.3344
E-mail: [email protected]
© 2012 Hawking Technologies, Inc. All rights reserved. All trademarks herin are the property of their respective owners. Apple, Mac, iPad, and iPhone are registered trademarks of Apple Computer, Inc. No Affiliation implied or expressed.
HD45X- QIG 02012.02.07
www.hawkingtech.com
i
i


