99 Feet
350 kHz
1.5” x 1.8”
1.57” H x 2.75” W x 4.33” L
(closed position)
6 volts DC
(4 x “AA” Alkaline Batteries)
35 Feet
45 Degrees
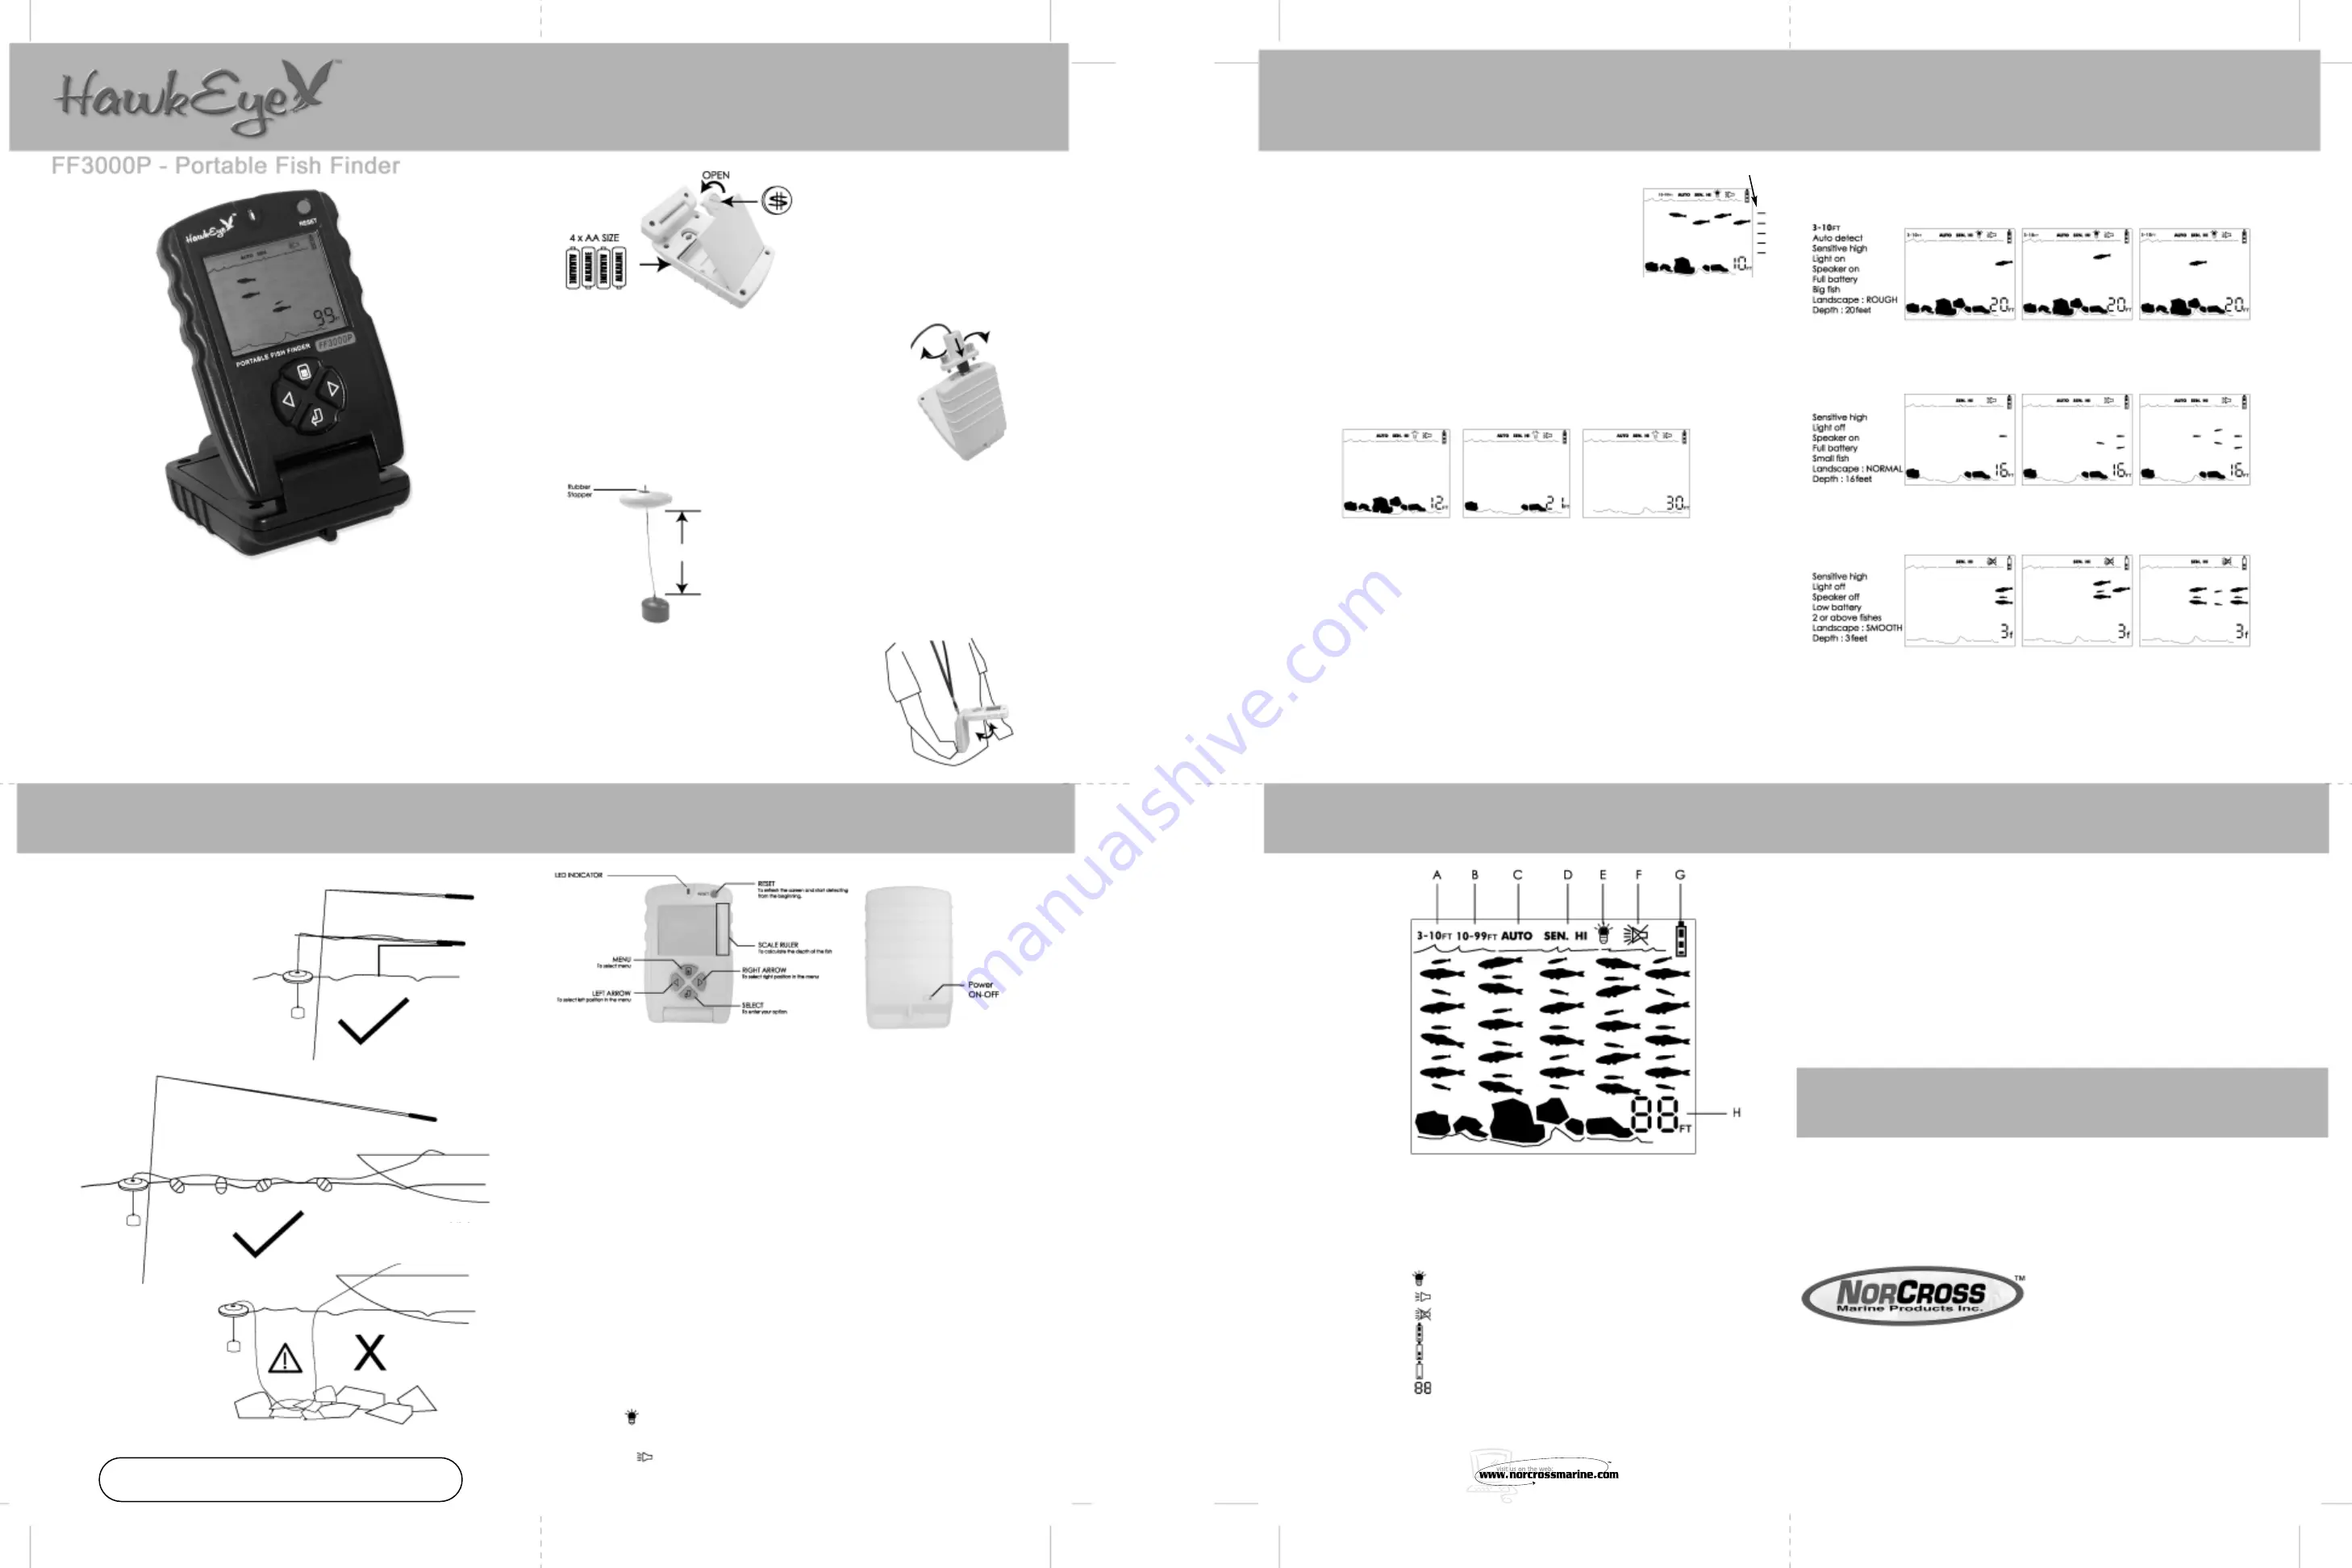
Using the Transducer
1. Toss the transducer and
float assembly into the
water at your desired fish-
ing location.
2. Use a pole to guide the
transducer to a desirable
position (5a) or add floats
on the cable to allow the
cable to float on top of the
water (5b)
.
(5c)
Do not allow the cable to sink to the bottom
as it may become entangled in debris (5c).
Installing the Batteries
1. Use a coin to open the battery
door.
2. Install 4 “AA” batteries (Alkaline).
Be certain to align the batteries
as per the engravings within the
battery compartment.
3. Close the battery door completely
before continuing.
Connecting the Transducer to the Display Housing
1. Plug the transducer connector in the display housing.
Be certain to align the plugs properly before connecting.
2. Lock the connector by turning the locking screws
clockwise until tight (do not over tighten).
Adjusting the Transducer Float
The transducer float must be adjusted so
that it is between 6 and 10 inches away from
the transducer.
1. Pull out the rubber stopper.
2. Adjust float so that it is 6 to 10” from the
transducer.
3. Replace the rubber stopper.
6”-10”
Installing the Neck/Safety Strap
Install the neck/safety strap to the hook on the back
of the display (located next to the ON/OFF switch).
(5b)
(5a)
Operator’s
Manual
SETUP
(cont.)
SETUP
The Fish Finder Can Be Fine Tuned for a Variety of Conditions.
• Pressing the “MENU” key accesses the setup.
- fast blinking represents the field for change by pressing “Select “.
- Exit setup at any time by pressing (M) OR by waiting 3-5 seconds
with no action.
• Pressing the “RIGHT and LEFT ARROWS” moves between selections.
• Pressing the “Select” key enters the selection. OR toggles fast blinking feature
ON/OFF
- once Select is pressed the field change is set and the fast blinking will move
to adjacent field.
Fishing Zone Selections - (“3-10FT”, “10-99F”, “AUTO”)
The fish finder has 3 fishing modes.
• “3-10FT” - manually sets the fishing zone between 3 and 10 feet.
• “10-99F” manually sets the fishing zone between 10 and 99 feet.
Slow Blinking (“3-10F” or “10-99F”) represents the depth range currently active
• “AUTO” automatically detects landscape and updates the water depth every
10 seconds.
Note: “AUTO” will remain solid when selected, while the 3-10F or 10-99F will
slow blink to indicate the depth range detected by the Auto Detect mode.
(To conserve battery power utilize the manual settings whenever possible.)
Sensitivity Selection - (“SEN HI”)
Increases the fish finder’s sensitivity. Select “HI” when targeting smaller fish.
Backlight - ( )
Increases the visibility of the display in the dark.
Fish Alarm - ( )
Sounds an audible alarm when groups of fish are detected.
Fish Location Scale Indicator
Use the scale indicator to measure the fish’s depth location.
This can be done by dividing the depth reading by 5. This
number represents the value of each bar.
(example, the depth is 10 feet, the fish symbol appears
between the first and second line. This means the fish is
between 2 and 4 feet)
Understanding the Display
The bottom contour, composition, and landscape will be evident on display as a
series of “rock” indicators. The more “rock” indicators that appear, the rougher the
bottom is. Rough bottom indicators could represent heavy rock or vegetation.
LED
The indicator LED on the FIsh Finder will be lighted when the power is on.
Depth Meter
The depth meter on the right bottom corner will appear after the power is on for 3
seconds. The depth meter will be deactivated if the depth exceeds 99 feet.
Audible Alarm
The audible fish alarm sounds when a group of fish appears on the LCD. The size of
the fish symbol indicates the size of the fish
scale indicator bar
Rough Bottom Contour
Variable Bottom Contour
Smooth Bottom Contour
To be eligible for warranty coverage your fish finder must have a copy of the Warranty Registration
Card on file with NorCross Marine Products, Inc., so be sure to submit the included registration
card within 10 days of purchase.
N
OR
C
ROSS
L
IMITED
W
ARRANTY
NorCross Marine Products, Inc. warrants, to the original purchaser, this product to be free from defects in
materials and workmanship for one year from the date of purchase. If the unit fails to perform as described
in the product’s written specifications, due to a defect in materials or workmanship, we will repair it free of
charge to the customer for parts or labor. The customer, however, is responsible for any costs associated
with returning the unit to NorCross. This warranty is
void if damage or malfunction is due to abuse, misuse,
accident, failure to reasonably maintain, improper
installation or use, or unauthorized alteration or
repairs. Norcross retains the exclusive right to repair
or replace the unit at its sole discretion, and holds this
right as the exclusive remedy available to the cus-
tomer against NorCross for any defect, malfunction, or
non-conformity concerning the product, or for any
loss or damage resulting from any other cause what-
soever. Norcross will respond to all warranty claims
within a reasonable time after receipt of the unit from
the original purchaser, with such response time not to
exceed thirty days without written notification of delay
to customer.
To obtain warranty service, securely pack the unit, and mail prepaid via insured post to: NorCross Marine
Products, Inc., Warranty Department, 1629 Prime Court - Suite 800,Orlando, FL 32809. A copy of the origi-
nal sales receipt is required as the proof of purchase for warranty repairs. A copy of the Warranty registra-
tion card must also be on file with NorCross Marine Products, Inc., so be sure to submit the included regis-
tration card within 10 days of purchase. Please be sure to include your name, address, email address, and
a daytime phone number within the package.
1629 Prime Court, Suite 800
Orlando, FL 32809
PH: (407) 581-2614
Fax: (407) 422-0501
Toll Free: 888-NorCross
Email: [email protected]
A
(3-10FT) - Detecting depth between 3-9 feet
B
(10-99FT) - Detecting depth between 9-99 feet
C
(AUTO) - Auto Detect landscape every 10 seconds
D
(SEN. HI)=Sensitivity set to Hi,
(SEN. )=Sensitivity set to Low
E
( ) - Backlight On
F
( ) - Fish Alarm On
( ) - Fish Alarm Off
G
( ) - Full Battery
( ) - Low Battery
( ) - Very Low Battery
H
( ) - Depth Meter
B
C
D
E
F
G
H
A
SPECIFICATIONS:
Depth Capability
Operation Frequency
Display Area
Unit Size
Power
Transducer Cable Length
Transducer Angle
OPERATION
OPERATION
(cont.)
OPERATION
(cont.)
OPERATION
(cont.)
CARE
WARRANTY
**Remove the batteries when not is use.
Care of Your Fish finder
1. Unscrew the transducer plug screws and remove the plug from the fish finder.
2. Clean the transducer and cable with fresh water and dry-off before storing.
3. Remove the batteries from the fish finder to prevent battery leakage and corrosion.
4. Do not submerge and/or spray the fish finder display/housing with water or use
chemicals to clean. If necessary, wipe with a damp cloth.
5. Store the fish finder in the storage bag in a dry place.
Operation Reminders
1. The fish finder may indicate false readings or become unreadable if the fishing area has too
much grass or water plants. This condition may be indicated by a steady fish icon across the
bottom of the display.
2. Do not operate 2 fish finders within 100 feet of each other as this may produce false
readings.
3. When operating the fish finder in murky waters with a soft bottom Sensitivity should
be set to "Hi" for more accurate depth information.


