


16
Setting Up the Fence Boundary/Trigger Zone
15
Havahart
®
Radial-Shape 2 Wireless Dog Fence
www.HavahartWireless.com
Havahart
®
Radial-Shape 2 Wireless Dog Fence
1-800-800-1819, Option 1
Setting Up the Fence Boundary/Trigger Zone
Installing the Radial-Shape 2 Wireless Dog Fence
Display Options:
Viewing Distance to Dog and Battery Status
(see Screen 2.3):
•
Select Display Options (see Screen 2.1).
•
Select Show Collar Monitor (see Screen 2.2).
Turning the Display Off/On
(see Screen 2.2):
•
Select Display Options (see Screen 2.1).
•
Select Display Off (see Screen 2.2).
•
Press Enter to turn the display back on.
Setting Alarm Options:
Setting Alarm Volume Level (see Screen 2.5):
•
Select Display Options (see Screen 2.1).
•
Select Alarm Options (see Screen 2.2).
•
Select Alarm Volume Level (see Screen 2.4).
•
Use the up or down arrow keys to choose the desired alarm
level. Select HIGH, LOW, or OFF (see Screen 2.5).
•
Press Enter.
•
Select OK to save.
Turning Boundary Breach Alert Off/On
(see Screen 2.6):
•
Select Display Options (see Screen 2.1).
•
Select Alarm Options (see Screen 2.2).
•
Select Boundary Breach (see Screen 2.4).
•
Use the up or down arrow keys to turn the boundary breach
alert OFF or ON (see Screen 2.6).
•
Press Enter.
•
Select OK to save.
Screen 2.3
Screen 2.4
Screen 2.5
Screen 2.6
Screen 2.1
Screen 2.2
NOTE: See Battery Status Level meanings on Page 12.
NOTE: Turning off the display will NOT turn off the System.
NOTE: It is recommended to set the alarm volume level to HIGH.
NOTE: It is recommended to keep the Boundary Breach Alert ON.
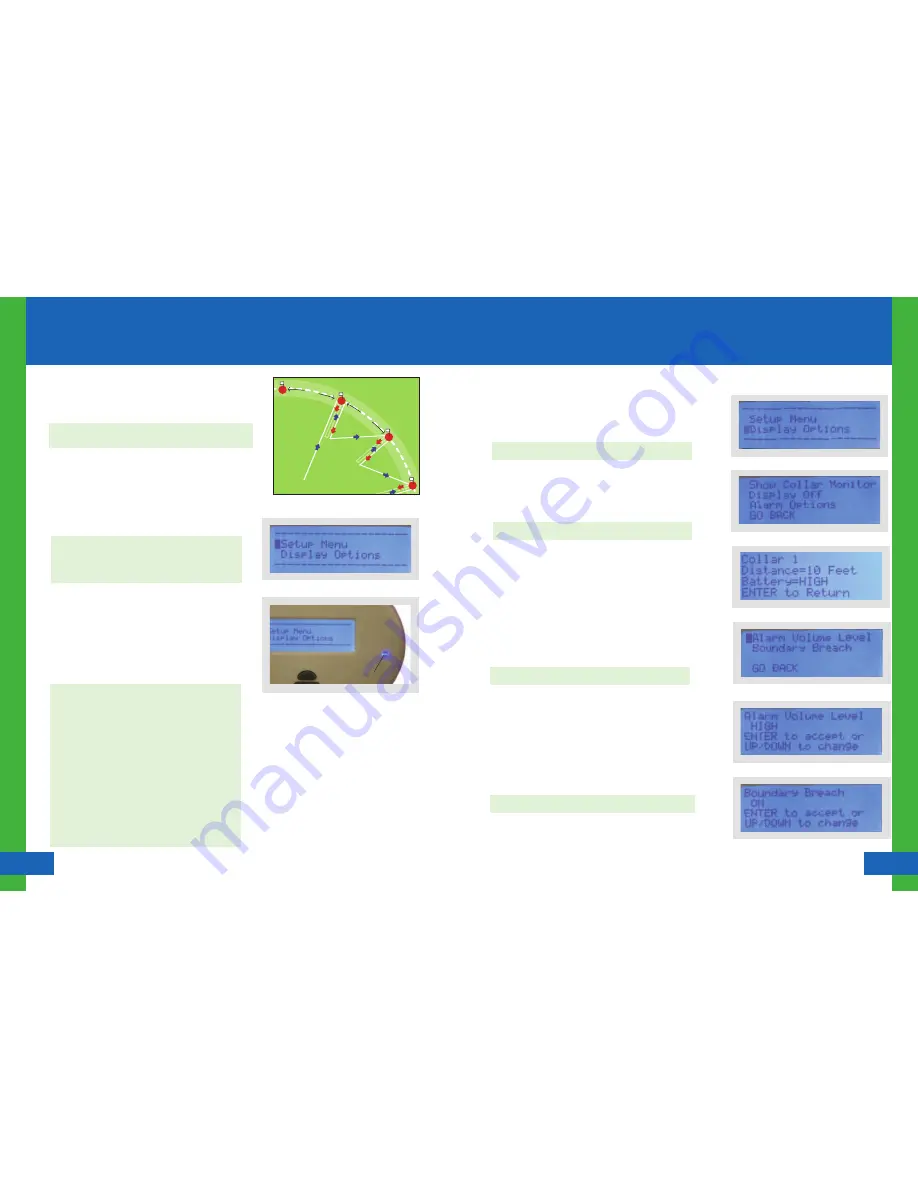
Placing Training Flags:
Once your boundary is established, it’s time to place the remaining
Training Flags. Training Flags are critical for the effective training of
your dog.
1.
Repeat the process in Step 3 of Establishing the Fence
Boundary/Trigger Zone Distance by walking toward the fence
boundary about 6 feet (2 paces) to the right of the previous
flag, verifying the fence boundary, placing a flag, and then
stepping back into the Roaming Area.
2.
Repeat Step 1 until the entire containment area is surrounded
(see Illustration D).
NOTE : Consult the Flag Calculator on Page 7 to determine the
number of flags you need.
NOTE: These flags represent the location of your wireless
fence and will be used later to train your dog. Be sure that
the flags form an enclosed area and that your dog has safe,
adequate entry to your house.
Fenc
e Bo
und
ary/
Trig
ge
r Z
on
e
6 ft
6 ft
Illustration D
Turning the Trigger Zone Off/On:
1.
Navigate to the Menu where Setup Menu and Display Options
are listed (see Screen 2.0).
2.
Press the blue flashing Power Button to Turn Off the Trigger
Zone (see Figure 1.6).
3.
Press the Power Button again to Turn On the Trigger Zone.
NOTE: All settings will be retained in system memory
when you Turn Off the System.
If you would like to confirm that the Havahart
®
Collar
will deliver a static correction when crossing the Trigger
Zone, you can use the Heart-Shaped Collar Tester. Set the
correction level to Static Level 1. Hold the metal contact
points located inside the holes of the Heart-Shaped Collar
Tester against the Probes of the Havahart
®
Collar so that
metal is touching metal. Carry the Havahart
®
Collar by the
Battery Housing with the Heart-Shaped Collar Tester held
against the Probes. Extend your arm down by your side.
Make sure that your body does not get between the Collar
and the Controller as your body may affect the signal and
cause the boundary to shift inward. Walk to a boundary
point and watch the Heart-Shaped Collar Tester illuminate.
Remember to set the correction level back to Tone Only
for training.
Screen 2.0
Figure 1.6
Power
Power Button
Installing the Radial-Shape 2 Wireless Dog Fence


